| THE MG |
|
|
 | | 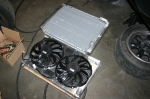 | November 22, 2010 - Here's the new radiator along with the old one.
The size difference is even more dramatic in person. The fan shroud is a really nice piece, it's laser-cut aluminum built specifically for this radiator. The fans are two fairly high-flow SPAL units with high-torque motors to help them pull against a restriction like multiple heat exchangers. Not a problem here, but most "low profile" fans will fall off dramatically even when asked to deal with just a single radiator.
The rad itself is the same basic design as the other one, but with a more efficient core. Based on testing at Flyin' Miata, it should actually outperform the big guy.
This is all off-the-shelf stuff designed for LS-powered Miatas by Flyin' Miata.
entry 459 - tags: cooling | | | 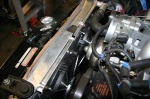 | November 22, 2010 - Test fit of the new rad.
The fan shroud comes with two sets of 1/4" spacers. Ideally, you want the shroud as far from the radiator core as possible while still being sealed. In this picture, here's the amount of room left with none of the spacers installed. The nose of the water pump sits nicely between the two fans, maximizing the amount of room available. Nice. I'd love to say it was cleverly planned, but really it's just a happy coincidence.
The shroud still fits well with one 1/4" spacer, but two makes it basically impossible to install. Still, it should work quite nicely.
entry 460 - tags: cooling | | | 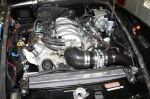 | November 22, 2010 - The fully installed radiator.
The lower support was moved a bit more than 2" for more curb clearance and to match the lower edge of the stock front valence. The fan shroud has been fully installed with gasket material around the edge, forcing every single molecule of air to go through the radiator. The upper brackets holding the rad in place are ones from a 1999 Miata and they look nice and factory. I even put a couple of brackets on the top of the shroud to guide the steam fitting hose nicely around the intake.
I'm really happy with how this turned out, it looks really good. Now I just have to sort out the lower radiator hose now that the outlet has moved up by a couple of inches...
entry 461 - tags: cooling | | | 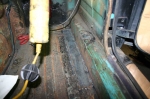 | November 22, 2010 - It hasn't been all radiator work here over the past few days.
I also repaired the floor. First, I cut out the rotten section including one small patch on the sill. A patch (of fairly thick gauge) was welded in. Nice and solid, ready for another 40 years.
entry 462 - tags: rust | | | 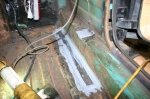 | November 22, 2010 - Next step: seam sealer.
Makes for a nice smooth finish and protects against pinholes.
entry 463 - tags: rust | | | 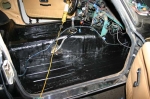 | November 22, 2010 - The final step: POR-15 rust paint.
As you can see, I didn't just paint the new patches. I also painted the new radiator support and the entire interior up to the top of the transmission tunnel. My friend Eric and I used to joke about a POR-15 dipping vat, and this looks pretty close! That sheetmetal should be nicely protected against future corrosion now.
Looks pretty good, actually.
entry 464 - tags: rust, paint, POR-15 | | | 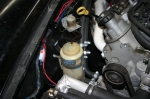 | November 23, 2010 - This little thing makes me smile.
It's the windshield washer bottle and pump. It's just so cute! I managed to mount them in almost exactly the same place as the original MG location. It's a really nice fit.
Good thing MGs have small windshields. That bottle is pretty small!
entry 465 - tags: windshield | | | 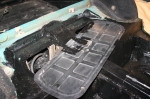 | November 23, 2010 - Lots of miscellaneous work on the car so far today.
I welded in a dead pedal to make life a little more comfortable and to aid in driver retention under enthusiastic conditions. The battery box cover that goes under the rear seat got modified to clear the new bump for the rear axle - that's it in the picture, showing shiny wet paint on the new section. I also removed the parking brake cables for the time being so I can spend more time scratching my head on how to make it work, and built a tie-down for the battery.
Lots of small jobs, most of them rewarding and all leading towards a car that can be used for more than idling up and down the block!
entry 466 - tags: packaging, battery, ergonomics | | | 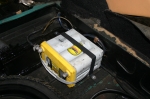 | November 23, 2010 - Here's the battery all done.
The nice thing about Optima batteries is that you can flop them on their side without any problem. Makes for some easy packaging. In this case, it's just behind the passenger wheel for good weight distribution. The steel strap over the battery holds it in place really well, it's not going anywhere.
entry 467 - tags: battery | | | 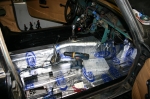 | November 23, 2010 - A new look for the interior!
That's heat and sound insulation to make the cockpit more livable. There are big fat exhaust pipes running under the car, a loud and hot powerplant underhood - and I want this car to be a good cruiser. This should help quite a bit. I've used one roll of the insulation now, and that added 6.5 lbs to the car. I'll probably use two more for a total weight penalty of just under 20 lbs. I can live with that.
entry 468 - tags: heat | | | 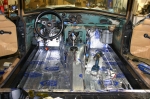 | November 24, 2010 - The final heat shielding.
There are two 36"x60" packages of Cool-It in the car now. I'm going to pick up one more to cover everything behind the rear bulkhead - under the rear seat and in the rear cargo area. It sure looks pretty. And bright!
entry 469 - tags: heat | | | 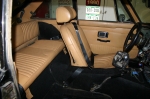 | November 24, 2010 - A couple of hours later, here's the interior!
Okay, I got a bit carried away, but it wasn't really that much work. I've only installed the biggest pieces of carpet - there's a puzzle of oddly shaped carpet pieces that are supposed to go in the footwell, but I reshaped the footwells enough that they probably won't fit anyhow.
Happily, the carpet over the transmission tunnel fit. A year ago, I welded a brace on top of the tunnel and I was afraid it was going cause problems with my carpet. I had to relocate the holes for the seatbelt mounts, but there was enough extra carpet that it worked.
Ah, seatbelts! You can see the driver's belt in place here. They're a non-retractable design from Beams, picked up from JC Whitney. I didn't like the retractable designs available and this are more like the original belts in the car. It'll be a bit more of a hassle to adjust on a regular basis. Considering that I have two cars with race harnesses, they're not too bad!
entry 470 - tags: seatbelts, interior, carpet | | | 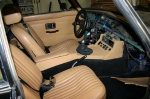 | November 24, 2010 - The interior looks pretty good!
Janel points out that maybe it needs a dashboard, but I'm looking at what's actually there. The center console is just sitting in place, and it will have to be modified at the rear to deal with that brace. Still, it suddenly looks like a real car. Almost...
The front bumper, front valence and grille are all installed as well. Am I dressing up the car to make it look good? Why, yes I am! Family is coming over for Thansgiving dinner tomorrow and I want to make it look good. But I'm not rushing any of this, it was actually time to install the interior. This will also make it easier to drive for shakedown purposes. The dashboard will stay out for a while so I can easily continue wiring.
entry 471 - tags: interior, wiring, assembly | | |  | November 26, 2010 - Janel wanted a dashboard, so I decided to give her a dashboard.
It didn't take long to pop it in, but then I started playing with heater controls and other doodads. Still, after a couple of hours of work it almost looks like a real car. Only three of the gauges - tach, fuel and temperature - are hooked up but I had to fill the extra holes anyhow or it would look weird.
The dash was painted before we got the car, and the paint is damaged. There's also a big giant crack in the top. I'd like to recover it, but it kinda looks good in tan. Hmm.
entry 472 - tags: interior, dashboard | | | 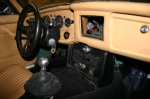 | November 26, 2010 - When I was messing around with the dash, I also changed the center console for the one from the 1969 parts car.
You can compare it to this picture. I think I like the older design better, it's so simple and the interior seems more spacious. The downside is that there is no more armrest. We'll see if that's an issue.
The 1969 parts car came with a radio, but I already had this "radio blanking plate" with a chrome surround and the octagon logo. Looks great. I just have to figure out how to finish up the trim around the bottom.
Take a look at the shroud around the steering column as well. It's the Miata part, and I had to trim off just the tiniest bit to make it fit. It really works with the rest of the interior.
entry 473 - tags: interior, dashboard | | |  | November 26, 2010 - Of course, with the car basically complete, it's time for a drive!
Not just a pootle up and down the street, but a real test drive. The car's never been further from home than my "around the block" test drive that totals about 6 miles, and it only did that once before being disassembled.
First, I drove down to the gas station that's almost exactly a mile down the road. Janel didn't feel I should be on my own, so she followed in a support vehicle. Luckily, support was not needed. The car did have a metal-on-metal scraping noise that was directly related to wheel speed, but I suspected that was a brake dust shield that had been bent and was making contact with the rotor. Inspection upon return to the garage showed this to be the case, so I bent both front dust shields back into their original shape and fixed a wire on the fuel gauge.
Now it was time to go a bit further afield.
entry 474 - tags: testing | | | 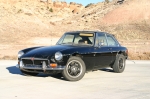 | November 26, 2010 - I took the car around my test loop.
Coming up to the house, I decided I hadn't had enough so I kept going to a good spot to take pictures.
How was it working? Well, it needs an alignment pretty badly. I'd guess it has a bit of toe-out and almost no caster, meaning the steering is darty and doesn't self-center very well. I need to sort out both spring rates and damping - never having set up a car with a live rear before, that's going to be interesting. The car also squeaks and rattles quite a bit. Nothing too surprising here.
How does the powerplant feel? Monstrous. After taking things easy to make sure the temperatures were good and there were no obvious problems, I started giving the car a bit of throttle. And it likes it a lot. This is a seriously fast little car. The shift pattern is very tight, the pedal effort is nicely matched between the throttle, clutch and brakes and other than the non-centering steering it feels good to drive. Engine temperatures stayed fairly low and I didn't get the chance to confirm if the fans were kicking in. The intake air temperature was only a couple of degrees above ambient.
Noise levels are reasonably high, with a big resonance at 1500 rpm. I still don't have my sound deadening in the rear yet and when I got home, I realized that the exhaust fires right into the rear valence. That's easy enough to fix and is probably causing a lot of the noise. I'll fix that tonight or tomorrow.
entry 475 - tags: testing | | | 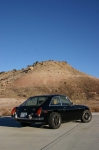 | November 26, 2010 - I did come home from the drive with a to-do list.
- fix a bad squeak in the rear hatch
- flatten the flanges on the headers (especially the passenger's side) and install gaskets
- find the heater fan wiring and hook it up
- find the cause of a groan on medium braking
- align the car
- try softer springs all around to see how they work out
The car's booked for an alignment on Wednesday morning. The hatch squeak should be fixed if I've found the problem. Softer springs aren't required but I want to try them out. I'll do a nut-and-bolt on the front suspension to find that groan, and put some more brake anti-squeal on the pad backs.
entry 476 - tags: testing | | | 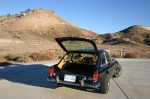 | November 26, 2010 - I don't know why I find this angle so much fun, but I do so you're stuck with it.
After taking the pictures, I bedded the brake pads and headed home. I'm not sure I got the pads hot enough, but I'd prefer to have the alignment done properly before I go too nuts. It'll be interesting to see if the car will align, that will be a moment of truth for my suspension building skills!
entry 477 - tags: testing, brakes | | | 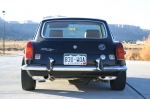 | November 26, 2010 - Here's where some of my exhaust noise comes from, I suspect.
Check out how those mufflers dump right into the rear valence...and doesn't the car look cool from this angle? I suspect that's reflecting the sound right back into the car.
entry 478 - tags: exhaust | | |
|

 THE DIARY