| LIFE OF A GT |
|
|
 | |  | January 7, 2010 - The exhaust manifolds that came off the Camaro were odd - they were made out of a couple of pieces of stamped steel welded together.
They also put the exhaust on the passenger's side right into the footwell. Not cool.
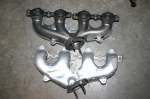
Just for fun, I brought these guys home. They're the manifolds that come off the LS3 crate engines we use at Flyin' Miata. I'm not sure exactly what they're originally for, but they're pretty nice looking. The driver's side (bottom in the picture) has a dent to clear the steering column, and the passenger's side runs downwards instead of back. If I can use them, it'll save me a huge amount of work.
entry 248 - tags: exhaust | | | 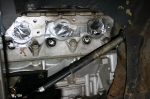 | January 25, 2010 - Another shot of the proposed steering column routing.
It looks as if it'll be fairly simple to arch the exhaust out a bit and run the column between the header and the block.
entry 265 - tags: steering, exhaust | | | February 8, 2010 - I've been looking at muffler and exhaust options as part of my push to sort out the basic packaging.
Essentially, should I run two small mufflers or one medium size one? The goal is to get the car as quiet as possible, as I want this to be a cruiser. If it costs a few horsepower, that's acceptable. The dual pipes (say, 2.5") are easier to package than a single 3" one.
It's not an easy answer. The problem is the fuel tank. It's offset to one side, so to run twin mufflers I'd have to move it sideways. That's not a big deal, but even with that I'd still need some pretty narrow cans. For the single muffler, I'd be looking at a can of approximately 5 x 10 x 17 at most. Luckily, this is a pretty common size range, and I can choose from Flowmaster (excellent website, not a lot of positive comments on the sound from some people), Dynomax (many recommendations for the Super Turbo), Magnaflow (I have one on the Seven, it's so loud it's a running joke locally) and Hooker Aero Chamber.
Based on the recommendations, I think it's down to a competition between the Super Turbo and the Aero Chamber. The fact that the Hooker doesn't have any packing but relies on internal baffling is a bonus for long life. The good thing is that neither one is terribly expensive so I can experiment if I have to. I'd still prefer a pair as part of a dual exhaust, but I just don't think I can make it fit.
Fun stuff, though.
entry 274 - tags: exhaust, packaging | | | 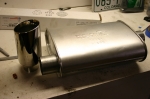 | February 20, 2010 - I've been trying to figure out what order to do things in right now, and I've decided to work on the exhaust.
I'm not really sure why that ended up at the top of the list, but there you go. It could be because the Super Turbo muffler I ordered showed up, and so now I know for sure there's enough room for it to fit.
The tip is one from a Flyin' Miata exhaust that I brought home to try for size and to see what Janel thought. She likes the style - they're really nice looking, with a double-walled tip with a constant outer diameter and a rolled inner shell - but thinks it's a bit big at 3.5". No worries, we have 3" ones as well which I think will be perfect. I like the slightly slanted tip.
Is it too early to pick out exhaust tips? Of course not!
entry 290 - tags: exhaust, tip | | | 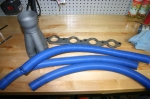 | February 20, 2010 - Of course, building the exhaust means building the headers.
I've been digging around trying to find recommendations on primary tube length, but to no avail. A diameter of around 1.625" or 1.75" seems to be the one to use, and since the last header I built used the latter I will probably do so again as I have some spare parts - including this collector.
The header flange is GM part 12480130, and it's 7/16" thick. Beefy! The blue pool hose? Well, that's how I do my initial layout testing. I'll figure out the general routing of the tubes first then fine-tune them with a very cool tool that will be making an appearance soon.
But there's no need for it. When I installed the steering column and started to figure out where the collector was going to go, it became obvious that there was no way to run a long-tube header in the car. I simply don't have the room - and that's with the collector in the wheel well! So it appears I'll have to settle for good flow instead of a nice extraction design. Oh well, it'll be an improvement over the stock units at least. And it should be easier to make this way.
entry 291 - tags: header, headers, exhaust | | | 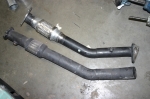 | February 20, 2010 - I saved these two Miata downpipes from the dumpster a few years back.
Flyin' Miata was moving and a lot of random, outdated parts were being sent to the scrapyard. Well, they're not much good as is. But they do have new stainless steel flex joints in them! So I'll cut those out and use them in the exhaust system. I don't expect the engine to move much, but it can't hurt.
Recycling at its finest.
entry 292 - tags: exhaust | | | 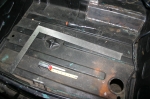 | February 20, 2010 - Before I can start fooling around with the exhaust, I need to confirm that the twin mufflers really will fit.
I'm almost positive they will, but it's time to move the gas tank. This is far less difficult than it sounds. The tank bolts to the bottom of the flat trunk floor. I simply had to drill a number of new holes 3" to the left of the existing ones. The large hole for the filler required a hole saw, but otherwise it was quick and easy work.
entry 293 - tags: fuel tank, packaging, exhaust | | | 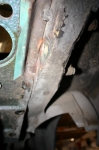 | February 21, 2010 - In order to fit the muffler under the car, I needed to take a chunk out of the wheel well.
You can see it at the lower right of the photo, it hasn't been cleaned up yet. Since the track is now wider than it used to be, this doesn't cause any sort of interference problem with the tires.
I also chopped a seam off the rear frame rail, visible at the top right of the photo. This rail was originally where the rear spring attached, so it saw some decent loads. But with the new coil spring setup, only the bumper is attached back here. By taking off the seam, I'll be able to move the muffler up by about 3/8". Hey, packaging is tight!
entry 295 - tags: exhaust, packaging | | | 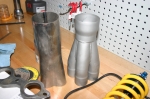 | February 21, 2010 - I've spent the weekend looking at exhaust options, figuring out how it will be routed and what components will make up the final design.
The two collectors in the picture are a couple from my collection. The grey merge collector on the right is an Edelbrock piece, one that I've used before in another build. I only have one of these.
The one on the left is of unknown parentage and will take more work to use as I'll have to cut and weld a star in between the tubes, while the Edelbrock is a slip-on. I have a pair of the basic ones.
The Edelbrock, being a merge collector, will theoretically flow better. But it has a 3" outlet (most collectors don't go much smaller) and I'll have to neck it down to 2.5" almost immediately - I'll use a Flowmaster ball joint connection to do that. So the benefit of the merge collector may be lost. The simpler one is also a 3" outlet, but it'll be shorter in length when assembled. The fact that I already have a pair of the simpler ones makes me think that's what I'll end up using.
I've been trying to figure out how to route the exhaust pipes over the axle. That leaves me short of space for an X-pipe, adds a bunch of bends and gets very tight just behind the axle. The idea is that running under the axle will be bad for ground clearance. But then I realized that the axle at full droop won't drop below the level of the floor pan. This means that if I run the exhaust pipes straight back, they'll clear the axle and ground clearance won't be affected at all! As an added bonus, it'll give me more room to run an X. Excellent. I just put in a big order for exhaust bits that will let me finish pretty much everything but the headers.
I thought I remembered the same thing being done on the Dan Masters build. I checked the photos and yup, it should work.
I have pretty good ground clearance on this car. The lowest point will have right around 4.5" clearance from the ground.
My decision to do exhaust now actually makes sense. It's not as flexible in packaging as some of the other components. Once the exhaust is sorted out, I'll be able to determine the location of the fuel pump and filter as well as the lines to the front of the car, keeping the fuel away from the hot pipes wherever possible. The same goes for wiring. I'm also looking at the cooling setup, but more details will come on that.
This is a really fun part of the build.
entry 296 - tags: exhaust, packaging | | | 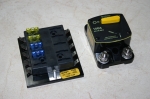 | February 26, 2010 - Parts are starting to arrive from all over!
Del City provided this 10-circuit fuse block. I figure I only need 6, but more can't hurt. The MG only has about 4 and they're all devoted to lighting from what I can tell. If I only need 6 of these 10, I'll integrate the two boxes.
I also picked up a big master circuit breaker. It'll give a bit of "uhoh" protection. It also lets me cut the power to the whole car, which is really handy when it comes time to work on things or to store a car for a while.
Most of the post-header exhaust parts are here as well, and the big box from AFCO will arrive Monday. I'll have no excuses for not working on the car shortly!
entry 297 - tags: wiring, exhaust | | |  | March 1, 2010 - Exhaust bits!
Most of these have been around for a week or so while I continue to do nothing at all with them. The ball flanges on the right will join my headers to the main pipes, with some room for "oops". The shiny band clamp was also going to perform a similar task, but may be out of a job.
The rubber donut is an interesting bit - it's from a 1999-05 Miata and looks almost identical to a 1990-97 version. But it has a bit more rubber in the middle where the earlier unit has a void and is thus stiffer. Since I'm concerned about keeping my exhaust fairly constrained to avoid hammering on - well, everything - I decided to go with the stiffest one I could. Naturally, they're twice as expensive as the others. Hopefully I won't need TOO many of them!
The cone is intended to slip inside a collector to cut down on exhaust noise. Since the open area is actually greater than that of a 3" pipe, they claim little power loss and a 2-3 dB sound drop. I think I'll hold these in reserve, just in case. Janel wasn't excited about the new car parts, but she was almost hostile to the thought of making the car quieter!
entry 300 - tags: exhaust, noise | | | 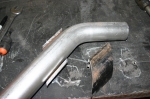 | March 4, 2010 - Now that the driveshaft is done - at least, my part of it is - it's time to take on the exhaust.
This has to pass through a frame crossmember in order to get from front to back, and I realized it would package better if it did so at a 45 degree angle. I picked up some pipe with an ID a bit bigger than the exhaust OD. It's some sort of massive gas pipe, and my poor chop saw had a heck of a time with it!
I sectioned my 45 degree piece to match it to the thickness of the crossmember. To make things interesting, the crossmember tapers in height as it heads towards the sill. So the pipe insert had to be different heights at each corner. Careful measuring, and voila. Ready to weld in once I've cut out the crossmember.
On further reflection, I'm thinking this might actually be best if I leave the pipe as a round pipe. That'll retain more strength (not sure if it's needed here, but still) and will make the lowest point of the car a piece of very burly pipe instead of a thin exhaust pipe. It'll still have approximately 4" of ground clearance, but it's at the breakover point. We'll see, I can always weld this bit back together. And yes, I have considered how I'll remove the exhaust without cutting it up!
entry 302 - tags: exhaust, packaging | | | March 7, 2010 - The plan for today was to complete most of the exhaust system.
To do this, I have to cut a half circle out of that crossmember to install my round insert. And this proved to be no fun at all. In fact, the only tool that was willing to do the job was the angle grinder, and due to the shape of the cutout the only way to do that would be to nibble it away piece by piece. My air-powered saw is nothing but an exercise in frustration. What I really need is a plasma cutter.
And there's a plasma cutter at work. Okay, sometimes I do have access to special tools! I'll see if I can bring it home on Monday. Then, instead of hours showering myself with sparks, I'll chop out that metal in about 5 minutes. Hopefully without setting myself on fire, but you can't have everything.
entry 303 - tags: exhaust | | | 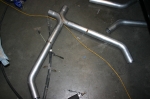 | March 15, 2010 - First step on the exhaust.
This is the section that goes through the new pass-through. Clearances are tight (no, really) but it works. The wide section at the bottom is the front half. I'll build the back section first, then start working on the header design. I'm thinking there will be rapid visible progress with this part, which is always satisfying.
entry 311 - tags: exhaust | | | 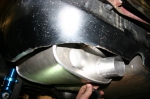 | March 16, 2010 - With the X located, I figured I needed to identify the other end.
So I hung the first muffler under the car. It took a bit of fiddling around to get the location sorted, but a couple of hangers and some careful placement and it was in place.
entry 312 - tags: exhaust, muffler | | | 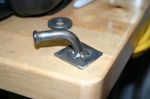 | March 16, 2010 - I needed a way to attach hangers to the bottom of the car.
The flat floor is a bit tough to weld to, so I welded the hanger to a small plate. The hanger itself is a piece of 1/2" bar bent to shape. I tried both a small kink and a bead around the end to keep the rubber from sliding off. Both seem to work pretty well.
entry 313 - tags: exhaust | | | 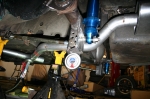 | March 16, 2010 - Once the muffler was in place, I was able to figure out the routing of the rest of the piping.
It's fairly straightforward. The only problem is the trailing arm bracket on the rear axle housing. It's nicely in line with the outlet on the muffler. The muffler is also higher than the axle at full droop.
A 45 degree piece out of the muffler, rotated about 45 degrees from vertical and mated to another 45 degree piece wiggled the pipe nicely around the obstacles. Nice and simple. I used jack stands to support the exhaust under the car - lots of jack stands. Once I figured out how, it went pretty quickly.
entry 314 - tags: exhaust | | | 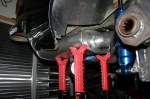 | March 16, 2010 - With one side of the exhaust done, now I have to do it all again - and make it symmetrical.
Uhoh. The first step is to position the muffler in exactly the same place. It's the most visible part of the system so I have to get this right. I won't weld hangers on this one until it's hooked up to everything else, to make sure I don't accidentally put a bit of variation in the system.
entry 315 - tags: exhaust, muffler | | | May 3, 2010 - Work has finally resumed.
I took some time off for lasik eye surgery (highly recommended), some engine work on the Targa Miata, a trip to Laguna Seca with three days at the track, etc, etc. But it's time to dig back into things.
I didn't get a lot of work done tonight - I repositioned the muffler in the perfect location again, then figured out how to snake the exhaust pipes past the Panhard bar mount on the axle at full droop and cut a couple of pipes - but it was a start. Expect more progress! Will the car run by the end of the month? It's possible...
entry 317 - tags: exhaust | | | 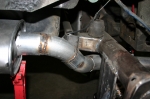 | May 10, 2010 - This was a fun little section to do on the exhaust.
The pipe has to twist around the Panhard bar mount on the axle and wiggle up to the muffler. And I had to do this while putting the muffler in the perfect place. The end result did have me welding up a bit of a gap - you can see the ugly resulting weld - but it'll do the job! It's just tacked together now, I'll clean everything up later.
Next step: hangers for this muffler. Then for the X-pipe. Then I do the headers.
Janel has a new job that keeps her traveling quite a bit during the week. This has shifted the timeframes I have available to work on the car - evenings are much easier to do, but weekends are pretty much out. I'm figuring it out now, so work should continue apace.
entry 318 - tags: muffler, exhaust | | | 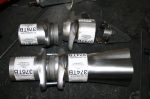 | May 12, 2010 - Exhaust work continues.
I now have the system complete up to the entrance to the x-pipe. Now I have to figure out the headers. My collectors have a 3" outlet and the rest of my exhaust system is 2.5", so I plan to use these ball flanges to neck things down while also providing a good spot to disassemble the exhaust. The problem is that the whole assembly is pretty long as you can see. I've cut down most of the parts and taken a significant amount of length out since this photo was taken. You can see the conical insert from Dynatech that should drop the sound level by around 2-3 dB.
I'd prefer to be using a slip-on collector as they're a lot easier to deal with than this minimalist one - but unfortunately, I don't have any. So I'll have to cope with it.
entry 319 - tags: exhaust, collector | | |  | May 16, 2010 - Time for the headers!
I've built a couple of headers before - most memorably, the one for the Targa Miata - so I have a fairly good idea what I'm doing. In this case, packaging is my biggest problem. I'd love to do a nice equal length, long-tube header for maximum power but I simply don't have the room for it. So I'm going to settle for simply fitting everything in place. I figure it'll be lower restriction than the stock stuff (hopefully) and it's certainly not tuned length.
The key to making this relatively easy is the Ice Engine Works "header lego". It's a box full of little blocks that snap together. They come in straight and in 2", 3" and 4" radius bends. Each block is 1" of tube, which really helps when it comes time to make primaries of a particular length. In this case, I'm just trying to get things to fit. There's a fairly massive length difference between the front and the back cylinders.
The initial mock-up was done on the car and transferred to the work bench.
entry 322 - tags: header, exhaust | | | 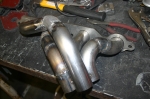 | May 16, 2010 - With a wave of the magic welder, the plastic mock-up has been transformed into metal!
Well, the magic welder, magic chop saw and magic sawzall. I tweaked the design a little bit to make it work better and to take into account the various diameter bends I actually had on hand. It worked out well, there's a bit of art to the way the front two tubes work together and it all comes together nicely. These are 1.75" tubes, by the way.
entry 323 - tags: exhaust, header | | | 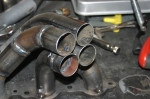 | May 16, 2010 - All four primaries come together nicely.
The next step is to fit the collector on. Since my collector is a cheap bent piece of pipe instead of a nice slip-on, I'll have to weld up the hole in the center as well as make sure they seal well in the deep gaps between the tubes.
This is the driver's side, which has the steering column and the brake booster to deal with. When I think about it, I didn't really have to do anything to cope with those parts, so I could probably make the passenger's side as a mirror image of this one. I don't know if I have enough 2" radius bends to make that happen, but it might be worth trying simply to avoid problem-solving a second time.
entry 324 - tags: exhaust, header | | | 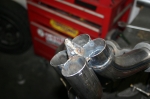 | May 18, 2010 - Before attaching the collector, I had to seal up the gaps where the four pipes come together.
This little pyramid might help the flow from the four primary pipes merge. Or maybe not - but it won't hurt.
entry 325 - tags: exhaust, header | | | 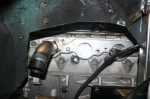 | May 18, 2010 - The passenger's side header wasn't a mirror image of the first, partly because the right head sits a bit further back than the left one.
I decided to try building this one out of metal first. I used the header lego to figure out the general layout of the tubes (cleverly coming up with almost the exact same tube routing as the other side) then built them tube by tube. This is more traditional way to build a header than the lego method. It ended up being about the same level of difficulty, although having the lego helped out considerably when it came to figuring out the length of various bends.
The big advantage to this method is that I was able to be more precise in placing the collector than I had been when I built the other version on the bench. It was close, but this one was better.
entry 326 - tags: header, exhaust | | |  | May 18, 2010 - The first three tubes were tacked into place with the flange bolted to the engine.
The fourth one was test fit on the car, then I did the finishing placement on the bench. It ended up perfectly placed - the two long tubes are nicely parallel, which means nothing for flow but looks pretty.
When it came time to put the collector on, it was exactly where it needed to be.
entry 327 - tags: exhaust, header | | | 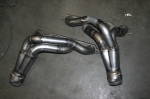 | May 18, 2010 - The two finished headers.
You can see where I had to cheat the angle of the collector on the driver's header (seen here on the right side) a little bit, but I'm pretty happy with the result. They fit well, give me full access to spark plugs, can be installed without removing the engine and should give decent performance even if they're not all equal length. I just have to finish one more more 2.5" tube to connect the right header to the X pipe, add a couple of O2 sensor bungs, and the exhaust will be complete. Woohoo!
entry 328 - tags: exhaust, headers | | | 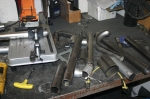 | May 18, 2010 - The debris of header building.
They were built out of mandrel U bends. If I have the count right, it took one with a 2.5" radius, one 2" radius, four 3" radius and a couple of other bits and pieces that were left over from previous projects. The primary tools were a chop saw and a belt sander.
entry 329 - tags: headers, exhaust | | | 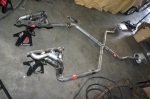 | May 22, 2010 - The exhaust is finished!
After making sure all the tack welds were strong enough and wouldn't shift, I dragged the whole thing out from under the car and finished the welding. It's built in five pieces - the main one with the X and the mufflers, two short hockey stick pieces with the ball joints for the headers, and the headers themselves. Right now, it's all hung with five hangers and I'll probably up that number somewhat.
But it's done! Woohoo!
entry 330 - tags: exhaust | | | 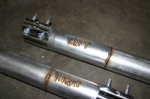 | May 22, 2010 - The two hockey stick pieces are pretty much clones of each other.
They should be identical. But just in case they're not, I labelled them!
entry 331 - tags: exhaust | | | 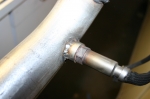 | October 6, 2010 - Time for a good day of work.
I have a goal! First, I need to get the exhaust system assembled. I figured out good O2 sensor locations, drilled the pipes and welded in bungs for the two sensors. Easy enough. I also added a new hanger at the back on the right muffler to match one that was already in place on the left.
entry 398 - tags: exhaust | | | 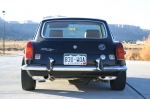 | November 26, 2010 - Here's where some of my exhaust noise comes from, I suspect.
Check out how those mufflers dump right into the rear valence...and doesn't the car look cool from this angle? I suspect that's reflecting the sound right back into the car.
entry 478 - tags: exhaust | | | 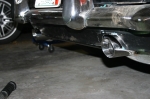 | November 26, 2010 - The solution: tips!
I've had these sitting on my workbench for pretty much a year, but there were always more pressing things to do. But with the prospect of more driving tomorrow and my interest piqued, I decided to stick 'em on.
Easy enough. First, I traced a rough cutout and cut it out. Then I slipped the tips on over the tubes on the mufflers and welded them on. Voila.
I think they look rather snazzy. I'll clean up the cutouts when I go to paint the car.
entry 479 - tags: exhaust | | | 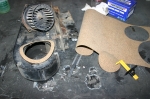 | November 26, 2010 - You'd think I had plans to spend more time driving this thing.
In order to keep Janel happy, the car needs a heater. So I found the wiring for the heater fan switch (someone had helpfully placed a label on it that said "HEATER FAN"), plugged it in and...nothing.
Nuts.
So I stuck the switch in the bead blaster just to make sure there were no corrosion problems. Checked the power at the fan and it was getting juice and a good ground. Just for fun, I grabbed the fan out of the parts car and plugged it in.
Success.
The car had a bad heater fan. Luckily, it's possible to remove the fan without affecting anything else and there's just enough room, so I swapped them out. There was a fair bit of noise going on though. I decided I needed to move the fan outwards very slightly and give it some noise isolation, so I made a gasket out of cork. Mission accomplished, the car now blows air through the heater into the interior. I also taped up the cold air inlets that are not currently attached to anything to minimize the amount of cold air intrusion into the cab.
Speaking of gaskets, I slipped a thick composite gasket between the passenger side header and the head. That will hopefully cut down some of the noise from an exhaust leak - although I also realized that there's still a significant hole in the passenger's footwell that's used for the wiring. I have a grommet to go there but I'm still working on the wiring, so it'll stay open for now.
Just because this wasn't enough, I raised the ride height a bit to get closer to my target height. The fender cutouts make it look a bit odd but that's a temporary thing. This may improve the ride and handling as well, although the visible different camber on each front wheel will probably have some effect.
The car should be ready for more driving tomorrow. This is going to be fun.
entry 480 - tags: exhaust, suspension, HVAC | | | November 27, 2010 - Spent some more time driving today.
The loud exhaust drone at 1500 rpm seems to be gone, that's probably due to the exhaust tips. Excellent. It's still not a quiet car, I'm going to work a bit more with the sound insulation and see what I can do there. A lot of the noise seems to be coming through the firewall. There's still some carpet to install, maybe it'll help some.
The ride is also better with the slightly raised height. I'll spend some time tweaking the shock settings, but I suspect it's going to want a bit less rear spring. It has some 250 lb ones now, and I think the lightest I have in the garage is 225. I'll give those a try.
The heater works well. Good.
Janel was driving this time as I monitored the car through an OBD-II scanner. Can't do that with most MGs! Anyhow, she seemed a bit taken aback at the sheer number of creaks, squeaks and bangs from the car as it first started moving down the road. But once she got into the gas, she started laughing. Especially when I reported she hadn't even hit 50% throttle. She likes the car a lot.
Not over-fond of the brakes, as they don't bite too aggressively. The power booster isn't over-boosted and I'm not completely sure the R4S pads are fully bedded. They're also going to be a bit slippery in the near-freezing temperatures we used on the test drive. I am tempted to replace them with a set of Performance Friction PFC 97 pads, which is what I use on the Targa Miata race car. I'll give the R4S a bit more time, as they're usually a good setup.
entry 481 - tags: brakes, test, suspension, exhaust | | | 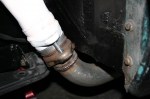 | December 5, 2010 - Time to do some functional work.
I found what is likely a source of a fair bit of exhaust noise - the driver's side header outlet is leaning up against the footwell. Solidly enough to clear the paint off the footwell. So I pulled the header and exhaust pipe off and decided an effective fix would be a simple dent. A slot in the footwell, a few hammer blows and voila, lots of room. Given the shape of the footwell, it's unnoticeable from inside the car. I covered up the slots with seam sealer and I'll put it all together again shortly. I'm excited to see if this makes a big difference to the sound - I suspect it's where a fairly loud rumble/vibration at higher loads and highway cruise was coming from.
entry 504 - tags: exhaust | | |
|

 THE DIARY