| LIFE OF A GT |
|
|
 | | 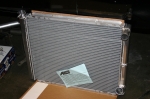 | March 1, 2010 - More parts have arrived!
This shipment is from AFCO. Along with some interesting suspension bits for the Targa Miata came this radiator. It's a dual-pass setup for maximum efficiency and it's huge! Seriously, it's the smallest rad I found that I thought would work and it's also the biggest radiator I thought I could fit: 26" wide and 20" tall. There's going to be some serious surgery ahead to make this work, and I think it's going to also entail hood pins. I just hope I can make it fit without hanging it down below the body.
There was one more option, a Scirocco style unit. Nice and small, also a dual pass. But the core size is 12.5 x 18", and my current rad is 18.5 x 22.5". That Scirocco one is just tiny. There are also some single-pass units that are a bit smaller, but the dual pass packages better in terms of outlet location.
Eek, this is going to be a challenge. At least I know that, once installed, this car will be immune to overheating. I hope.
entry 298 - tags: cooling, packagin | | | 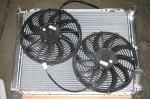 | March 1, 2010 - Despite the huge size of the radiator, it's a bit of a challenge to fit fans.
These are 12" units, and I guess this staggered setup will work. It's either that or one huge 18", and that would put the motor in the worst possible place. Given the fact that there are no heat exchangers (such as intercoolers or AC condensers) in front of the rad and pretty clear airflow, I think even two unshrouded fans like this will do the job. I'm very concerned about the depth of the assembly, as the more I push the rad forward the less hood height I have to play with - and I'm already tempting fate there.
entry 299 - tags: cooling, fans | | | 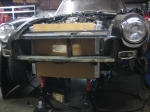 | March 7, 2010 - Since the exhaust was off the menu for the day, I turned my attention to the radiator.
It really is a monster. I chopped out more of the sheetmetal in the nose and tested to see how high I could put the rad with the hood closed. Had I specified the rad without a filler cap, it would have been a bit higher. Naturally the rad is just wide enough to cause interference with the structure of the hood.
Still, it's not quite as bad as this picture makes it look - which is pretty bad. At this height, the bottom of the radiator is approximately an inch below the front bodywork and about the same distance above the steering crossmember behind it - these are eyeball measurements, I haven't confirmed the exact dimensions. It has 6" of ground clearance. If I decide to install the MG Special Tuning airdam I picked up last spring, the radiator tucks in nicely behind. So we'll call that good then.
Due to the size of the engine and my decision to use (very slim) electric fans behind it, I have the radiator sitting quite far forward. If I were to put the fans in front of the radiator, I could move the whole thing back and gain myself some more clearance. This would make the fans less effective, but it's worth considering. After all, I think I have a slightly over-specified cooling system at the moment...
entry 304 - tags: radiator, cooling | | | May 23, 2010 - I spent part of the day running around looking for a way to connect a new line to the fitting on the MG gas tank.
Naturally, it's some oddball size that was probably created by the Romans and not used anywhere outside MG since 1982. But I think I've got that figured out. The fuel pump is mounted and I'm waiting for a couple of 45 degree fittings to arrive so I have everything I need. It actually won't take long to plumb things together once I have them, I think anchoring the main feed line will take longer than anything else.
I also started mounting the radiator - I'm trying to get most of the metalwork out of the way before I clean up and start running fuel lines and wires. There were a few false starts here as I tried to figure out a good, clean way to mount it. I've got some brackets welded in now that will do the job, but they're not as clever as I'd like and I'm probably going to add a cross bar under the rad to act as some impact protection. The hood closes and there's 6" of clearance under the rad - I consider that a victory!
entry 333 - tags: cooling, radiator, fuel | | | 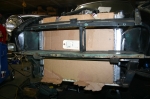 | May 27, 2010 - The radiator is mounted!
This is not a great picture of it, but you can see the new crossmember that runs underneath the rad. I spent a surprising amount of time on this, but the end result is solid, has 5" of ground clearance, supports and protects the radiator and allows for a simple drop-in installation.
It does drop down below the standard nose. Painted black, that might not show. The Special Tuning front air dam I picked up last year (!) is almost exactly the same depth, which will not only hide the rad but will also help me manage some good airflow. We'll see how it looks when painted.
entry 335 - tags: radiator, air dam, cooling | | | 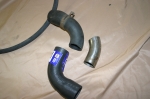 | June 1, 2010 - I decided to get the coolant lines finished so I could call the cooling system done.
Well, done except for an overflow tank and the heater, but I can cope without those for a bit. And I found a problem.
The radiator I have came with what I thought were the perfect inlet and outlet sizes. Big ones - 1.5" at the top and 1.75" at the bottom - but for some reason I thought that was exactly what I need. Oops. The Camaro radiator has 1.375" inlet and outlet. So I not only had to deal with a radiator sitting quite close to the engine, but also a size change in my hoses.
This is the resulting lower one. The Camaro part (top piece) was actually the perfect size but of course it wouldn't fit the radiator. I found a short 90 degree bit that did the job. The join is in a bit of an awkward place, but a curved piece of pipe took care of that. Voila. Sorted.
entry 338 - tags: radiator, hoses, cooling | | | 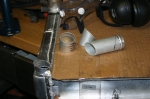 | June 1, 2010 - The upper hose was more of a challenge.
The lack of space between the radiator and the engine was a problem here, and I also had to find room to alter the size of the hose. So I decided to turn the fitting by 90 degrees and change the size at the same time. This will end up with a 1.375" fitting running parallel to the top of the radiator, allowing me to simply cut down the factory upper radiator hose. I'm hoping one of my coworkers - a TIG magician - can stick all these pieces together for me. I can do it, but it'll look pretty ugly.
entry 339 - tags: cooling, radiator | | | 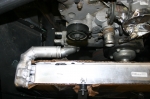 | June 6, 2010 - Tyler at Flyin' Miata stuck all the bits of my upper hose fitting together for me.
Nice work! I have welded aluminum in the past, but I prefer to save my stumbling around for less critical applications. Having the fitting (I think it's actually an outlet on an LS engine) turned 90 degrees like this makes things so much easier.
entry 340 - tags: cooling, radiator | | | 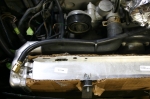 | June 6, 2010 - The final result.
The upper radiator hose from the Camaro was trimmed down and fits perfectly. A hole was drilled and tapped in the top of the radiator (through a boss Tyler welded in there for this purpose) and a fitting for the steam line was threaded in. And that's the radiator modifications done. I haven't done anything with the heater hookup yet, but that's a fairly quick job.
entry 341 - tags: radiator, cooling | | | 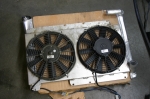 | June 6, 2010 - The fans will be mounted to the radiator something like this.
Obviously, I've just laid the fan shroud from a different car on to the radiator, but the theory is there. I'll make a similar shroud that covers the whole radiator, and the fans will be these two in approximately the same place. I think it should cool well.
entry 342 - tags: radiator, fans, cooling, shroud | | | 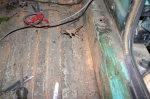 | November 18, 2010 - Work continues.
I'm going to fix up the slight bit of rust on the passenger's floor - these two sections will be trimmed out and replaced.
Meanwhile, the radiator has been pulled out. The new one will be ready today and I'll start working on modifying the bracket at the front of the car.
entry 458 - tags: cooling, rust | | | 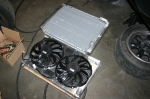 | November 22, 2010 - Here's the new radiator along with the old one.
The size difference is even more dramatic in person. The fan shroud is a really nice piece, it's laser-cut aluminum built specifically for this radiator. The fans are two fairly high-flow SPAL units with high-torque motors to help them pull against a restriction like multiple heat exchangers. Not a problem here, but most "low profile" fans will fall off dramatically even when asked to deal with just a single radiator.
The rad itself is the same basic design as the other one, but with a more efficient core. Based on testing at Flyin' Miata, it should actually outperform the big guy.
This is all off-the-shelf stuff designed for LS-powered Miatas by Flyin' Miata.
entry 459 - tags: cooling | | | 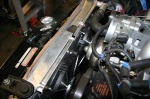 | November 22, 2010 - Test fit of the new rad.
The fan shroud comes with two sets of 1/4" spacers. Ideally, you want the shroud as far from the radiator core as possible while still being sealed. In this picture, here's the amount of room left with none of the spacers installed. The nose of the water pump sits nicely between the two fans, maximizing the amount of room available. Nice. I'd love to say it was cleverly planned, but really it's just a happy coincidence.
The shroud still fits well with one 1/4" spacer, but two makes it basically impossible to install. Still, it should work quite nicely.
entry 460 - tags: cooling | | | 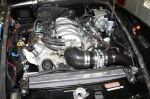 | November 22, 2010 - The fully installed radiator.
The lower support was moved a bit more than 2" for more curb clearance and to match the lower edge of the stock front valence. The fan shroud has been fully installed with gasket material around the edge, forcing every single molecule of air to go through the radiator. The upper brackets holding the rad in place are ones from a 1999 Miata and they look nice and factory. I even put a couple of brackets on the top of the shroud to guide the steam fitting hose nicely around the intake.
I'm really happy with how this turned out, it looks really good. Now I just have to sort out the lower radiator hose now that the outlet has moved up by a couple of inches...
entry 461 - tags: cooling | | | December 24, 2010 - Janel and I took the MG for some last-minute shopping.
It was kind of fun, the car's enough of a "real car" we can do this now. It's definitely quieter and Janel strongly approves of the new interior look.
Unfortunately, in some stop-and-go traffic trying to get in and out of the grocery store, the car got pretty hot. I didn't hear the fans kick in, even though it momentarily got hot enough that both should have been spinning away. All of my other testing has been at higher speeds and cooler temperatures. I'm going to have to look in to this.
It was by far the coolest looking car in the parking lot, though.
entry 522 - tags: cooling | | |  | February 1, 2011 - My little science fair project.
I started by stopping off at NAPA on the way home and going through their Big Book Of Temperature Sensors. Not all of the sensors had information about their resistances, but I was able to pick out a few likely suspects out of the catalog. Two of them were in stock, so I brought them home to test.
First, I used the multimeter to check the resistance between the body of the sender and the stud. The MG part apparently reads 800-830 ohms. NAPA sensor 6046 read 631, sensor 6178 was 273.
Then I boiled some water and risked my tender fingertips by dipping the sensor in it while I measured the resistance. The cooking thermometer told me the actual temperature of the water. At 195F, sensor 6046 read 48 ohms and 6178 read 31. Apparently the MG one should be 31-35 at 190F.
So, 6046 will be fairly close when the car is cold, but read a bit low when hot. However, it's also changing quickly in the normal operating range. 6178 will probably read right about C when cold, and should be pretty close when hot. I'll give them both a try in the car and see how they behave for real, but at least I know what to expect!
entry 548 - tags: science!, cooling | | |
|

 THE DIARY