| LIFE OF A GT |
|
|
 | |  | April 25, 2008 - Time to get rid of the teal "lips" left over after the original grille was removed.
I had a can of glossy black auto paint that was used to paint the Mini's arches, and it proved to be a very good match to the MG. A quick bit of masking and voila! No more lips. Sure, it's not a Pebble Beach concours job, but you have to be on your knees in front of the car and about a foot away to notice. Which I believe is how things work at Pebble Beach...
entry 44 - tags: grille, paint | | | 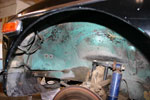 | April 25, 2008 - While I'm painting things and I have the wheels off, it's time to take care of these teal wheelwells as well.
I used a different black for this - a satin color. After all, they're not supposed to be shiny. Just dark.
Note the tube shock conversion in the front. That was a surprise!
entry 45 - tags: paint | | | 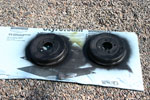 | April 25, 2008 - More painting!
This time, the rear brake drums. They were ugly and rusty and very obvious behind the new wheels. So a shot of satin Rustoleum and we're good. You might notice that this is three different types of black paint so far. I used four, but I forget what the other was for! Oh right, the cover for the pedals.
So, how did the brakes turn out? Well, it took a bit of cleverness to get them bled properly with the dry master, but once we got a bit of fluid moving through they pumped up nicely. So it looks as if my brake master was a success, at least in the short term.
entry 46 - tags: paint, brakes | | | June 16, 2010 - Order of operations.
One of my hang-ups recently has been a dilemma. If I do all the wiring and plumbing necessary to make the car run now, I'm going to have to tear it all apart again so I can repaint the engine bay and interior. But I want to make noise and get the car running! The problem was the paint.
Until I realized I didn't need to use automotive paint from a gun. In fact, there was a better option: POR-15. This anti-rust paint is one I've used in the past on both the Seven and the Land Rover. Brushed on, it gives a surprisingly good finish. You can apply it over rust and it's very strong - it'll give much better protection to the metal than normal paint. And of course, since I can apply it with a brush, I can do things like paint under the new fusebox and then mount it permanently without having to worry about dealing with overspray.
entry 349 - tags: paint, logistics | | | 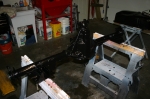 | June 19, 2010 - The rear axle, fuel tank and panhard bar have all been given a coat of POR-15.
So has the pedal box. I also hit some of the brackets welded on the car to use up some of the leftover paint. Once the tank is dry, I can do the final installation and not have to take it out again. Woohoo!
entry 350 - tags: paint, fuel, axle | | | 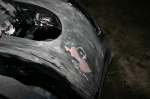 | June 28, 2010 - I haven't been working on the MG of late, but I've been acquiring more skills that will come in handy.
I've had to do a bit of bodywork on another car and it's forcing me to develop the ability to lay down paint nicely and also develop more patience! The car in question is a deep, deep black that I'm going to use on the MG, so it's teaching me just how unforgiving black can be.
Once this is resprayed to an acceptable finish, I'm going to dive back into the MG. But I don't think it's going to be driving in a month and a half, an unofficial target I'd set for myself. Not unless I really start to focus and maybe take a few days off work. Sigh.
entry 352 - tags: body, paint | | | 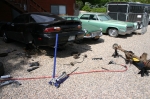 | July 17, 2010 - Okay, there's that done.
The black bumper was painted, then sanded down again and painted again. I learned a huge amount about sanding on compound curves, surface prep, paint gun setup and the general unforgiveness of shiny black paint. But now I'm in pretty good shape to paint the MG. Not that I'll remember any of this when it comes time to paint! I also made a trip back to Canada for a week or so.
But now it's time to get cracking. I have to drop a differential off at the drivetrain shop for work, so I figured I'd bring the Camaro and MG axles in for their diff swap at the same time. I don't know how to set up a rear end and I'm happy to let someone else do it for me. So I jacked up the Camaro and had at it with the tools. An hour later, the rear end was free in the driveway.
Note the very large boards underneath the jackstands, this car is not going to sink into the gravel, fall off the stands and kill me.
entry 353 - tags: Camaro, differential, rear axle, paint | | | 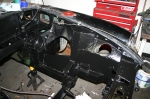 | August 19, 2010 - A coat of paint made all the difference to the car.
I used POR-15, my favorite rust paint. It's what I used on the Seven and Basil the Land Rover. I've found it to be tough and long-lived. It's also really easy to put on with a brush, flowing into a nice smooth coat and easy to touch up later. I use disposable chip brushes because it's almost impossible to clean them.
The end result looks good! Nice and shiny with a distinct lack of nasty surface rust. I painted the new metal under the car as well to protect it. I missed a few spots (of course!) and I have to move the jackstands to access a couple more, but overall it really looks good.
You can see the hole for the air intake in this shot as well.
entry 365 - tags: paint | | | 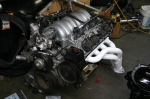 | August 19, 2010 - I've also been playing with the engine.
The most obvious is the new white headers. They were starting to pick up some surface rust sitting around the garage, so I grabbed a can of high temperature header paint to give them a nice coat. Black would have hidden the welding better, but I'm a sucker for white headers as followers of the Targa Miata know. I think they look awesome. Why paint and not ceramic? Because that's expensive and I've had pretty good luck with this paint. It'll do for now.
I also swapped the original Camaro intake manifold for my Corvette one. This isn't due to any sort of performance increase, but because I painted it to look like aluminum! Of course, it's not completely convincing. But it's a nice change from the usual black plastic and I think it'll look even better as it ages - ie, gets a little bit of dirt on it.
The Corvette manifold does have two differences, though. First, it doesn't have a hole for an EGR fitting, so I won't need to plug that. Good. Secondly, it doesn't have threaded holes for the throttle cable due to the drive-by-wire Corvette. Umm, bad. I'll fix that.
With the dressed engine sitting beside the painted rear axle and with the car freshly painted up, things are looking really nice!
entry 366 - tags: engine, paint | | | 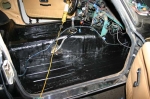 | November 22, 2010 - The final step: POR-15 rust paint.
As you can see, I didn't just paint the new patches. I also painted the new radiator support and the entire interior up to the top of the transmission tunnel. My friend Eric and I used to joke about a POR-15 dipping vat, and this looks pretty close! That sheetmetal should be nicely protected against future corrosion now.
Looks pretty good, actually.
entry 464 - tags: rust, paint, POR-15 | | | 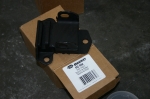 | January 14, 2011 - I spent part of the day today talking paint and bodywork with the local paint shop.
Hightower supply has been very helpful to me. I came home with some new primer and a big bucket of body filler to make those fender flares all pretty.
I also want to try some rubber motor mounts in the car. I think some of my noise is vibration coming through the mounts. I put some competition motor mounts on Janel's street Miata and got a similar noise. Now, the mounts I used were generic small block Chevy (pre-LS1) mounts from Energy Suspension. I went to NAPA, opened up the Big Book Of Motor Mounts, and spotted this on the first page. I don't know what the application is - probably every V8 from General Motors from 1960 to 1997 - but I think that's it. I just hope the softer mounts don't let the exhaust and other bits and pieces lean up against each other.
entry 531 - tags: motor mounts, bodywork, paint | | | 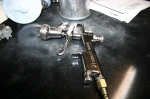 | February 1, 2011 - A fancy new paint gun!
Well, not new. But new to me. Since I want this car to look good and black paint is very unforgiving, I've decided to step up from my cheap and cheerful Harbor Freight guns to a good one. It's still mostly up to me, but this guy should get rid of some excuses.
entry 546 - tags: paint | | | 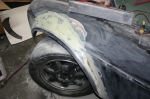 | April 5, 2011 - The sanding work continues.
I'm learning quickly and I think the final result will be good. The left front corner is almost perfect, and the left rear is also good. With how the car is parked, it's harder to get to the right side so it's lagging behind! I have picked up a couple of air-powered sanders that should accelerate progress somewhat - they've proven themselves to be very effective while cleaning up the burned paint on the roof.
One thing I learned from painting the Miata is that errors that appear catastrophic when the car is fresh out of the paint booth and sitting under the fluorescent lights disappear when the car starts to get used. But I'm still going for a good job.
entry 561 - tags: paint | | | May 10, 2011 - Another rest for the MG.
I took a trip to visit family, then trucked a couple of thousand miles to Road Atlanta for the vintage races. Meanwhile, the poor car waited. Until tonight! I used my new air powered D/A sander to quickly put the final shape on those front fenders. Not only was it a lot faster, I got a nicer finish than when I'd been doing it by hand. I feel like I'm actually making progress now. I'll do the rears in the next day or two, then shoot the car with a layer of primer in preparation for more exciting sanding!
entry 564 - tags: paint | | | 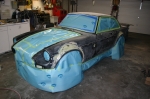 | June 15, 2011 - Okay, the car's all masked.
The paint's been wiped down with grease remover. It's time to make it all the same color.
entry 571 - tags: body, masking, paint | | | 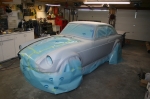 | June 15, 2011 - And voila!
A coat of primer. Unfortunately, only one coat instead of 2-4 because I ran out. It's amazing how much better it looks already. I'll go pick up some more primer so I can give it a bit more. Some of it is still wet in the picture, thus the darker area around the front wheel.
Having the whole car one color makes it obvious where I've done well and done badly on my shaping. On the passenger's side, it looks quite good and I'm happy with that. The driver's rear needs some more work, mostly because I'm dealing with the skim coat put on by the previous painter. So I'll do some quick touch-up there and try again.
Much more sanding to come - but this will be much quicker than before.
entry 572 - tags: body, primer, paint | | | 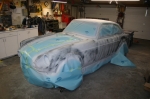 | June 15, 2011 - Some vandal defaced my paint job!
Oh, no, wait. That was me. I shot a thin coat of black primer over the white as a guide coat.
Well, first I gave the car a couple of extra coats of the white primer to build up the coat. Then the guide coat. Now I sand the guide coat off. The purpose of this is that it will highlight any low spots in the paint as the high points sand to white and the low spots stay black. Thus allowing me to find and address problems that will show up in the shiny final paint.
I should point out that this isn't a "how to paint a car" tutorial. I've done a couple of cars in the past, but I'm still very much an amateur. In fact, this is the first time I've done a primer coat like this.
Luckily, primer is made to be sanded. So this is actually a very satisfying job.
entry 574 - tags: primer, paint, body | | | 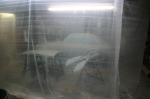 | June 16, 2011 - The primer sanding is done, and it's time for the big, gratifying step.
Yup, paint booth time. The booth itself is nothing more than plastic hung from the roof of the garage. Before the plastic goes up, though, the cleaning happens. Lots of sweeping up dust. Then sweep again. All that dust I've been creating for months has to be corralled, lest it become a pimple on the MG.
I love this part. Big visible changes happening fast.
entry 576 - tags: paint | | | 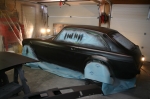 | June 16, 2011 - And it's black!
This is an epoxy/sealer coat, so it's nowhere near as glossy as the final result will be. One nice thing about this is that it's a good practice run for the next couple of stages, as I learn how to move over the car. The C pillars beside the hatch are problematic to do well, I'll concentrate on getting them right with the color coat. I can also tell that the arches aren't as smooth as I thought, as wet black paint under fluorescent lights is a much harsher judge than the previous flat white.
But look! It's black!
entry 577 - tags: paint | | | 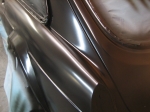 | June 16, 2011 - The color coat is on.
This laid down really well. It's not a glossy black, sort of a trendy satin. But pretty smooth.
Isn't this a cool angle for the car?
entry 578 - tags: paint | | | 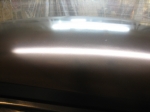 | June 16, 2011 - A shot of the roof.
I've painted two complete cars in the past, both Miatas with hardtops. But this is the first time I've painted a car where I couldn't unbolt the roof and put it on a stand! It's a lot more difficult. Still, the finish came out pretty well.
entry 579 - tags: paint | | | 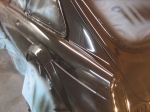 | June 16, 2011 - And finally, the clearcoat.
Here's that rear 3/4 shot again. Not bad at all.
entry 580 - tags: paint | | | 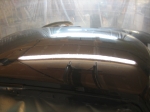 | June 16, 2011 - And the roof.
Quite a difference! There's a little bit of debris visible, but I'm happy with how this turned out. And I never did lean up against the side of the car while painting the roof! I was being very cautious about that, let me tell you. I have no idea how people do it with big cars or trucks. Ladders or climbing apparatus, I assume.
entry 581 - tags: paint | | | 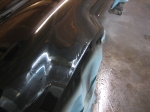 | June 16, 2011 - It's not all sunshine and daffodils, unfortunately.
The last car I painted had some dry spots in the clear, which are dull instead of shiny. So I concentrated on putting down a nice wet coat. I used the same speed on my strokes as with the other coats, but the clear decided to run in several spots. This is the most tragic of them. Nothing that can't be fixed, but it didn't make me happy. Oh well, it just means more sanding. And it's also not going to keep me from putting the car back together!
Note the wet floor. That's to keep dust under control. I also swept the paint booth between each stage. Interestingly, the sealer was the dustiest. But there always seems to be some dust in the clear. I don't really enjoy laying down clear, it's sticky stuff that always seems to create problems. But there you have it. The first car I painted used single-stage paint without a clear so I don't have that much experience with the stuff yet.
Overall, I think it's going to be a pretty good paint job. I'm getting better at wielding a paint gun and building a clean paint booth - I had less overspray hanging in the air on the clearcoat stage than before.
Now I get to put the car back together!
entry 582 - tags: paint | | | 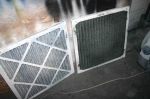 | June 18, 2011 - In order to help with dust control while painting, I had an exhaust fan pulling through a furnace filter.
Another filter cleaned the air entering the booth. Guess which one was pulling the overspray out of the air?
Yuk.
entry 583 - tags: paint | | | 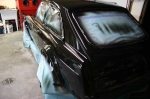 | June 18, 2011 - Now comes my favorite part - unwrapping.
This angle gives you a pretty good idea of the shape of the flares.
entry 584 - tags: body, paint | | | 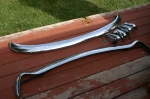 | June 18, 2011 - I've decided to let the paint dry for a couple of weeks before I sand down those runs.
And man, are there are a lot of runs. So this means I'm going to assemble the car now, even though some of this will have to come off again later.
Why? Because that means the car changes from a thing that lurks in the garage to a living car again. I can drive it and enjoy it, and take care of problems one at a time.
But before the bumpers go on that deep black paint, they need a polish. Which is a good excuse to sit on the deck in the sun.
entry 585 - tags: bumpers, body, paint | | | 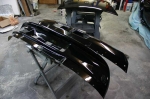 | June 18, 2011 - I painted both the stock front valence as well as the Special Tuning one.
It's amazingly difficult to find a picture of an MG with a Special Tuning airdam that's actually painted instead of being left in white gel coat. We'd never been able to get a good idea of how it looked, so I figured I'd just paint it and we could bolt it on to see.
entry 586 - tags: paint, body | | | 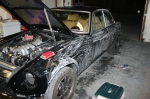 | June 27, 2011 - So much for that nice pretty paint.
I decided it was time to start sanding. I hit the worst runs with wet 500 grit, then moved to 1000 to flatten the rest of the car. It's going nice and quickly, although it's easy to see that I've had to remove a lot of the trim I installed just a week or so ago. Sigh. Still, it should look amazing when I'm done. And once this is all smoothed out, I'll be able to install the side trim and mirrors and even some of the new interior panels. Oooo!
entry 604 - tags: body, paint | | | June 28, 2011 - More sanding!
I feel like I'll have a masters degree in sanding MGs when this is done. I've gone over the whole car with 500 grit to knock down the worst runs - there weren't as many as I thought - and followed it up with 1000 and 1200. I'm now doing a final run over with 2000 grit. Hard to believe, but there's a visible difference between each one. The car's looking really smooth now.
Next step after the 2000 grit is the buffing. That's where it'll really pop and I'll have the ability to really make mistakes. Foreshadowing? I hope not.
entry 606 - tags: paint | | | 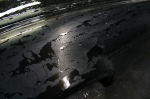 | June 29, 2011 - Here's the result of all that sanding.
The car is super-smooth and satin black. I tried a bit of buffing on the roof and decided that panel simply wasn't smooth enough - there was still a bit of a pebbled surface where I'd hit the top of the orange peel but not flattened it. So I wetted everything down and kept going.
Polishing this weekend. That should be a fairly quick and very gratifying job.
entry 607 - tags: polish, paint | | | 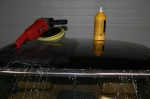 | July 2, 2011 - Buffing time!
Try to guess which side is the "before" side. I started off with a fairly mild setup, a gentle foam pad and a less aggressive compound. That's the result on the roof there. Not bad, but my initial sanding was with some pretty coarse paper. I followed it up with lighter paper, but either I don't have enough patience (most likely) or the setup simply wasn't aggressive enough.
So, after some experimentation, I ended up with my most aggressive combination of abrasion: some old 3M Product III rubbing compound and a wool boot on the rotary buffer, set on 3.5 out of 6. That did the job.
I did all my experimentation on the hood because I figured that if I really screwed it up, it would be the easiest to repaint. No worries there, I found I didn't burn anything up. One big help was the Meguiars training video, which they've uploaded to YouTube. Sure, there's a lot of advertising for Meguiars in there, but it shows you how to move a buffer properly and a lot of good techniques.
entry 608 - tags: buffing, paint | | | 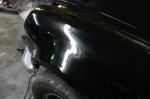 | July 2, 2011 - Here's that flare that had the big runs in it.
It's not perfect, but it's a whole lot better. I won't have to try to avoid this angle when taking pictures of the car anymore! You can see that my initial sanding marks are still there, even after using 2000 grit and a couple of passes with various polishing compounds. By the way, I followed up that 3M rubbing compound with some Meguiars polishing compound and then a swirl remover. The sanding marks actually kinda make it look like a well-cared-for but old enamel paint job. Instant patina!
I know, I know. But I'm going to call this good for now so I can get the car up and running again. The goal was to get rid of the worst of the runs so I can put the badges and side trim on. I can do some more finishing work later on if I feel the need. Right now, of course, I'm looking at a spotless black car under fluorescent lights.
I did learn some neat techniques for getting rid of runs without wet-sanding the entire car. Although the car did need it due to orange peel. I'll get pictures of them later, as I know I'll probably come across at least one more that will need a touch-up.
entry 609 - tags: buffing, paint | | | 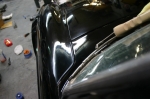 | July 3, 2011 - I left one small panel on the car alone so I would have a good before/after comparison.
That's it at the base of the windshield. It made a good test for the quality of my buffing too! The untouched panel is visibly rougher but has about the same shine as the fender does, so it's worked out pretty well.
entry 610 - tags: Buffing, paint | | | 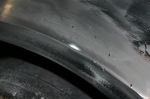 | July 3, 2011 - It's not all good news, though.
Whilst trying to get rid of the worst of the drips, I managed to sand through the paint. No, not with the rotary buffer that everyone warned me about, but with 2000 grit sand paper. I wasnt trying to sand right on the lip but I must have had the angle just a bit off. Argh.
I left it alone while I continued with the rest of the car. I'll touch it up eventually, but I figured I should make sure there aren't any other spots that will need work first.
Once everything is polished, it's just a small white spot on the lip. Not too obvious in real life.
entry 611 - tags: buffing, paint | | |  | July 6, 2011 - After work today, I decided I just had to take the MG for a run.
I hadn't seen it outside the garage since all the sanding and the complete assembly. I gave up on trying to fabricate excuses and just took off.
It certainly is a lively little thing.
Anyhow, here's Nigel. Did I ever mention the car's been named Nigel Brimstone? Well, he has. So here's Nigel all assembled. Mirrors, side trim, badges. There are no elements that look unfinished or require apology. And he looks good! Sure, the paint isn't perfect. But in the real world with a bit of dust, out of the merciless fluorescent lights, he looks just fine. Time to start working on the driving experience a bit more.
entry 626 - tags: paint, body | | | July 9, 2011 - Cruise night!
As a general rule, I don't go in for cruise nights. I prefer my gasoline burned at wide open throttle on a racetrack, not burbling up and down a busy street or squandered in burnouts. I also find that only a particular type of car shows up, and there are only so many 1960's American cars patterned after the same template I can take at one time. But there was an event last night just down the street from my house and so Janel and I took the excuse to get the MG out for some exercise.
I'm glad I did. There was a great mix of cars, from the usual cruise night fodder to a nice survivor 356 coupe. No other MGs, and nobody else with a set of worn R-compound tires other than my friend Brandon's bike-engined Locost and the MG. The reaction to the MG was pretty fun to watch. I had it parked with the hood up and there were a lot of double takes. A lot. After the masses saddled up to idle up and down the main drag, we took off and went to dinner with Brandon and his girlfriend Leigh. The MG behaved like a normal car with working windshield wipers, headlights, turn indicators and even a full-time fuel pump! Janel drove it for part of the night and displayed a tendency to use significantly large amounts of throttle without any provocation. She approves of the car's sprightliness.
Unfortunately, the paint does not look good at all when it's shined up and out in the sun. I got caught in some rain on the way home from work yesterday and it seems to have taken a lot of the shine off the final buffing, really showing up the wet-sanding marks. Even the flattened paint where I managed to get rid of all the sand marks with 2000 grit had no sheen. I tried to give it a quick polish but to no avail. So it's back to the buffer soon. Still, the car is a driver and that makes it a lot more fun than when it was stuck in the garage for paint!
entry 627 - tags: paint | | |
|

 THE DIARY