| LIFE OF A GT |
|
|
 | |  | April 11, 2008 - The biggest modification is the tan interior.
As much as I can tell, the dash, console, headliner and other interior trim was all painted tan some time ago. Our mysterious interior decorator actually did a pretty good job until it came time to do the dash. The masking job there wasn't quite as well done as it could have been.
entry 10 - tags: intro, interior | | | 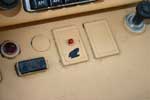 | April 11, 2008 - Here's the problem with the dash painting.
Some parts were simply painted over, others were not masked well. It's possible to scrape the tan off the hard plastic parts with your thumbnail. The current idea is to de-tan the dashboard ourselves. I'll see if I can repair a crack in the top pad at the same time.
entry 11 - tags: intro, interior | | | 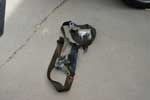 | April 12, 2008 - The rear seat belts were looking pretty scruffy.
They wouldn't retract all the way, the belts were discolored from sun and some sort of liquid, the receivers were AWOL - and we're never going to be cruel enough to put someone back there anyhow! So out they come.
entry 14 - tags: interior | | | 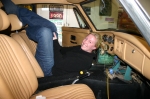 | January 1, 2009 - Before I start cutting and welding the car, we need to make it a bit more flammable.
Janel wandered into the garage and helped me pull the dashboard. We had a lot of fun trying to decipher the workshop manual instructions. Here, she's trying to find the invisible bolts holding it together.
entry 113 - tags: interior, janel | | | 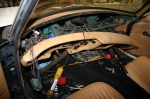 | January 1, 2009 - The dash is almost out.
I just need to label the wiring and we can disconnect it. Due to the poor paint job on the dash, we're going to make it black again. The whole interior of the car was painted tan - and with a fairly good job. But at least one of the panels seems to be stock, so hopefully there's a stock equivalent. The door panels are rather wavy.
The dash is going back to black, as the paint job on it is poor. It also needs some repair as can be seen. The choices are to try to patch it up and then respray the dash, buy a $50 top bit to cover it up, or install a $300 dash. We'll see what wins - I'll probably start with option A and see how that turns out.
entry 114 - tags: interior, dash | | | 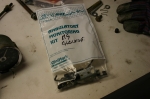 | January 1, 2009 - Whenever disassembling a car to this extent, always bag and label parts.
Who knows how long it will be before it gets reassembled?
The number of fasteners involved in the glovebox was amazing.
entry 115 - tags: interior, tips | | | 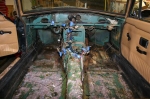 | January 1, 2009 - Naked MG!
Janel and I attacked the car this afternoon and stripped it right down. Now that this is done, it's time to start the real modification. We did discover that while many of the panels in the car were painted, the seat upholstery was not. So it looks as if we do have a color match to an MG color. Based on the catalogs, I'm guessing "honey tan". We'll probably duplicate a couple of the panels if we can find some vinyl, as a few are a bit banged up.
The size of the fasteners holding the seats down was a little spooky - they're about 1/3 the size of the ones used in a Miata.
entry 119 - tags: interior | | | 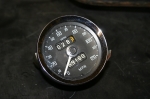 | January 14, 2009 - I picked up a spare speedometer on eBay.
The plan is to stuff electronic guts inside the stock gauge, and I figured having an extra would make me more comfortable taking it apart. I'd rather not go to a $300 adapter or use Autometer gauges, I like the old Smiths look. Besides, it was cheap!
entry 138 - tags: interior, gauges | | | 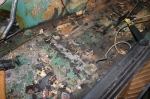 | January 16, 2009 - Yuk.
I'm removing the asphalt sound deadening from the floorboards so I don't set it on fire while welding to the floor. It's coming off fairly well with a hammer and chisel, so I'm going to pick up an air hammer on the way home from work today to expedite matters. Then the condition of the floorboards will be revealed, but nothing I've seen so far leads me to be concerned. It looks bad in pictures, but all the rust is just surface scum. I can't believe I got so lucky!
entry 145 - tags: interior, rust | | | 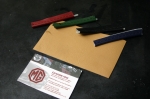 | September 7, 2010 - Janel and I have realized that the interior of the car is going to need some attention.
We bought this particular car because it was black with a tan interior, and it looked great. Of course, then it turned out to have a bad paint job and the interior was just spray painted. But we still got a good rust-free chassis!
Of course, if we're going to refresh the interior we have to deal with matching the paint or replace it all. The latter is tempting but we have the problem of the headliner. I do not want to replace it - and it actually looks pretty good.
Looking at various color samples online, it appears the (unpainted) seats are "biscuit" and they do match the rest of the interior. Unfortunately, Moss Motors doesn't sell this color for the GT, only the convertible. I found a shop in the UK that offers a full biscuit interior for the GT but I wanted a color sample to be sure. And here's what showed up in the mail today!
The good news is that I was right. The seats are biscuit and match the sample perfectly. The complete interior does include new seat coverings, but this way we know everything will match. Yay! A big thumbs up for Chase MG. I'll put in an order for the parts soon. It actually quite affordable, a full interior for less than the price of two seats from Moss.
entry 391 - tags: interior | | | 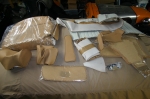 | November 7, 2010 - A giant package arrived from the UK.
This is a complete interior for the GT! What makes it special is the fact that it's "biscuit", a color that's not offered for the GT from Moss Motors and thus not from anyone else in the US. I don't know if it was a factory color for the GT or not, but it's what we have (well, it's the color of our seats and the rest of the interior was spray painted to match) and we like it. I bought it off eBay from Chase MG, and it looks really good.
Basically, it will replace every panel below window level including seat upholstery. All for around the price of one seat from Moss. Nice.
entry 425 - tags: interior | | | 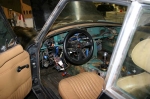 | November 15, 2010 - The interior needs a bit of work still.
Again, lots of dangling wiring. I need to finish swapping over from the MG column switches to the Miata ones which will clear up that particular snarl nicely. I think the tach zip-tied in to the base of the windshield is a nice touch though.
One thing to check off the to do list: brakes. Janel helped me bleed them this morning and the pedal is nice and firm. Just the way it's supposed to be. I do have to remember to bed the pads though, it's easy to forget that when months pass between installation and driving.
entry 455 - tags: interior, brakes | | | 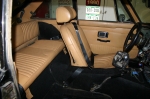 | November 24, 2010 - A couple of hours later, here's the interior!
Okay, I got a bit carried away, but it wasn't really that much work. I've only installed the biggest pieces of carpet - there's a puzzle of oddly shaped carpet pieces that are supposed to go in the footwell, but I reshaped the footwells enough that they probably won't fit anyhow.
Happily, the carpet over the transmission tunnel fit. A year ago, I welded a brace on top of the tunnel and I was afraid it was going cause problems with my carpet. I had to relocate the holes for the seatbelt mounts, but there was enough extra carpet that it worked.
Ah, seatbelts! You can see the driver's belt in place here. They're a non-retractable design from Beams, picked up from JC Whitney. I didn't like the retractable designs available and this are more like the original belts in the car. It'll be a bit more of a hassle to adjust on a regular basis. Considering that I have two cars with race harnesses, they're not too bad!
entry 470 - tags: seatbelts, interior, carpet | | | 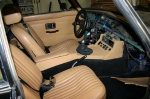 | November 24, 2010 - The interior looks pretty good!
Janel points out that maybe it needs a dashboard, but I'm looking at what's actually there. The center console is just sitting in place, and it will have to be modified at the rear to deal with that brace. Still, it suddenly looks like a real car. Almost...
The front bumper, front valence and grille are all installed as well. Am I dressing up the car to make it look good? Why, yes I am! Family is coming over for Thansgiving dinner tomorrow and I want to make it look good. But I'm not rushing any of this, it was actually time to install the interior. This will also make it easier to drive for shakedown purposes. The dashboard will stay out for a while so I can easily continue wiring.
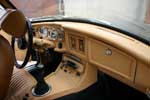
entry 471 - tags: interior, wiring, assembly | | |  | November 26, 2010 - Janel wanted a dashboard, so I decided to give her a dashboard.
It didn't take long to pop it in, but then I started playing with heater controls and other doodads. Still, after a couple of hours of work it almost looks like a real car. Only three of the gauges - tach, fuel and temperature - are hooked up but I had to fill the extra holes anyhow or it would look weird.
The dash was painted before we got the car, and the paint is damaged. There's also a big giant crack in the top. I'd like to recover it, but it kinda looks good in tan. Hmm.
entry 472 - tags: interior, dashboard | | | 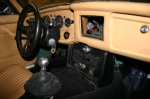 | November 26, 2010 - When I was messing around with the dash, I also changed the center console for the one from the 1969 parts car.
You can compare it to this picture. I think I like the older design better, it's so simple and the interior seems more spacious. The downside is that there is no more armrest. We'll see if that's an issue.
The 1969 parts car came with a radio, but I already had this "radio blanking plate" with a chrome surround and the octagon logo. Looks great. I just have to figure out how to finish up the trim around the bottom.
Take a look at the shroud around the steering column as well. It's the Miata part, and I had to trim off just the tiniest bit to make it fit. It really works with the rest of the interior.
entry 473 - tags: interior, dashboard | | | 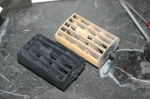 | December 20, 2010 - While the dash is out to work on the speedometer and other wiring, I've decided to remove the crappy tan paint on some of the parts.
Most of the interior of the car was painted pretty well, but the dash itself hasn't weathered well. It's cracked on top too. The eventual plan is to recover it with fresh vinyl (or a metal dash if I can hunt down all the parts), but in the meantime I want to work with what I have.
These dash vents are no longer available. But a few minutes in the bead blaster brought them back from ugly to original!
entry 515 - tags: interior | | | 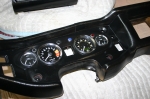 | December 21, 2010 - A peek at the dashboard.
It used to be a very shabby looking thing, it's looking much better now! Not exactly concours-ready - my technique of dealing with a crack above the speedometer was to put some black duct tape over top before painting - but it's worlds better. You can see dusty hand prints above the tach, the paint job isn't as patchy as it looks in the picture.
Although looking at that old shot of the interior, I see I have the location of some of the lights in the wrong place - the right turn indicator and the alternator light seem to have traded spots. That'll be a bit of a pain to change now, as I took a special effort to make sure they're properly anchored!
entry 516 - tags: dash, interior | | | 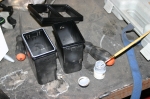 | December 22, 2010 - These center vents are supposed to have a chrome lip on them.
At least, I think they are based on checking a lot of photos online. I decided to add one using model paint and a steady hand. Okay, it was aluminum and not silver, but it does the job. And it was a nice relaxing 20 minutes to paint the two vents and the escutcheon that surrounds them.
That's a heck of a word, escutcheon. But according to Moss Motors, that's what the goofy thing is called.
entry 518 - tags: interior | | | 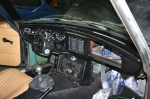 | December 22, 2010 - Lots of detail work on the car today.
While the dash was out, I cleaned up a bunch of wiring, added sound deadening behind the dash (you can see some peeking through the glovebox), refinished a few switches, removed the radio antenna and generally cleaned things up. One of the things I did was repaint the panel in front of the dashboard black, and bead blased and painted the defroster vents in silver. I like how that looks. I also swapped the a-pillar trim for the black set off the parts car. All just little things, but it's making the interior look good instead of rough. There's still a lot to do, of course, but it's much more respectable now.
The switch on the far left of the dashboard is the "brake check" switch. I no longer have that function available to me, and I'm not sure what to do with it. The shape of the switch is like no other on the car, so I can't substitute a different on in its place. Right now, it's just blanked off.
entry 519 - tags: interior | | | 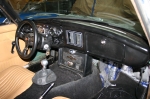 | December 26, 2010 - A (poor) shot of the complete dashboard.
Quite a change from the original look. The overspray on the carpet isn't really noticeable in person, you only see it when it's all lit up with the flash.
There hasn't been any major work on the car in the last few days, I've just been driving it. The defroster got a test on Christmas night when we had to head home after dinner, and it passed. I still need to work on sound levels coming from the back of the car, but a bit more of my silver cladding should help out there. I suspect that this would not be a problem in one of the convertibles, but the coupe body does provide a nice resonance chamber at around 1500 rpm. Still, I've been enjoying it quite a bit so far. The speedo works well and seems to be accurate, the dash lighting is about as good as could be expected and overall the car is working fairly well. The new Bosch H4 headlights I installed put out ridiculous amounts of light, just as I'd hoped.
Just because it's that time of year, I took a look back to see what I was doing around this time in the past. A year ago, I drove the Camaro into the garage for the final time. Two years ago, we decided to disassemble the interior. And this year we used the car to drive to Christmas dinner. I'd call that progress!
entry 523 - tags: interior, testing, looking back | | |  | February 1, 2011 - Big work!
I had a few other things to do over the weekend, but I couldn't leave the MG completely alone. I have a few toys that have come in for the interior, so I decided to play with those. Here's the original state of the door.
entry 544 - tags: interior | | | 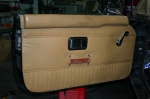 | February 1, 2011 - The final result!
Okay, it's not a big change. The most obvious is that door pull. The plastic MG one really bugged me, and I wanted leather. This particular strap is actually a door limiting strap for a classic Chevy truck - but it's got the right vibe to it and should wear in nicely. It isn't a perfect match to the interior color, and that's exaggerated by the flash - but it's better. I'll live with it for a while and decide what to do.
The window winder was originally black plastic, and I replaced it with a cast metal unit that both looks and feels much better.
We have replacement door panels for the car, but this is still the dirty and wobbly original part. Why? Because I'm still considering moving that door pull, and I don't want to put extra screw holes in my good door.
entry 545 - tags: interior | | | 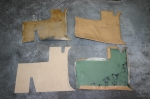 | February 5, 2011 - After the frustration of the flare not following orders, I decided to work on something that I know I can do.
The MG interior is made of the biggest collection of little weird bits and pieces, with carpet chunks screwed into bodywork and various vinyl-covered panels all over the place. Of course, the vinyl panels are simply a piece of cardboard underneath, and when they get wet they warp badly. That's an untouched one in the upper right of the photo.
We have a bunch of replacement panels from the UK. But I don't think it includes these kick panels, down in the footwell. More importantly, I've modified both footwells so even pristine pieces would need to be modified.
They're obviously not original because they're biscuit color, and the GT didn't come in biscuit as far as I can tell. They're not spray painted either, thank goodness.
I peeled the vinyl and some decomposing black foam off the backing board. I then modified the original board to make sure it fit properly. Once that was sorted out, I squashed it as flat as I could and traced it on to a piece of MDF. I cut that out (it's at the bottom left) then used some spray adhesive to glue the vinyl on to the board.
entry 551 - tags: interior, vinyl | | | 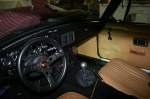 | February 5, 2011 - Here's the end result, just ahead of the door panel.
It's not perfect, but for a little bit of work it's an enormous improvement. You can see how wobbly the door card is by comparison.
entry 552 - tags: interior, vinyl | | | 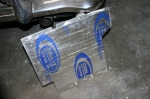 | February 5, 2011 - I also spent some time on a passenger footrest.
The engine computer is at the end of the footwell and it really is the best place to rest your feet. Well, not the best place, but the easiest. So I built this panel to cover it up.
It's a royal pain to install, with one bracket that needs to be bolted to both the footrest and the floor. But it's pretty solid and it'll do the job. Now I just have to cut a piece of carpet to fit it.
entry 553 - tags: interior, footrest | | | 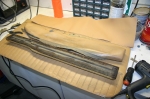 | July 3, 2011 - The logical next step after finishing the side trim would be to take the car out into the brilliant sun and marvel over how good it looks as the finally product.
But I had to reinstall the door panels, and what better time to install the new ones? The main door card went on easily enough with just a bit of fiddling around. The pad at the top of the door, on the other hand, needed to have the new vinyl wrapped around it. Not a hugely challenging task, but one that takes time to do it right. So I spent the rest of the day upholstering four chunks like the one in the picture. But man, do they look good now.
entry 617 - tags: interior | | | 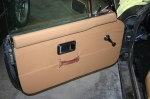 | July 3, 2011 - Ta-daaah!
A complete door. The panel design isn't identical to the original (assuming the previous cards were the original ones, which may not be the case) but it looks good. So I may not win at Pebble Beach. I'll cope. It looks so much better than before, though. The only part visible that was on the car when we got it is the door latch, and Janel's asked me if I can make it look better!
I still have to do the side panels for the rear seats. The upper pads are done, but there's still a bit of work to do behind the panels. Tomorrow, the car will emerge.
entry 618 - tags: interior | | | 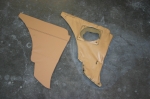 | July 4, 2011 - Before and after.
Yes, I think the interior should look better.
entry 619 - tags: interior | | | 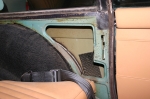 | July 4, 2011 - Removing the side panels in the back revealed this secret smuggling compartment.
That's the outer skin you can see, along with the backside of the welds for the rear flares. A previous owner had cut out part of the inner panel in order to fit a speaker as well.
Seems to me this is a good spot for exterior noise to get in. You can see the large amounts of factory sound deadening.
entry 620 - tags: interior | | | 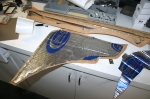 | July 4, 2011 - I'm considering filling that opening with something to absorb noise.
But in the meantime, the back of the new panel was beefed up with the same Cool-It that was used elsewhere in the car.
The final result looks so much better. Janel came into the garage, sat in the car for a while and proclaimed it to be a real car. That's a big step!
entry 621 - tags: interior | | | 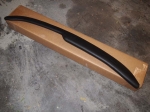 | June 12, 2012 - When I repainted the dash a while back, I simply covered up a crack with black tape and sprayed over it.
This was intended to be a temporary thing, with a future plan of refinishing the complete dash. But then the 1969 parts car showed up with a plastic dash cap - and you know what? It looked pretty good. I think I saw one in place when I was at the Mitty as well. So I decided to take the easy route.
Unfortunately, when I unpacked the cover there was a big gouge out of one side. Nothing functional, but when a part is 100% aesthetic it's difficult to overlook a problem that's right in front of the passenger and very much not aesthetically pleasing. The box wasn't damaged and the gouge appeared to have been in place when the part was wrapped up at the factory.
So I called Moss Motors and got Kevin on the line. He offered to send me a new one - and after I told him it was damaged inside the plastic, he actually went into the warehouse and started unwrapping. He called back the next day and said they were all a bit rough, but he'd picked the best for me. It was shipped out that day and arrived shortly after.
Now that's excellent customer service. I've been on the other end of that phone call. Would our company have handled things as well? I don't think so.
The cover will likely go on this week. Janel thinks it's a big step up.
entry 645 - tags: interior, dash | | |
|

 THE DIARY