| LIFE OF A GT |
|
|
 | |  | April 25, 2008 - I gave the car an oil change to get rid of the 6-year-old oil in the sump.
The oil filter definitely did not want to come off, but eventually succumbed to a screwdriver hammered through. Crude but effective. I went to drain the oil cooler and - yuk.
So the cooler got cleaned (lots of brake cleaner did the job) and cleaned again. I also discovered that it had been mounted with a couple of sheetmetal screws run through the tapped holes in the body. Oh, and mounted crooked. Nothing but the best! So I ran a tap down the four mounting holes, got four matching bolts and installed it properly. All the holes lined up perfectly - there was just a real hack working on this car at some point.
entry 47 - tags: engine | | | 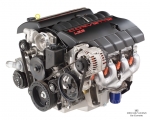 | October 31, 2008 - A new plan.
The original intent was to install a Ford 302 into the MG, as it's cheap and readily available. However, that was before I got mixed up with transplanting an LS1 into a Miata. I fell in love with not only the performance, but also the packaging and the (relatively) light weight of the engine. So I've switched plans. It's going to be an LS1.
entry 63 - tags: engine choice, planning | | | 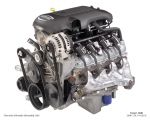 | October 31, 2008 - Sharp eyes will notice the giant "LS2" on the last engine.
Okay, so I cheated on the picture. And here's the engine I'm really considering. It's marketed as the "Vortec 5300" and it's found in late model Chevy Silverado trucks. But in the 1500 extended cab 4wd versions, it's a special high output version called the L33. Unlike the usual truck motors, it has an aluminum block so it's a lot lighter.
It's also taller, but the LS1/LS6 intake manifold and oil pan should bolt right on. Hopefully it won't be too big a deal to drop the alternator somewhat as well. It's a 5.3 versus the 5.7 of the LS1, and that's simply due to a smaller bore. With the right parts bolted on, it'll basically end up a slightly smaller version of the LS1, and all the same hop-up parts will fit. LS6 cam, perhaps?
But the big reason is that they're a lot more affordable. LS1s are well known and are expensive. Truck motors are not sought after by most enthusiasts. I've been able - without trying too hard - to find a 16,000 mile example for under $1000 shipped. I'm sure I can do better. I'll still have to buy a few parts to make it work, but it'll come in well under the price for an LS1. And with 335 lb-ft and 310 hp, it's not going to be a slouch.
entry 64 - tags: engine choice, planning | | | 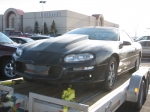 | November 9, 2008 - We have the drivetrain.
While I was in the middle of trying to figure out just what an L33 would need to convert it into something closer to my needs, I spotted an ad for a 1998 Camaro on Craigslist. The whole car was going for about the usual price for an LS1/T56 combination. So there was a change of plans, and now there's one very evil looking black car parked in the driveway. I could have driven it home, but with the forecast of snow in the mountains I decided that it would be better to give it a ride.
These cars are enormous. It's ridiculous.
Not only do I have an engine and transmission, but here's my ECU, my wiring, potentially the guts for my instruments, a flywheel and clutch, a high-pressure and high-flow fuel system and anything else I might need. All sorts of things that had the potential to really nickle-and-dime the project.
Even better, the engine was rebuilt about 30,000 miles ago with an XR259HR Comp cam and a Comp cam "RPM kit". There's also headwork and some sort of aftermarket shifter. Best of all, because it's all in a running car, we could test drive it.
It's a happy engine. Very strong. The transmission likes to pop out of reverse. The seller - a fellow Grassroots Motorsports reader who originally bought the car as an engine for his GTO race car - thinks that it's simply a shifter in need of adjustment, and it does have that feel when you're trying to slot it into place. I'll see if I can fix that up. He also threw in a couple of extra oil pans he didn't need (the GTO uses a different one), a power brake setup from a GTO and a low-mileage oil pump that he doesn't need. Let's just say he was a kindred spirit when it comes to this sort of project.
So it was a bit more than I'd originally intended to spend. But there are a lot of resellable parts. That hood, for example. And the limited slip rear end. And the Borla exhaust. And possibly the stainless header (that I think includes cats) that was included, uninstalled, in the trunk. And of course, almost a complete car's worth of other stuff.
Janel announced that the car was at the bare minimum of loudness for her project with the Borla. I think I'm going to have to install some exhaust cutouts.
entry 69 - tags: engine choice, donor | | | 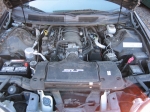 | November 15, 2008 - The engine!
This is ridiculous. The nose of the Camaro is about 15 feet long, and the rear four cylinders of the engine are embedded in the firewall. There's no reason for this car to have such a stupendous nose other than overcompensation. Of course, you could say the same about the cowl induction hood on this particular car.
It looks like changing the serpentine belt would involve crawling into the engine bay, and looking at the rear spark plug on the driver's side makes my hands and back hurt just thinking about having to change it.
The good news is that all the fluids look good and fresh, and under that SLP airbox cover (which doesn't fit as well as it could) is a nice K&N. Someone took care of this powerplant. Can't say the same about the body of the car, which has the look of a shoddy body shop reassembly about it, but that's not a concern of mine!
entry 73 - tags: donor, engine | | | 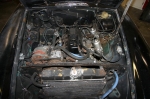 | November 25, 2008 - Time for this to come out.
After a mad three and a half days of work in the garage, I have a new fabrication station and a lot more room. Room that will shortly be taken up by a multitude of Camaro and MG parts, of course. But the real work will get underway this weekend as the original engine comes out.
The car completely refused to start to drive into the garage, showing signs of some sort of major wiring problem. I also discovered a badly bodged alternator swap on the car. No worries, it's all going away.
Time to get dirty!
entry 78 - tags: engine, teardown | | |  | November 27, 2008 - Time to pull the engine.
In case I have to put it back in, it's good to know the official manual will be very useful - check out step 35.
entry 80 - tags: dismantling, engine | | | 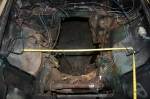 | November 28, 2008 - The nekkid engine bay.
That front subframe has mounting points that are just under 19" apart. The Miata subframe? Right about 32", as the tape measure indicates. One thing's for sure, the new subframe will free up an enormous amount of room. At the expense of a small bit of work.
entry 84 - tags: engine bay, subframe | | | 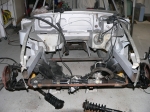 | November 28, 2008 - Here's a shot of the only MGB - that I know of - to be fitted with Miata suspension.
The car was never completed, but it's very useful info. I've shown the rear subframe installation in the past, here's a shot of what was done up front. New frame arms. I'm going to do a little more reinforcing, especially of the upper shock mounts.
This picture also shows how much more potential space there is with the new setup. Combine that with a tubular front subframe like this one and all sort of room opens up.
entry 85 - tags: engine bay, subframe | | | 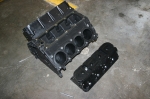 | December 6, 2008 - My secret weapon has arrived!
It's a plastic LS1 from P-Ayr that I picked up from Summit Racing. It weighs next to nothing, letting me pop it in and out of the engine bay easily instead of humping around 500 lbs of metal. All of the factory mounting points are represented by steel inserts, so I can also use this to work out my header setup as well as things like motor mounts. If I wanted, I could even install different heads. There's no plastic version of the T56 transmission yet unfortunately.
Most importantly, this lets me experiment with fitment without taking the Camaro apart quite yet.
It was expensive enough that I'm taking very good care of it, and I should be able to resell it after the build is over. Meanwhile, it's going to make life a lot easier.
entry 95 - tags: engine, replica | | | 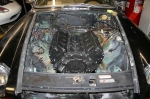 | December 6, 2008 - The engine is in!
And there you have it, an LS1 in an MG. Wow, that was easy.
Okay, maybe getting the complete functioning engine with transmission and suspension might be a little more difficult. But still, the first test fit, fits.
I've got the engine positioned to put the shifter in the same place as stock. Actually, it'll end up maybe an inch further forward. This is the best I can do without actually cutting anything other than removing the motor mounts at this point. With the Miata subframe in place, I should have a decent amount of room for headers.
entry 96 - tags: engine, replica, test-fit | | | 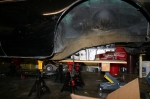 | December 6, 2008 - The engine height was set to put the oil pan at or slightly lower than the frame rails.
This is a bit of a guess, but I think it'll work nicely. I might be able to sink it down another 3/4" or so.
With this positioning, the engine ends up in almost exactly the same position relative to the wheels as the Miatas we do at Flyin' Miata. Only the front pair of cylinders are ahead of the wheels and the height looks to be the same. This means I could use an off-the-shelf subframe. Wow, could it be that easy?
The threaded holes in the plastic engine mean I could simply bolt up the extra oil pan. I like this thing more and more...
entry 97 - tags: subframe, engine, replica, test-fit | | | 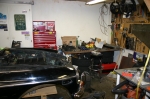 | December 6, 2008 - A test of the hood clearance will have to wait until I get an intake manifold.
There's one on the way right now. As with a number of the other parts, it'll probably get sold after the swap as I won't need it anymore. But placing a ruler across the edges of the hood opening looks promising. We'll see.
I might be able to push the engine back slightly, which would have a beneficial effect on the weight distribution. But again, given where it sits relative to the Miata and the extra weight of the coupe body in the rear - I think it will work pretty well here.
This picture also shows the huge amount of room I'm building in. There's about 3' of clearance all around the car with my work area up front. This is definitely a home project!
entry 98 - tags: engine, test-fit, replica | | | 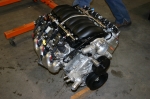 | December 8, 2008 - The complete engine.
No, not mine. This is a 480 hp crate LS3 with a hot cam from GM Performance Parts. Yes, 480 hp. The Miata that's getting this is going to have more than 50% more power than our little MG. Yowza.
entry 100 - tags: engine | | | 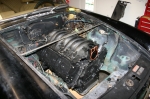 | December 10, 2008 - The intake is here!
The ruler test shows that it doesn't really fit under the hood - but the hood isn't flat. Still, I'm hoping to get the engine a bit further down and back. I really need to borrow a transmission to try it for clearance. I think what I'll end up doing will be to strip the interior, cut out most of the tunnel and then rebuild to clear the trans.
entry 102 - tags: engine, fitment | | | 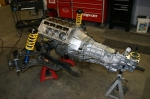 | December 10, 2008 - And here's what is going inside.
I walked into the shop at work and found this behemoth sitting on the floor. I have to say, it's very handy doing this swap at home while there are two LS3 Miatas being built at work as well as a completed LS1 Miata that's undergoing constant development. That's the drivetrain from the LS1 car, removed to get new heads and a cam.
It's a pretty close match to what I'm going to use. The subframe is the tubular version of a Miata subframe, with the same control arms and steering rack. It looks as if my engine positioning will be a bit further back than this one, which helps a bit for rack clearance, oil pan clearance and weight distribution.
It sure makes the transmission look huge!
entry 104 - tags: engine, subframe, transmission, fitment | | | 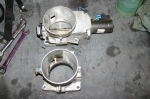 | December 31, 2008 - On a different note, here's a peek at the difference between a Corvette throttle body and a stripped-out Camaro one.
The Corvette (top) uses drive-by-wire and is significantly larger.
entry 112 - tags: engine | | | 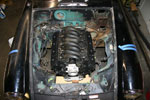 | January 3, 2009 - With the frame rails out of the way, we did an engine test fit.
It's the first time I've dropped the engine in with a throttle body. And this is pretty much the correct location for it. I just need to check my driveshaft angle and I think it'll move back approximately an inch, but everything works well. The shifter comes out in the stock position and most of the engine is behind the wheel line - marked here with blue tape.
entry 128 - tags: engine, fitment | | | 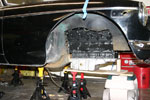 | January 3, 2009 - Here's a view of the engine height.
At my planned ride height, I'll have about 5" of air under the bottom of the pan. It's only going to protrude about 3/4" below the stock frame rails. More importantly, I'll also have it nicely protected. And you can't see it in this picture, but the hood is on and latched!
It'll fit without body modifications!
entry 129 - tags: engine, fitment | | | 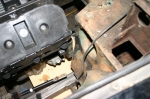 | February 1, 2009 - The plastic engine is back in the car.
I clamped a piece of plywood to the bottom of the framerails to ensure the bottom of the engine will not protrude below. And it's looking pretty good. It needs to come back 1.5" from the current position to put the shifter in the correct location, which will place the right head almost up against the leading edge of the footwell. I can make a little more room there if need be.
On the driver's side, the head sits slightly forward so there's more clearance there. But it does hit this protrusion at the bottom of the footwell. A bit of poking around revealed an odd thing - there's a significant amount of footwell in front of the gas pedal at WOT. Space you simply can't use. Is it left over from RHD versions of the car? That useless space is exactly where I need more room in the engine bay, so this is working out nicely. So nicely, in fact, that it appears very little work will be needed to stuff this giant drivetrain in place. Work beyond rebuilding the frame from the firewall forward, of course. But passenger compartment intrusion will be minimized. Amazing.
entry 165 - tags: footwell, clearance, engine | | | 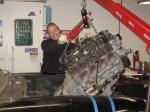 | December 31, 2009 - Because I was tired of wiring, and the engine was sitting right beside the car, I decided it was time to stick it in!
Janel came to help, as there's no way I could have done this myself. The MG is sitting sideways across the end of the garage, so first we had to carefully sneak the suspended engine and transmission around the front of the car, then push the crane sideways to feed the engine into the chassis.
It was a bit of a tight fit. Pulling the complete shifter out would have helped, but with some careful tilt/move/tilt/move we were able to wiggle the engine in to place. Well, almost.
Janel likes to be around for the big dramatic moments. Almost exactly a year ago, she was helping me hollow out the engine bay and pull the dash.
entry 240 - tags: Janel, engine, installation | | | 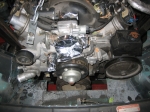 | December 31, 2009 - Here's why I knew I needed to fit the real engine instead of just my plastic one.
The pulleys and water lines and accessories make things more complex. And it became apparent pretty quickly that I needed to open up the front of the engine bay a bit more. Time to chop a bit more off the car!
entry 241 - tags: engine, destruction, first fitment | | | 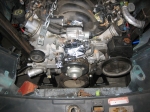 | December 31, 2009 - Voila!
A minute with Mr. Sawzall and the offending parts are removed. I have some structure to put back in to ensure the bumpers don't fall off the car, but the engine slipped in to place.
I also had to open up the hole in the interior for the shifter. It's in the perfect place, but the Hurst shifter on our T56 is a bit larger in diameter than the hole.
entry 242 - tags: engine, destruction, first fitment | | | 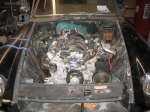 | December 31, 2009 - And voila!
The engine is installed. Not for the final time, as I'm going to have to pull it to finish welding up the frame and some other bits. There's also a cross piece in the transmission tunnel that wants to be just a little bit smaller - I've cut it once, but not quite enough. That will let the whole drivetrain level out.
It's a tight fit in spots. The distance between the oil pan and the steering rack is minuscule. The transmission tunnel is shrink-wrapped around the trans. And I'm really not sure how to fit the exhaust - even coming out the fender wells is going to be tight, I'll have to make sure there's enough clearance for the tires. The oil filler looks like it's making a bit of contact with one of the stiffening ribs in the hood. But these problems can be overcome!
But there it is - a complete LS1/T56 in a 1972 MGB.
entry 244 - tags: fitment, first fitment, engine, transmission, destruction | | | 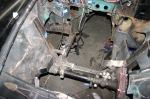 | July 20, 2010 - Welding time!
I've started to panel the engine bay. This will increase the rigidity of the front end, which is my primary goal. You can see the right front corner (on the left in this picture) is done, including some special bulges to clear the control arm. The left rear is also done, leaving a large hole for the headers to pass through. I could make this hole smaller, but then I'd only be able to remove the headers when the engine is out of the car. I can see that particular problem coming back to bite me! For a bit of extra strength, there's also a 1" square tube along the top of the left rear plate.
You can also see the unusually shaped motor mounts, including the one that has to reach over the steering column. Or at least, you could if I'd managed to take the picture in focus.
The engine bay looks pretty awful right now with all the different colors. I also have to admit that some of the welding to the original sheetmetal is not well done. But it'll be strong enough, and a bit of time with the grinder, some seam sealer and a POR-15 paintbrush will make it all look good. First, I have to finish some more patching and a bit more bracing.
entry 356 - tags: engine bay, sheetmetal | | | 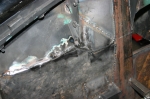 | August 12, 2010 - All of the seams on the cockpit will be sealed with seam sealer to ensure they're air/water tight.
Some of the others in the engine bay - like this one - will simply get ground down before paint. Not all of them need to be, but the ugly ones do. The only piece of stock sheetmetal in this picture is the bit at the upper left with the leftover Aqua paint on it and a little bit at the upper right!
entry 361 - tags: fabrication, engine bay | | | August 16, 2010 - So, I had to wash the Bonneville salt off the M5.
Janel and I went to Speed Week this past weekend. How cool is that? Anyhow, I took the opportunity to roll the LS1/T56 combo outside to clean it off as well. First, I pulled the coils off so I could get to the valve covers underneath. Then hosed the whole thing down with some degreaser and hit it with the hose.
Nothing too exciting, really. But the engine looks goooood!
entry 363 - tags: engine | | | 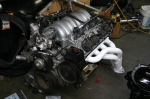 | August 19, 2010 - I've also been playing with the engine.
The most obvious is the new white headers. They were starting to pick up some surface rust sitting around the garage, so I grabbed a can of high temperature header paint to give them a nice coat. Black would have hidden the welding better, but I'm a sucker for white headers as followers of the Targa Miata know. I think they look awesome. Why paint and not ceramic? Because that's expensive and I've had pretty good luck with this paint. It'll do for now.
I also swapped the original Camaro intake manifold for my Corvette one. This isn't due to any sort of performance increase, but because I painted it to look like aluminum! Of course, it's not completely convincing. But it's a nice change from the usual black plastic and I think it'll look even better as it ages - ie, gets a little bit of dirt on it.
The Corvette manifold does have two differences, though. First, it doesn't have a hole for an EGR fitting, so I won't need to plug that. Good. Secondly, it doesn't have threaded holes for the throttle cable due to the drive-by-wire Corvette. Umm, bad. I'll fix that.
With the dressed engine sitting beside the painted rear axle and with the car freshly painted up, things are looking really nice!
entry 366 - tags: engine, paint | | | 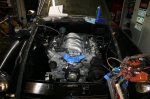 | August 29, 2010 - The next big step - a really big one.
The engine is now installed, hopefully to stay! Janel came in to help me wrestle the big beast into place and it was one of those situations where it looked like there was no way it was going to work - until it just slipped into place.
Now feel like I can really make some serious progress. Anything I do from now on stays done! Exciting? Oh yes.
entry 374 - tags: engine | | | October 7, 2010 - It's aliiiiiive!
After reprogramming the computer - which took about 5 minutes, using software I'd never seen before - I ran upstairs and told Janel I had a surprise for her. She didn't know how close the car was to starting. I jumped in the car and hit the key. It cranked for a few seconds, then a few seconds more. But it was trying. So I tried again and VAROOOOOOOOOM! Lots of noise, lots of revs, and a running engine.
I caught it all on video. It's a cinematic masterpiece, with expository dialogue, a build-up of tension and then a big climax followed by a happy denouement. In case you're wondering, I was talking to Janel who is standing at a safe distance behind the camera, taking refuge behind the Mini.
Watch it!
It wasn't completely successful. The first few times it didn't want to stay running more than a couple of seconds. It eventually settled down and kept running, but at a 2500 rpm idle. Since the main goal was to simply get it to work, I declared that enough. Even just a few seconds of running was enough to get the paint on the headers to bake in and release a nice cloud of smoke. I'll spend some more time cleaning up the wiring and hunting for vacuum leaks. Maybe this weekend I'll let it run for a bit longer to see if the engine speed will settle down as the computer re-learns this engine. The change in behavior from the first start to the fourth was notable.
First I need to blow the smoke out of the garage. Whew!
entry 405 - tags: first start, engine, video | | | October 12, 2010 - More progress.
A quick test with a smoke machine uncovered a vacuum port on the back of the intake manifold, underneath the MAP sensor. Almost impossible to see, and now capped. With that done, the idle quickly settled down under 1000 rpm and was continuing to improve when I shut things down. So it's looking as if the engine is a happy bunny.
I found an error in the wiring diagram I'm using. The engine computer is supposed to have a constant 12v feed to store all the various internal settings. According to the diagram, that feed was switched power so it only turned on with the key. Every time the computer loses power, it needs to relearn various settings such as the idle - so this would have been an annoying problem. Fixed now!
I'm working on related wiring now. The coolant gauge is hooked up, but the engine hasn't been hot enough to test it yet. I'm working on the tach now.
I also picked up all the pieces I need to complete the braking system. At least, I think I have all the pieces now. I'll start working on that soon, as it's the biggest step preventing me from actually driving the car. Ooooo!
entry 406 - tags: brakes, wiring, engine | | | 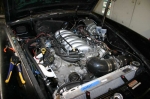 | November 15, 2010 - Here's the current state of the engine bay.
Still some way to go on wiring, but I'm waiting until all the wires are run before covering them up. I'm not sure how to handle the big junction by the fuse boxes, between the MG bullet connectors and the sheer number of wires it's a pretty big bundle. I'm tempted to just build a box to sit over top of it all and hide it from view! Until the car is fully debugged, I'll probably just leave it exposed and ugly.
Currently, I'm in the middle of setting up some relays for the future cooling fans. And in case you're wondering, the note on the rad says "Hook up heater controls" - a reminder to do it when the rad comes out.
entry 454 - tags: engine bay, wiring | | |
|

 THE DIARY