| LIFE OF A GT |
|
|
 | |  | December 8, 2008 - Here's a new T56 to go with that LS3.
It's the same transmission as is in our Camaro donor, so I'll be using it for measurements.
entry 101 - tags: transmission | | | 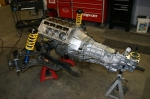 | December 10, 2008 - And here's what is going inside.
I walked into the shop at work and found this behemoth sitting on the floor. I have to say, it's very handy doing this swap at home while there are two LS3 Miatas being built at work as well as a completed LS1 Miata that's undergoing constant development. That's the drivetrain from the LS1 car, removed to get new heads and a cam.
It's a pretty close match to what I'm going to use. The subframe is the tubular version of a Miata subframe, with the same control arms and steering rack. It looks as if my engine positioning will be a bit further back than this one, which helps a bit for rack clearance, oil pan clearance and weight distribution.
It sure makes the transmission look huge!
entry 104 - tags: engine, subframe, transmission, fitment | | | 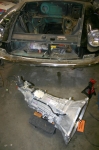 | February 1, 2009 - I borrowed a T56 for some test fitting.
It's a brand new shiny one that should be identical to mine other than the aftermarket shifter. Oh, and a decade of grime! I'm keeping the Camaro together as long as possible.
It's a big boy and weighs about 140 lbs. Quite a contrast from the stock unit, and I'm a bit concerned about fit. But I have a welder!
entry 163 - tags: transmission, Camaro | | | 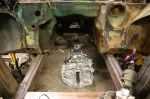 | February 1, 2009 - Here's the transmission sitting in the correct location.
Correct in two dimensions, anyhow. I pulled the bellhousing off because it's much easier to bolt that part to the engine for clearance testing.
Some quick tape measure work tells me that the T56 should fit much, much better than I'd feared. I haven't lifted it up into the car yet (I need to work out a stable way to support it while being able to lift and move it around), but it appears that it should fit into the stock tunnel as if the car was shrinkwrapped around it. Amazing. There's even a crossmember that I think is in the perfect place to support the rear.
entry 164 - tags: transmission, fitment | | |  | February 2, 2009 - After a bit of finagling, the transmission is in place.
Sort of. It's sitting about 1" to 1.5" too low and pressed up against the top of the transmission tunnel. Some more surgery may be required - but the fact that I'm this close without making any modifications is astounding. There's one doodad just below the shifter (pardon the technical terminology) that will require a small hammered dent in the tunnel to allow the shifter to be centered in the hole.
However, a test fit of the hood with the engine in place tells me that I'm either going to have to modify the hood or lower the engine. I've been testing the fit with the oil pan level with the frame rails, 5" off the ground. Possibly more, actually, when I review my notes. They show the rails at 5.75" high, although I think that was with the original wheel size. Regardless, I have lots of clearance. I'm tempted to drop the whole thing by 1" to improve clearances everywhere. I'd put a crossmember in front of the pan to protect it. A quick check with a tape measure shows 4" of clearance on one of the Miatas in the garage, so 4" is certainly streetable.
entry 169 - tags: fitment, transmission | | | 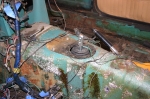 | February 2, 2009 - Here's the current shifter location.
It's offset slightly to one side due to the aforementioned doodad but the longitudinal placement is pretty much perfect.
entry 170 - tags: transmission, fitment | | | 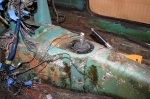 | February 6, 2009 - And here's the final shifter location.
Looks perfect. You can see the square hole I had to cut in the top of the transmission tunnel to make space for the trans - the tunnel has a low point while the transmission does not. Sorry, make that the tunnel had a low point...
The "doodad" I mentioned before is a reverse lockout solenoid. Above 5 mph, the solenoid prevents you from hitting reverse. There's some logic to that, but it's a hassle for me. It could easily be removed completely but given the tight shift pattern of a T56, that's not the most intelligent solution.
On Elvis, we pulled the solenoid out and tweaked the spring tension in the lockout. This negated the need to run wires to the solenoid, but it still left things a bit on the bulky side for me. I'm going to see if I can manage to design a replacement that fits flush to the side of the transmission. It looks plausible.
entry 172 - tags: transmission, fitment, reverse | | |  | February 17, 2009 - Not much work on the car of late.
I'm thinking that I want the full engine with all accessories before I go any further with motor mounts and the like, and that means I need to kill the Camaro. So I'm starting by making storage arrangements for at least one car while I do the work, to ensure I have space in the garage. I may shift my attention to the rear of the car first and get that sorted out, simply to postpone the chaos.
In other news, I brought an LS1 Miata home last night. No, I don't get to keep it! It's been fitted with a big nasty cam and makes a really fun noise. As an added bonus, it also has north of 400 hp. Janel got all giggly when she fired it up in the garage. Too bad we're still breaking in the rear end, so I can't unleash the hounds on this thing. Yes, this requires some self-control.
But I did learn something. It has a modified reverse lockout. The solenoid has been disabled and a different spring inserted. Even when being careful, I bounced off reverse twice while aiming for 5th. Most times I hit the desired gear just fine, but I wasn't too excited about it. So the plan is now to retain the reverse lockout in fully functional form. I'll just have to reshape the transmission tunnel. It's hammer time!
entry 174 - tags: transmission, Miata, Camaro | | | 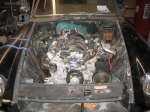 | December 31, 2009 - And voila!
The engine is installed. Not for the final time, as I'm going to have to pull it to finish welding up the frame and some other bits. There's also a cross piece in the transmission tunnel that wants to be just a little bit smaller - I've cut it once, but not quite enough. That will let the whole drivetrain level out.
It's a tight fit in spots. The distance between the oil pan and the steering rack is minuscule. The transmission tunnel is shrink-wrapped around the trans. And I'm really not sure how to fit the exhaust - even coming out the fender wells is going to be tight, I'll have to make sure there's enough clearance for the tires. The oil filler looks like it's making a bit of contact with one of the stiffening ribs in the hood. But these problems can be overcome!
But there it is - a complete LS1/T56 in a 1972 MGB.
entry 244 - tags: fitment, first fitment, engine, transmission, destruction | | |  | January 20, 2010 - The transmission crossmember is finished.
Finally! It's upside down in the picture, in the car it steps up to reach the stock LS1 transmission mount. The bits on the end bolt in to captive nuts installed on the frame rails. Of course, I didn't have that set up ahead of time so I first had to weld the nuts on to a piece of 1x2" strap, cut two large 0.875" holes in each frame rail and then weld the strap on to the rails. The holes in the strap and the bracket are perfectly matched to the bolt size so there's no slop at all, which made positioning very important. I put the bolts in shear instead of tension for the simple reason that if they start to back off, my transmission won't start to sag downwards and eventually fall down.
The stud on the rubber bushing on the transmission is an inch long, which isn't long enough to protrude all the way through my mount. Thus the large hole in the middle, which is where the nut for the stud goes through along with a socket to tighten it up. Works like a charm, although I really need to deburr that hole to make it look better in pictures like this.
The raised middle section didn't end up being raised quite enough - the original measurements told me 0.75", and it looks as if 1.25" would have been more accurate after I decided the tail of the transmission needed to be slightly higher. Oh well, it's a good solid fit and it works well. Due to the close tolerances on the holes, it's actually a bit tough to install as the bolts won't thread into the holes unless the mount is perfectly positioned, but I'm willing to accept that particular tradeoff for a precise fit.
entry 257 - tags: transmission | | | 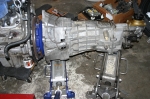 | August 29, 2010 - It's almost time to put the engine in.
But first, I need to get at the slave cylinder. See, the Camaro uses a sealed hydraulic system and I need to mate it to the MG (or a different) master cylinder. It's also hard to bleed the system with the transmission mounted in a small car, or at least that's the fear. So I used the same setup that Flyin' Miata uses in their V8 Miatas. It's a new braided line with a banjo fitting on the end and a second long hose with a cap on it, used for bleeding. Easy enough - but I had to split the engine and transmission to do it.
The T56 transmission is a heavy beast, about 140 lbs. So I used a pair of jacks to hold it level as I pulled it free from the engine. And here's the first surprise - a Spec clutch. Normally, the smart thing to do when you've got your engine and transmission cracked apart is to put in a new clutch, but this one felt pretty good in the Camaro. So it's going to stay.
I thought there had been a change in slave cylinder designs, so I had a new one of the latest design ready to pop in. Well, turns out this car had the same design. It may have dated from the installation of the Spec clutch (remember, this engine was rebuilt about 30,000 miles ago) but whatever the reason, I may not have needed that new slave. Oh well, in it goes.
With the two-jack technique, the transmission slipped right on to the engine smooth as silk. It's never that easy. Which means something must have gone wrong.
entry 372 - tags: transmission, clutch, slave, hydraulics | | | 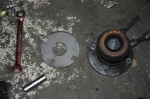 | August 29, 2010 - Of course there was a problem.
After I had the transmission all tightened down, I picked up the old slave cylinder and turned it over - and discovered this spacer hiding underneath. It's laser-cut steel, definitely not stock. It was probably installed with the clutch. Since the Camaro worked, it's also probably required as the old and new slaves are the same part number. So I had to pull the transmission out again. At least I was just working with an engine sitting on the floor!
Naturally, I ran into other problems. I pulled the slave off, installed the spacer and went to bolt it up again. And stripped out a thread on the aluminum transmission casing. With the spacer in place, there was less thread engagement. I ran a tap down the hole and dug through my collection of fasteners until I found a bolt that was long enough to make up the difference of the spacer. That worked fine, so then it was just a matter of reassembly. Sheesh.
Let's hope this all works!
entry 373 - tags: transmission, hydraulics, clutch | | |  | November 11, 2010 - The T56 transmission has a lockout on reverse.
It's triggered by the ECU, and locks out reverse anytime you're above 5 mph. Pretty smart - I've driven cars with the same lockout triggered by the brake lights, and that works fairly well until you try to downshift from 6th to 5th while braking, and get reverse instead.
The problem is that the solenoid is pretty big. It wouldn't fit in the transmission tunnel. Instead of modifying the tunnel, I decided to leave the solenoid off and then build an access panel in the side of the tunnel so it can be installed once the transmission is in situ. I also need to put a small bulge in the panel to clear the solenoid, but not too big. I'm almost done that now.
entry 444 - tags: reverse, transmission, fitment | | | 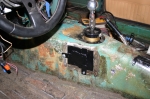 | November 13, 2010 - The access panel for the reverse solenoid lock-out is in place.
It sure doesn't look pretty, especially in shiny black paint trying to make the welds look a boogery as possible, but it does the job. The idea was to 1) make it removable for future transmission removal or solenoid access and 2) add a bulge to allow the solenoid to clear the tunnel. It'll be covered by carpet eventually so it'll never be seen again, and I sealed the gap around the edges. So, not an easy thing to remove. But it can be removed.
The solenoid seems to be working. The spring inside certainly adds to the effort of hitting reverse, and as far as I can tell it's locking out reverse completely above 5 mph. I'll test it further once I'm on the road.
entry 449 - tags: reverse, transmission, fitment | | |
|

 THE DIARY