| THE MG |
|
|
 | | 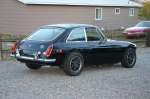 | November 15, 2010 - With the video of the first drive getting attention, I'm fielding a few questions about the car.
The most common is about the wide track and the suspension choices, typically with people pointing out that I could have used a bolt-in setup from Fast Cars. I did actually use a rear end similar to their design. But here's a recap of the thinking, all gathered together in one place. This is taken from an email I sent to someone.
About the BGT's suspension - I decided to go with Miata suspension on
the car, in large part because it's a setup I understand very well
given my history. I also have a large collection of spare parts, and
this makes it much easier to keep a fleet of cars happy. Being able to
swap brakes between the Lotus replica and the MG came in handy just
last week as I borrowed some parts off the Lotus to get the MG
driveable. It's also much less expensive than buying one of the
coilover setups on the market for the B, and allowed me to toss the
stock subframe and other bits. As an unplanned side effect, I also
saved quite a bit of weight.
So, going with the Miata front suspension meant I had a wider front
track. I could have narrowed it, but then I would have messed up those
beautifully controlled roll centers that I think are a major
contribution to the Miata's handling.
Now I needed a wider rear track to match. I seriously considered going
with a Miata rear end, which is a nicely packaged independent. I've
seen photos of a BGT with this rear end installed, but there were a
couple of problems. The first is the amount of sheer destruction
required to the rear of the car to make it fit. Secondly, the rear end
wasn't strong enough to deal with the assault from the V8, so I would
have had to modify it for a different differential. That's not a major
problem but it was an additional expense. By mixing the appropriate GM
parts, I was able to use the differential from the Camaro and a
standard-length axle housing to make the best use of what I had. If
the live rear doesn't work out, I'll change it over to a Miata rear
eventually, but I'm pretty happy with the overall engineering of what
I have. The car is stronger for it.
entry 451 - tags: suspension | | | 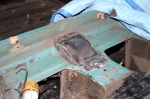 | November 15, 2010 - The top of the diff disagrees with the bottom of the car at full suspension compression.
It's due to the extra bracket on top. So I made a little house for it. I haven't checked to see how the rear seat will sit on top of this, some further creativity may be required.
entry 452 - tags: clearance, rear axle | | | 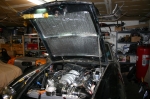 | November 15, 2010 - With the hood mounted, I found myself staring at a really ugly combination of peeling black paint and old Aqua.
So it had to go. A bit of Reflectix heat shielding and some foam tape and voila! All shiny and pretty. It does a nice job of distributing the light into the engine bay as well.
Reflectix is heatshielding and likely won't have much effect on noise, but it's what I had around the shop and it's cheap and basically weightless. I'll be putting down some heavier stuff inside the cabin and I might put some under the hood as well. We'll see.
entry 453 - tags: heat, pretty, hood | | | 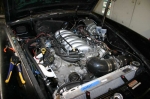 | November 15, 2010 - Here's the current state of the engine bay.
Still some way to go on wiring, but I'm waiting until all the wires are run before covering them up. I'm not sure how to handle the big junction by the fuse boxes, between the MG bullet connectors and the sheer number of wires it's a pretty big bundle. I'm tempted to just build a box to sit over top of it all and hide it from view! Until the car is fully debugged, I'll probably just leave it exposed and ugly.
Currently, I'm in the middle of setting up some relays for the future cooling fans. And in case you're wondering, the note on the rad says "Hook up heater controls" - a reminder to do it when the rad comes out.
entry 454 - tags: engine bay, wiring | | | 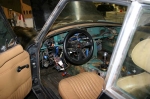 | November 15, 2010 - The interior needs a bit of work still.
Again, lots of dangling wiring. I need to finish swapping over from the MG column switches to the Miata ones which will clear up that particular snarl nicely. I think the tach zip-tied in to the base of the windshield is a nice touch though.
One thing to check off the to do list: brakes. Janel helped me bleed them this morning and the pedal is nice and firm. Just the way it's supposed to be. I do have to remember to bed the pads though, it's easy to forget that when months pass between installation and driving.
entry 455 - tags: interior, brakes | | | 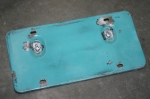 | November 18, 2010 - I stuck the license plate bracket in the bead blaster to clean it up and let me tack-weld those screws in place.
Much to my surprise, all the black paint came right off with minimal damage to the Aqua underneath. This is the biggest section of this paint I've found. That's quite a color!
Why was I messing around with the plate bracket? Because I have a set of plates to put on the car! It's legal! Insurance was handled through Hagerty for an amazingly low price - that's the benefit of driving a classic that doesn't get used for commuting. And yes, they know exactly what the car is. With insurance, plates were simple as there is no safety or emissions inspection in this area. It was just a matter of paperwork. I did get the unpleasant surprise of finding that Colorado now charges a "late fee" if you dare leave a car unregistered after the ownership is transferred. It doesn't matter if the car's been in the garage for two years. California does the exact same thing, and I had to go to quite a bit of work to wrest the title for this car from them without having to pay $600 or so in fees. Well, Colorado took a smaller bite but it still stings. I'll be doing things differently in the future, and Colorado will make less money as a result.
But never mind that - the car has tags!
entry 456 - tags: license plates, aqua | | | 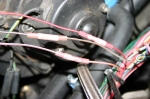 | November 18, 2010 - I'm still working my way through the wiring.
Not quickly, just a circuit or two at a time. The final MG circuit got power yesterday - horns and interior lights. The car has a most hilarious BOOOOP! horn from the factory. It should have two, but one has not yet come to the party.
One of the big debates in automotive aftermarket circles is "solder versus crimp". Solder advocates say that crimps are failure-prone and difficult to do well. Crimp advocates claim that solder joints are likely to crack and fail. Personally, I'm in the latter camp - a good crimp joint works better than a solder joint in the high-vibration environment of a car. It's telling that there are no solder joints in a factory wiring harness, for example.
But the crimps need to be done well. I use good-quality crimp connectors with a heat-shrink sleeve over top. The heat-shrink not only waterproofs the connection but also provides mechanical support for the wire so there's no way for it to vibrate and crack. The crimping tool itself is a ratcheting one with interchangeable jaws. It's a bit harder to find than the usual cheap-and-nasty variety, but you can often find them for $20-40. The ratcheting action prevents the tool from releasing until the correct squeeze has been put on the terminals - most people don't crimp them hard enough.
entry 457 - tags: electrical | | | 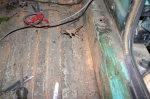 | November 18, 2010 - Work continues.
I'm going to fix up the slight bit of rust on the passenger's floor - these two sections will be trimmed out and replaced.
Meanwhile, the radiator has been pulled out. The new one will be ready today and I'll start working on modifying the bracket at the front of the car.
entry 458 - tags: cooling, rust | | | 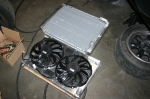 | November 22, 2010 - Here's the new radiator along with the old one.
The size difference is even more dramatic in person. The fan shroud is a really nice piece, it's laser-cut aluminum built specifically for this radiator. The fans are two fairly high-flow SPAL units with high-torque motors to help them pull against a restriction like multiple heat exchangers. Not a problem here, but most "low profile" fans will fall off dramatically even when asked to deal with just a single radiator.
The rad itself is the same basic design as the other one, but with a more efficient core. Based on testing at Flyin' Miata, it should actually outperform the big guy.
This is all off-the-shelf stuff designed for LS-powered Miatas by Flyin' Miata.
entry 459 - tags: cooling | | | 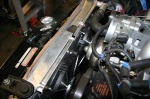 | November 22, 2010 - Test fit of the new rad.
The fan shroud comes with two sets of 1/4" spacers. Ideally, you want the shroud as far from the radiator core as possible while still being sealed. In this picture, here's the amount of room left with none of the spacers installed. The nose of the water pump sits nicely between the two fans, maximizing the amount of room available. Nice. I'd love to say it was cleverly planned, but really it's just a happy coincidence.
The shroud still fits well with one 1/4" spacer, but two makes it basically impossible to install. Still, it should work quite nicely.
entry 460 - tags: cooling | | | 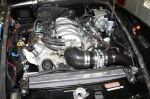 | November 22, 2010 - The fully installed radiator.
The lower support was moved a bit more than 2" for more curb clearance and to match the lower edge of the stock front valence. The fan shroud has been fully installed with gasket material around the edge, forcing every single molecule of air to go through the radiator. The upper brackets holding the rad in place are ones from a 1999 Miata and they look nice and factory. I even put a couple of brackets on the top of the shroud to guide the steam fitting hose nicely around the intake.
I'm really happy with how this turned out, it looks really good. Now I just have to sort out the lower radiator hose now that the outlet has moved up by a couple of inches...
entry 461 - tags: cooling | | | 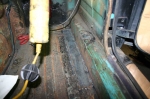 | November 22, 2010 - It hasn't been all radiator work here over the past few days.
I also repaired the floor. First, I cut out the rotten section including one small patch on the sill. A patch (of fairly thick gauge) was welded in. Nice and solid, ready for another 40 years.
entry 462 - tags: rust | | | 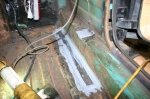 | November 22, 2010 - Next step: seam sealer.
Makes for a nice smooth finish and protects against pinholes.
entry 463 - tags: rust | | | 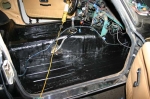 | November 22, 2010 - The final step: POR-15 rust paint.
As you can see, I didn't just paint the new patches. I also painted the new radiator support and the entire interior up to the top of the transmission tunnel. My friend Eric and I used to joke about a POR-15 dipping vat, and this looks pretty close! That sheetmetal should be nicely protected against future corrosion now.
Looks pretty good, actually.
entry 464 - tags: rust, paint, POR-15 | | | 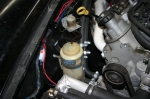 | November 23, 2010 - This little thing makes me smile.
It's the windshield washer bottle and pump. It's just so cute! I managed to mount them in almost exactly the same place as the original MG location. It's a really nice fit.
Good thing MGs have small windshields. That bottle is pretty small!
entry 465 - tags: windshield | | | 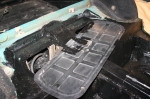 | November 23, 2010 - Lots of miscellaneous work on the car so far today.
I welded in a dead pedal to make life a little more comfortable and to aid in driver retention under enthusiastic conditions. The battery box cover that goes under the rear seat got modified to clear the new bump for the rear axle - that's it in the picture, showing shiny wet paint on the new section. I also removed the parking brake cables for the time being so I can spend more time scratching my head on how to make it work, and built a tie-down for the battery.
Lots of small jobs, most of them rewarding and all leading towards a car that can be used for more than idling up and down the block!
entry 466 - tags: packaging, battery, ergonomics | | | 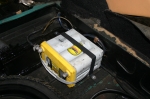 | November 23, 2010 - Here's the battery all done.
The nice thing about Optima batteries is that you can flop them on their side without any problem. Makes for some easy packaging. In this case, it's just behind the passenger wheel for good weight distribution. The steel strap over the battery holds it in place really well, it's not going anywhere.
entry 467 - tags: battery | | | 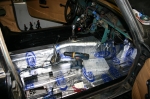 | November 23, 2010 - A new look for the interior!
That's heat and sound insulation to make the cockpit more livable. There are big fat exhaust pipes running under the car, a loud and hot powerplant underhood - and I want this car to be a good cruiser. This should help quite a bit. I've used one roll of the insulation now, and that added 6.5 lbs to the car. I'll probably use two more for a total weight penalty of just under 20 lbs. I can live with that.
entry 468 - tags: heat | | | 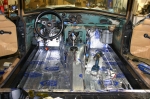 | November 24, 2010 - The final heat shielding.
There are two 36"x60" packages of Cool-It in the car now. I'm going to pick up one more to cover everything behind the rear bulkhead - under the rear seat and in the rear cargo area. It sure looks pretty. And bright!
entry 469 - tags: heat | | | 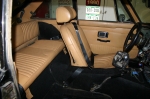 | November 24, 2010 - A couple of hours later, here's the interior!
Okay, I got a bit carried away, but it wasn't really that much work. I've only installed the biggest pieces of carpet - there's a puzzle of oddly shaped carpet pieces that are supposed to go in the footwell, but I reshaped the footwells enough that they probably won't fit anyhow.
Happily, the carpet over the transmission tunnel fit. A year ago, I welded a brace on top of the tunnel and I was afraid it was going cause problems with my carpet. I had to relocate the holes for the seatbelt mounts, but there was enough extra carpet that it worked.
Ah, seatbelts! You can see the driver's belt in place here. They're a non-retractable design from Beams, picked up from JC Whitney. I didn't like the retractable designs available and this are more like the original belts in the car. It'll be a bit more of a hassle to adjust on a regular basis. Considering that I have two cars with race harnesses, they're not too bad!
entry 470 - tags: seatbelts, interior, carpet | | |
|

 THE DIARY