| THE MG |
|
|
 | | 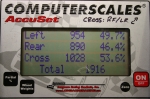 | January 31, 2010 - Here's the big surprise.
1916 lbs. Wow!
My estimate of 2500-2600 lbs for the finished product was based on a published curb weight of the GT of 2401 lbs. If you stuff one of these engines into a Miata, it gains right around 200 lbs with the sort of accessories I'm using. I know the stock MG engine is a hefty one, so I was hoping I might gain a bit less weight than that. But this number is a bit shocking.
So how was I so far off? This is for a car with no cooling system, exhaust, no fluids at all and no interior. It does include the 26 lb box of Camaro wiring that I pulled out of the donor, however, so there may not be a lot to gain with that. Fluids will add around 100 lbs to the car, figuring 10 gallons of gas plus coolant and others - although the engine does have oil. The Optima battery I'm going to use is another 27 lbs. The interior on an MG isn't that heavy and I actually had a Miata seat stuck in the car but it's probably fair to assume there's a hundred pounds to come there. The front bumper is also off the car and there's no spare. All relatively small things, but it adds up.
Still, I may have saved weight somewhere. It could be that my new front end is lighter than stock. Possibly even the rear. The Miata wheels are definitely lighter than the stock MG ones and I remember the front spindles and brakes being painfully heavy.
Should I change my expected final weight? I think I'll drop it down to about 2400 lbs. There could very well be 500 lbs of bits and pieces left to install. But wow. Simply adding the fuel and battery will bring to car to almost 50:50 weight distribution as well.
I'm starting to look at the car with a bit more respect. At 2400 lbs, it'll end up lighter than Elvis, the LS1 Miata I've had the chance to hustle around the track. And that is one fast car.
entry 272 - tags: weight | | | 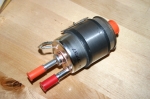 | February 5, 2010 - I'm still finishing up the garage rework and proof-reading the book manuscript again, so no progress on the car.
Seeing it sitting there on its wheels with an engine inside has me pretty inspired, and I cannot wait to dive back in. So I've been planning.
One of the things I need to do when converting from a 80 hp carbureted engine to a 350 hp fuel injected one is make a few changes to the fuel system. I have a good external Pierburg pump to use, that's good. But the LS1 is set up for a fixed pressure returnless system. Here's the answer - a Corvette fuel filter. It has a regulator built into it, so I just pump fuel in one end and it gives me the return line to go back to the tank as well as the feed for the engine. I'll mount it in the rear of the car by the pump. No adjustments do make, either. Just bolt it in and I'm good to go. I also picked up some 3/8" fuel line to feed the beast, I'll spend some time trying to figure out how to run it up the length of the car.
entry 273 - tags: fuel | | | February 8, 2010 - I've been looking at muffler and exhaust options as part of my push to sort out the basic packaging.
Essentially, should I run two small mufflers or one medium size one? The goal is to get the car as quiet as possible, as I want this to be a cruiser. If it costs a few horsepower, that's acceptable. The dual pipes (say, 2.5") are easier to package than a single 3" one.
It's not an easy answer. The problem is the fuel tank. It's offset to one side, so to run twin mufflers I'd have to move it sideways. That's not a big deal, but even with that I'd still need some pretty narrow cans. For the single muffler, I'd be looking at a can of approximately 5 x 10 x 17 at most. Luckily, this is a pretty common size range, and I can choose from Flowmaster (excellent website, not a lot of positive comments on the sound from some people), Dynomax (many recommendations for the Super Turbo), Magnaflow (I have one on the Seven, it's so loud it's a running joke locally) and Hooker Aero Chamber.
Based on the recommendations, I think it's down to a competition between the Super Turbo and the Aero Chamber. The fact that the Hooker doesn't have any packing but relies on internal baffling is a bonus for long life. The good thing is that neither one is terribly expensive so I can experiment if I have to. I'd still prefer a pair as part of a dual exhaust, but I just don't think I can make it fit.
Fun stuff, though.
entry 274 - tags: exhaust, packaging | | | February 8, 2010 - As part of a muffler discussion on the Grassroots forum, a fellow reader pointed me to a very similar car under construction.
Well, similar in concept. It's an MGB GT that's getting the LS1 from a 1998 Camaro based on the pictures. But it's a very different process. First step was to strip the car out completely and bead blast it clean, with pretty much all body panels removed. Between this and his rotisserie, he's got an excellent base for doing nice clean chassis modifications and he's doing a good job of making the car as strong as it should be.
The engine sits much further back than mine. Since the transmission is an automatic, he's not constrained by the shifter location. Nor did he keep the stock heater box. I'm not sure how he's going to fit a gas pedal in the car with that huge transmission so far back!
The rear suspension is a four-link, a design I stayed away from due to concerns about binding. I don't know how legitimate that concern is, but there you have it. Some of his packaging is easier because of it, there's no Panhard bar and the clearance problems I had between the upper mount and the seat bottom don't exist. Having the trunk floor cut out makes life a lot easier when you're fabricating this kind of thing, that's for sure! It looks as if the front suspension is a bolt-in Fast Cars coilover setup.
We're actually at very similar stages right now. He's done a lot of work to fit absolutely monstrous wheels in the car, both in diameter and width, and they're going under the Sebring-style factory racing flares.
Interesting to watch. We're taking different approaches, but with very similar goals.
Jay's MG build
entry 275 - tags: other builds | | | 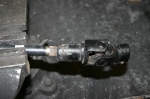 | February 9, 2010 - Time to get some work done on the car!
I started by removing the lower universal joint from the steering rack and welding it to the shaft. There simply wasn't enough room for the cross-bolt used in the original clamp design, the bolt would hit the motor mount.
entry 276 - tags: steering | | | 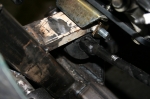 | February 9, 2010 - A peek at the clearance.
This is post-fix, before it was tighter! Installing the steering column is a bit of a pain. I had to lift the engine up, remove the rack, install the shaft on the rack, slide the whole thing back in to place and let the engine back down. I'm trying to make it easy to work on this car, but there's only so much I can do.
That motor mount bracket isn't fully welded yet. That'll happen when the engine comes out next time.
entry 277 - tags: steering, packaging | | | 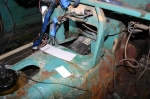 | February 9, 2010 - I also spent some time working on patch panels to cover up the exposed transmission.
I'm not going to be able to put some of them in until the trans is out, so I mostly ended up making plans and a few cardboard templates.
The tunnel is not as rusty as this shot makes it look!
entry 278 | | |  | February 9, 2010 - I wanted to do an ergonomics check, so I installed the driver's seat to see how everything was working out.
The gas pedal was held in place by a vice grip, the brake pedal return spring kept that in the appropriate place and the steering column was clamped on. The initial fit showed that the steering wheel sits very low. That's odd, given that my various collection of test wheels are all significantly smaller than the original. When I checked the MG column against the Miata one, I realized the difference was due to the bracketry on the column. With that taken into account (as seen here), the wheel was just about perfect. It needs to come a bit closer to the driver to be ideal, but that's easy.
The shifter is perfectly placed and everything feels good. I think it'll be a good driver. Don't mind the steering wheel, that's just one of the testing units. Although it's not exactly offensive.
entry 279 - tags: ergonomics, steering | | |  | February 9, 2010 - Check out my new muffler!
Some people use fibreglass or stainless steel wool for muffling, I use yogurt. This box is the same dimensions as a Dynomax Super Turbo, other than the lack of rounded edges. I crawled under the rear of the car and whaddya know, there's enough room for duals! Only barely and I have to move the gas tank over by 3", but I can do it! This is excellent, it means more power and more quiet, both good things. I'll have to figure out how to package an X pipe (and why) so there's some good learning ahead. I think I'll order a single muffler now so I can ensure the fit is good, then go ahead and move the tank.
I've also been researching fuel line parts. What a pain. I'd been hoping to avoid AN fittings but I don't think that will be possible. Our local Parker distributor has gone out of business so that makes my previous plan of using SAE flares more difficult.
entry 280 - tags: muffler, packaging, fuel | | | February 10, 2010 - I think I've sorted out how the fuel system will work.
I've ordered the always-necessary random bits and pieces. Turns out using AN fittings won't be such a problem, and this way I'll have a sexy braided fuel hose! It should come together fairly quickly when I start work. I've also ordered a muffler to confirm fitment.
I'm procrastinating. I really should be working on the metalwork around the transmission. But Janel's under the weather and asleep on the couch, so it would probably be rude to fire up the grinder, drill and Sawzall. Soon.
What I'm really trying to decide is if I should just bite the bullet and pick up a Painless wiring harness. I've wired cars from scratch before, and it's not that much fun. I've modified stock wiring harnesses, and that's possibly even less fun. It's so tempting to simply have something I can plug in with no mystery or work on my part. If it'll cut a month off the build time - that seems like a lot, but it's actually plausible especially when you consider my lack of experience with these engines - then it's probably worth it. I'm getting so lazy.
entry 281 - tags: wiring, fuel | | | 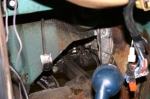 | February 13, 2010 - It's time to start putting some new sheetmetal in the transmission tunnel.
I don't particularly enjoy this part. The driver's footwell was giving me some hassles because it had an odd shape in it - a section pushed outwards. I'm pretty sure this was because the same chassis was used in RHD and LHD configurations, as it gave great footroom if the driver had been a passenger. As it was, it was useless space behind the pedals. Based on my anticipated exhaust routing, I think it'll also be a problem then. So I chopped it off.
By now, the hole has been filled with a flat plate. This makes it much easier to match my new sheetmetal to the straight edge instead of the factory bends, and I'll never miss the space behind the pedals.
entry 282 - tags: packaging, sheetmetal | | | 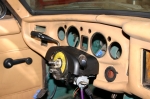 | February 14, 2010 - I wanted to see how the Miata steering column would sit with the dash.
My concern was that the location of the column would leave bare metal exposed. Well, that's not a problem. With the length of the unmodified Miata column, the standard column shroud is an almost perfect fit! I'll have to trim the bottom a bit to clear the shape of the dash, but that's easy. I'd also been worried the Miata parts wouldn't match the MG interior, but I think it's going to blend in really well.
In the picture, it looks as if it's hiding one of the gauges a bit. It doesn't look that way in person, but this is a 1999-05 shroud. I can also use from from a 1990-97 model, which is a little bit more square and might give a little more clearance.
The steering wheel will need to be a bit of a deep dish style to match the MG distances. But that's easy to do later as I fine-tune the ergonomics.
entry 283 - tags: ergonomics, steering column | | |  | February 14, 2010 - Mounting the steering column was easy enough.
I drilled out the spot welds holding the bracket to the MG column, and simply transferred it to the Miata part. It's just tack-welded here for a final test fit.
And with this, the steering column is finished. The car will sit on its wheels and can be steered. Progress is being made.
entry 284 - tags: steering column | | | 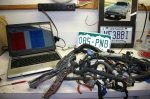 | February 16, 2010 - The folks on the LS1tech.com forum are very enthusiastic about modifying stock harnesses.
So before I dropped a big pile of cash on a Painless setup, I figured I'd give it a shot. I started by making a spreadsheet of all the wires in the ECU connectors, what they did and if they should be kept.
It turns out that even the oddball 1998 Camaro harness is very well documented. With the help of LS2.com this only took a moment. I walked through the list and put an X beside every wire I wanted. No VATS (anti-theft system), no EGR, no second O2 sensors, no fuel tank pressurization and no charcoal canister. Also, I didn't feel it necessary for the low oil signal to pass through the ECU.
All of this work was done with the Jaguar looking on, representing Lucas.
entry 285 - tags: wiring | | | 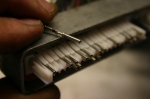 | February 16, 2010 - Nice work, GM!
The connectors for the ECU (actually, I think the term is PCM but I'm going to stick with my usual) might be huge, but after you pop off a couple of plastic covers I discovered that they're ridiculously easy to modify. Simply lift the wire terminal of choice upward a bit and lift the tap on top a bit further, then push. The wire slides right out. I used a dental pick when I was dealing with a single terminal in the middle of a bunch of others, but it's possible to do this with your bare hands.
A couple of minutes later, I had removed the wires I didn't want. If I decide to put them back later, they just push in.
entry 286 - tags: wiring | | | 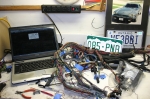 | February 16, 2010 - After all the extra wires were popped out of the connector, I started pulling them out of the harness.
I'd follow them back through the other wires to find what connector they went to. I unwrapped the harness (put together with a minimum of super-sticky tape, unlike the Miata!) and used zipties to hold it in shape.
Some connectors had other wires that were shared, typically power and ground. These were chased back to junctions with other wires and snipped off. The pink power wires will have to be taped up before I energize the harness. Gradually, the harness got simpler and simpler.
I used LT1.com (no, that's not a typo) to identify some of the wires in the various inline connectors. The "keep" wires that passed through these were typically things such as gauge information, so I pulled them out of the inline connectors, coiled them up and labelled them. I also replaced a hacked-up tach wire with one of an identical color - did the Camaro previously have a big aftermarket tach?
The Jaguar approves.
entry 287 - tags: wiring | | | 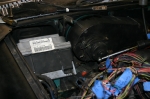 | February 16, 2010 - With the harness simplified, I laid it out over the engine.
Next I had to find a place to stash the enormous ECU. It's huge! Newer ones are smaller - but I don't have a newer one. With the removal of the AC system inside the car, there's some room above the passenger's feet. It would be hard to disguise the big modern heatsinked box though.
The MGB, like many other Little British Cars, is ambidextrous and uses the same chassis for RHD and LHD applications. There are even plates covering over the holes where the pedals would pass through the firewall. This leaves a fairly large space where the RHD pedals aren't, and it's the perfect size for the ECU. As a bonus, the Camaro keeps its ECU in almost exactly the same place so the wiring lengths are almost perfect. I can even reuse the Camaro bracket.
It seems I get lucky with packaging once in a while on this project.
entry 288 - tags: wiring, packaging | | | 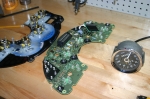 | February 16, 2010 - My plan has been to somehow stuff an electric speedometer inside the classic Smiths case.
The Camaro's T56 uses an electronic sender and the MG has a completely mechanical version.
Of course, I'm a long way from needing a speedo. But I'm not feeling completely healthy and poking around wires is more attractive right now than cutting and welding. Thus the electric emphasis of the last few days.
Well, it's not going to be easy. Looks like quite a challenge, actually. Enough of one that I started looking for alternatives. I already know of one, which is basically a small electronic motor in a box that takes an electronic signal in and spins a cable at the appropriate speed. It's a decent option, although a bit more of a kluge than I'd prefer. If you're converting a Miata with molded plastic gauges, you don't have a lot of other options. But the MG uses individual gauges, of course.
Poking around, I discovered that there actually exists an electronic Smiths speedo. It's not a perfect match to what I have, but it's awfully close. Close enough to work. And as a bonus, it's actually significantly less expensive than the little "gerbil box" motorized adapter. Excellent.
What about the tach? It's expecting a four-cylinder, so it'll read twice as fast with 4 pulses per crank revolution instead of 2. Some poking around pulled up an article on the British V8 site that explains how to add a potentiometer to easily make the tach adjustable. But wait, it gets better. 1972 was the only year to be fitted with a potentiometer from the factory. At the time the article was written, it wasn't known if this gave enough range to make it work with a V8, but I'm very willing to find out. If not, I'll just solder in a different one. Perfect.
entry 289 - tags: gauges, wiring | | | 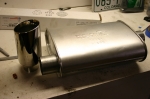 | February 20, 2010 - I've been trying to figure out what order to do things in right now, and I've decided to work on the exhaust.
I'm not really sure why that ended up at the top of the list, but there you go. It could be because the Super Turbo muffler I ordered showed up, and so now I know for sure there's enough room for it to fit.
The tip is one from a Flyin' Miata exhaust that I brought home to try for size and to see what Janel thought. She likes the style - they're really nice looking, with a double-walled tip with a constant outer diameter and a rolled inner shell - but thinks it's a bit big at 3.5". No worries, we have 3" ones as well which I think will be perfect. I like the slightly slanted tip.
Is it too early to pick out exhaust tips? Of course not!
entry 290 - tags: exhaust, tip | | | 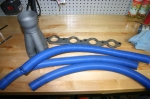 | February 20, 2010 - Of course, building the exhaust means building the headers.
I've been digging around trying to find recommendations on primary tube length, but to no avail. A diameter of around 1.625" or 1.75" seems to be the one to use, and since the last header I built used the latter I will probably do so again as I have some spare parts - including this collector.
The header flange is GM part 12480130, and it's 7/16" thick. Beefy! The blue pool hose? Well, that's how I do my initial layout testing. I'll figure out the general routing of the tubes first then fine-tune them with a very cool tool that will be making an appearance soon.
But there's no need for it. When I installed the steering column and started to figure out where the collector was going to go, it became obvious that there was no way to run a long-tube header in the car. I simply don't have the room - and that's with the collector in the wheel well! So it appears I'll have to settle for good flow instead of a nice extraction design. Oh well, it'll be an improvement over the stock units at least. And it should be easier to make this way.
entry 291 - tags: header, headers, exhaust | | |
|

 THE DIARY