| LIFE OF A GT |
|
|
 | | January 15, 2010 - A long day with not much actual progress.
I managed to cut out a bracket. Oooo!
Actually, I did quite a bit more than that, mostly planning. I was following a pickup this morning and noticed that the shocks were mounted very far inboard. I realized that this would give more wheel travel for a given amount shock travel, and that I had previously considered a slightly more inboard mounting point on the MG. Obviously I wouldn't want to go too far, as my coilover setup would put some pretty major bending loads on the rear end and the lessened shock travel would mean less precise damping. But would it make much of a difference?
So I dragged the rear end back off the workbench were it was set up to have the shock bracket mounted on the driver's side, and stuck it back under the car. A bit of rough measuring showed that my alternate setup would give me an extra 1/4" to 3/8" of droop. Nothing to be ashamed of for such a simple change, and it would also give me more room in the wheel wells. It would also drop the lower mounting point of the shock down considerably, about 1.5" closer to the ground.
However, while doing my measuring, I discovered I'd mis-measured last time and I really had 2" of droop travel from my expected ride height. I suspect I hadn't let the shock fully extend, these AFCO shocks don't have internal pressurization so you have to actually pull them open. If the damping is cranked up, that takes a significant amount of effort. Regardless of the cause, it appears I have nothing to worry about so I'll continue as planned. The rear end came back out and was reinstalled on the workbench.
While poking around back there, I started looking at other packaging concerns - specifically, the available space for a muffler. There isn't much. The layout of the MGB GT's truck is a little weird, though. There's a fairly tall flat floor. If you lift it up, you discover a cavernous hole that exists to house the spare tire and quite possibly enough tools to disassemble the car. If I move the fuel tank into this space, that opens up a huge amount of room for a muffler underneath. I could either move the existing tank without too much trouble or build my own new one with some baffling inside. Mounting the filler is going to be a bit more of a problem as it would then be about level with the tank, but I have an idea.
More work!
entry 253 - tags: packaging, suspension, fuel tank | | | 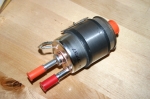 | February 5, 2010 - I'm still finishing up the garage rework and proof-reading the book manuscript again, so no progress on the car.
Seeing it sitting there on its wheels with an engine inside has me pretty inspired, and I cannot wait to dive back in. So I've been planning.
One of the things I need to do when converting from a 80 hp carbureted engine to a 350 hp fuel injected one is make a few changes to the fuel system. I have a good external Pierburg pump to use, that's good. But the LS1 is set up for a fixed pressure returnless system. Here's the answer - a Corvette fuel filter. It has a regulator built into it, so I just pump fuel in one end and it gives me the return line to go back to the tank as well as the feed for the engine. I'll mount it in the rear of the car by the pump. No adjustments do make, either. Just bolt it in and I'm good to go. I also picked up some 3/8" fuel line to feed the beast, I'll spend some time trying to figure out how to run it up the length of the car.
entry 273 - tags: fuel | | |  | February 9, 2010 - Check out my new muffler!
Some people use fibreglass or stainless steel wool for muffling, I use yogurt. This box is the same dimensions as a Dynomax Super Turbo, other than the lack of rounded edges. I crawled under the rear of the car and whaddya know, there's enough room for duals! Only barely and I have to move the gas tank over by 3", but I can do it! This is excellent, it means more power and more quiet, both good things. I'll have to figure out how to package an X pipe (and why) so there's some good learning ahead. I think I'll order a single muffler now so I can ensure the fit is good, then go ahead and move the tank.
I've also been researching fuel line parts. What a pain. I'd been hoping to avoid AN fittings but I don't think that will be possible. Our local Parker distributor has gone out of business so that makes my previous plan of using SAE flares more difficult.
entry 280 - tags: muffler, packaging, fuel | | | February 10, 2010 - I think I've sorted out how the fuel system will work.
I've ordered the always-necessary random bits and pieces. Turns out using AN fittings won't be such a problem, and this way I'll have a sexy braided fuel hose! It should come together fairly quickly when I start work. I've also ordered a muffler to confirm fitment.
I'm procrastinating. I really should be working on the metalwork around the transmission. But Janel's under the weather and asleep on the couch, so it would probably be rude to fire up the grinder, drill and Sawzall. Soon.
What I'm really trying to decide is if I should just bite the bullet and pick up a Painless wiring harness. I've wired cars from scratch before, and it's not that much fun. I've modified stock wiring harnesses, and that's possibly even less fun. It's so tempting to simply have something I can plug in with no mystery or work on my part. If it'll cut a month off the build time - that seems like a lot, but it's actually plausible especially when you consider my lack of experience with these engines - then it's probably worth it. I'm getting so lazy.
entry 281 - tags: wiring, fuel | | | 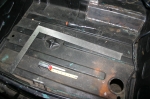 | February 20, 2010 - Before I can start fooling around with the exhaust, I need to confirm that the twin mufflers really will fit.
I'm almost positive they will, but it's time to move the gas tank. This is far less difficult than it sounds. The tank bolts to the bottom of the flat trunk floor. I simply had to drill a number of new holes 3" to the left of the existing ones. The large hole for the filler required a hole saw, but otherwise it was quick and easy work.
entry 293 - tags: fuel tank, packaging, exhaust | | | 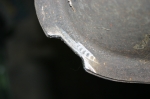 | February 20, 2010 - I did have to make one small alteration to the fuel tank.
This corner bumped up against my Panhard bar mount and kept me from getting the tank quite snuggled into position. A moment with the grinder solved that problem. You can see that the stock tank is actually crimped together. I was careful to stay clear of that section.
While I was goofing around underneath the car, I also removed the rear axle and relocated the lower shock mounting points an inch higher. This will give me a better bump/droop ratio for the suspension travel.
entry 294 - tags: axle, fuel tank | | | 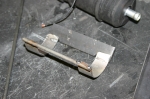 | May 12, 2010 - I'm also looking at laying out the fuel system and the packaging involved.
Not a big problem, really - more on that later. But first, I need a bracket for my fuel pump.
The pump is a Pierburg unit that should have no trouble with the big engine - I hope. It's a round piece with no mounting points. So, with the help of a short piece of exhaust tubing cut in half, I made this little doodad. I'll weld it on to the car and let it cradle the pump.
entry 320 - tags: fuel pump | | |  | May 12, 2010 - The pump is secured to the bracket with a clamp.
That's why the round bars connecting the two "hoops" for the pump. Sharp eyes will notice that the previous photo only had one bar. The reason is that the pump was able to rock too much with the clamp in place. Adding the second took care of that problem.
This is what it's like to build this car. Solving one small problem after another. It's fun. Now, where to put it?
entry 321 - tags: fuel pump | | | May 23, 2010 - I spent part of the day running around looking for a way to connect a new line to the fitting on the MG gas tank.
Naturally, it's some oddball size that was probably created by the Romans and not used anywhere outside MG since 1982. But I think I've got that figured out. The fuel pump is mounted and I'm waiting for a couple of 45 degree fittings to arrive so I have everything I need. It actually won't take long to plumb things together once I have them, I think anchoring the main feed line will take longer than anything else.
I also started mounting the radiator - I'm trying to get most of the metalwork out of the way before I clean up and start running fuel lines and wires. There were a few false starts here as I tried to figure out a good, clean way to mount it. I've got some brackets welded in now that will do the job, but they're not as clever as I'd like and I'm probably going to add a cross bar under the rad to act as some impact protection. The hood closes and there's 6" of clearance under the rad - I consider that a victory!
entry 333 - tags: cooling, radiator, fuel | | | 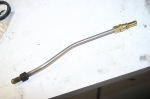 | May 27, 2010 - The first step in the fuel system - at least, from the point of the fuel.
The flare on the fuel tank is some weird British size, so I attached a new fitting to a short piece of the original fuel pipe. The fit on the compression fitting is so tight that I had to stick the pipe in the bead blaster and clean off the surface crust before it would slip over. The cleaner pipe will help it seal as well.
The two missing adapters I need showed up today in ludicrously large boxes, so I have everything I need to finish the fuel lines. I also started working on the wiring, and I've decided where the ECU will go. It'll be fairly straightforward from here.
entry 337 - tags: fuel, wiring | | |  | June 8, 2010 - A mysterious device I found while connecting the return line.
I think it's a swirl pot of some sort - it was mounted vertically with one of the fittings (marked "IN" here) at the top. The return line from the regulator came into this upper fitting, then the lower one returned to the tank. The little doodad was sitting higher than the tank, so that would work.
Anyone know for sure?
entry 343 - tags: fuel, mystery | | | 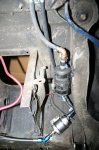 | June 8, 2010 - The fuel system is done!
It looks pretty nasty in this picture, partly due to the random wires of various sizes floating around and also due to some weird angles. The angles were chosen so I could use 45 degree fittings instead of 90 degree for less restriction. I also had to squeeze all the components into a fairly small space, of course.
The fuel comes from the tank through the 3/8" feed line, the leftmost one at the top of the picture. It's then adapted up to 1/2", because that's the size of the inlet on the pump. I didn't use 1/2" for that entire stretch because the actual line coming out of the tank is probably 5/16". The fuel then runs to the Corvette fuel filter, which doubles as a regulator. The braided stainless line at the bottom is a -6 AN line (3/8") that runs all the way up to the engine. The return line runs back to the tank through the factory swirl pot mystery cylinder at the moment. The stainless feed line runs through the transmission tunnel and is well anchored to keep it safe and to keep it from sawing through other things.
It took a remarkably long time to get all this done. Not only did I keep having to source adapters, but even securing the stainless line involved crawling under the car, measuring for a hole, drilling from above, crawling underneath to check the location, crawling back out to tack-weld the bolt into the hole, then going back under to bolt it up. Then move on to the next spot and do it again. Add to that the usual "whoops, I left my pen/ruler/wrench/fitting/drill on the table" up and down routine, and it seems as if I spent most of my day simply going under the car and back out again!
entry 344 - tags: fuel | | | 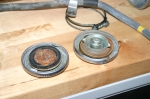 | June 9, 2010 - Mystery solved!
The "swirl tank" is actually a vapor separator as part of the emissions control system. What I thought was a return line was actually a vent for the fuel tank. The vapors collected in the separator traveled up to the engine bay into a charcoal canister and were eaten by the engine. Having the separator in place kept raw fuel from getting fed to the charcoal canister when a full fuel tank would expand from heat.
I can hijak the system to work as my return line - but then there's no venting capability for the tank. Older MGBs had a vented gas cap that let the pressure in the tank stay constant regardless of temperature fluctuations or fuel use. The downside is that they can drool fuel with a full tank on a hot day.
Luckily, the green MG parts car that lives outside is a 1969, and comes with the vented cap (on the right) and appropriate fuel filler tube. Since the charcoal canister from the 1972 car was damaged when I got it, that's my best solution. Looks like I might need to get a new cap though.
entry 345 - tags: fuel | | | 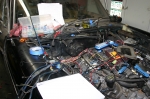 | June 16, 2010 - Wiring time!
This means I'm referencing a handy four-page schematic of the Camaro wiring, the one-page diagram for the MG and referring to the big 100-page book of Miata wiring once in a while. The Camaro wiring is actually going pretty well. The biggest problem is hunting down and fixing a couple of connectors that were damaged either when I pulled the engine or beforehand.
Integrating it into the MG wiring is a bit more challenging, although it did help when I figured out I was trying to reinstall the MG harness the wrong way in the car! I think I need to make a photocopy of the MG diagram and start identifying which sections to keep and which ones will be deleted.
Sharp eyes (and real obsessives) might notice that I've flipped the fuel rail over on the engine. This puts my fuel feed on the passenger's side instead of the driver's. It's just a bit easier to run it that way. Let's hear it for symmetrical intake manifolds!
entry 346 - tags: wiring, fuel | | |  | June 19, 2010 - The rear axle, fuel tank and panhard bar have all been given a coat of POR-15.
So has the pedal box. I also hit some of the brackets welded on the car to use up some of the leftover paint. Once the tank is dry, I can do the final installation and not have to take it out again. Woohoo!
entry 350 - tags: paint, fuel, axle | | | 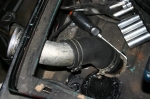 | August 23, 2010 - Exciting stuff - the fuel filler is in place.
Well, actually, this is exciting. It means the gas tank is bolted into place for the last time. The assembly I'm doing now is final assembly, and that's the exciting part. Real progress: the pile of parts around the car is shrinking!
Originally, the fuel filler on the tank entered the trunk floor straight below the filler neck. You can see the patched and repainted hole in this picture - it'll be covered by sound deadening or carpet when the car is assembled. Since I had to move the tank over to make room for the exhaust, I had to make the filler wiggle over a few inches. A bit of back-room shopping at NAPA yielded a filler hose with a 45 degree angle. It worked out perfectly.
entry 367 - tags: fuel | | |  | October 6, 2010 - The last step before trying to start the car was to put some fuel in the tank and pressurize the system.
That didn't work! Well, it did, but not completely. The stock MG fuel system uses a couple of flared fittings that, typically for the British, are probably only found on Spitfires and MGs. One of them's on the fuel tank itself. So in order to plumb everything together, I retained one of the original fuel hoses in the return line. Bad idea. As soon as the system was up to pressure and excess fuel started to feed back to the tank, this thing started leaking like a garden hose. The inner rubber hose must be cracked in at least 10 places.
So I pulled the hose out and managed to piece together a replacement using one of the end fittings. After a bit of fiddling around, the fuel system was happy and full of pressure.
entry 401 - tags: fuel | | |  | June 23, 2011 - So much for all the basking in glory.
I was driving home last night and the MG started to stumble for a bit, then coasted to a halt. It acted like it was out of fuel. This has happened before. Luckily, I was following my coworker Brandon home and I was only a couple of blocks from his house. So he grabbed a couple of items and we tried to fix it.
First, I checked that there was power to the fuel pump. Yup. We threw in some fuel, just in case. No change. The pump sounded a bit off, though. Strained. We sat there and kicked around a number of ideas such as clogged inlet screens, overheated fuel lines and the like. Finally, we decided to grab his trailer and just drag the car back to my place where I could troubleshoot in a more controlled environment. When we went to start the car to put it on the trailer, there was no fuel pump noise at all. A quick feel under the car and I found a power wire that was no longer attached! It had come off the ring connector. Aha!
I used a bit of electrical tape from underhood to tape the wire to the terminal, just enough to get the car running and on to the trailer. That got me home.
The connector is one that came with the pump. I didn't have any ring terminals in the mini size used, so I'd just reused the connector and spliced the wire into my harness. So this time, I cut off the spliced wire and crimped in one of my own, complete with heat-shrink. That should solve the problem. The car fired up happily so that must have been it. It's expected that a car that's had this much work performed would have some trouble.
entry 598 - tags: fuel, debugging | | | June 23, 2011 - Ah, nuts.
I spent a couple of hours running around some local roads shooting a bit of video and generally having fun with the car. The exhaust noises started coming back as the car got hot, but otherwise it behaved itself. Even with an ambient temperature around 95F or so, it didn't have any overheating problems. It did act a little cantankerous on a couple of hot starts, but cycling the key solved that. Quick car, let me tell you. The video will be along soon.
But unfortunately, the fuel problem returned. After running happily for all the video, I was heading home when the car started to stumble and then died in front of a gas station. I pushed the car into the lot where it was safe, and started poking around. My electrical connection seemed fine, but again the pump sounded a bit labored when it ran. I could sometimes get the car to fire up, but it would only fire a cylinder sporadically, just enough to keep it turning over but not much else. So I left the car and occupied myself elsewhere for half an hour.
When I got back, it fired up happily. I made it almost all the way home before it stumbled to a halt again. I parked it by the side of the road and again, a half hour later, it fired up.
So whatever is wrong is probably related to heat. I'm thinking it might be the pump itself. The pump I'm using is one that was sitting around my garage, and probably last saw action a decade ago. Foolish, maybe. But it's been working happily so far. The pump is fairly well protected from heat, although there is one of the exhaust pipes about a foot away. It doesn't feel hot to the touch, nor do any of the fuel lines.
It's possible that the input screen on the pump is clogged. Because the filter is also the regulator, the pump is pre-filter. It's quite likely there was a bit of debris in the tank despite my best efforts. I'm not sure that would manifest itself quite like this, but I'll investigate it none the less. I'll probably just swap in a new pump of the same type to be sure.
entry 600 - tags: fuel, debugging | | | June 26, 2011 - I swapped out the fuel pump yesterday.
There were none of the hoped-for obvious problem signs - no big chunks of gas tank stuff clogging the inlet, no damaged wiring. Nuts. A drive today in hot (95F) weather unearthed no problems with the fuel system, but it drove fine almost every time before. So the jury's still out. I hate it when things are inconclusive like this.
We did find one definite problem, though. The car is very well ventilated, quite livable even in our hot climate. But when Janel drove it in open-toed shoes, she discovered that increased speed pushes some air through the heater core and directly on to her feet. Now, the heater core is still running coolant through it as I wasn't sure when I hooked things up if the LS engine could do without that particular circuit. Apparently it can, and so I am under orders to fix that particular problem quickly before her feet melt. I'll have to see if I can find the old heater valve again.
Other than the hot toes, she did bond with the car. Especially when she was trying to merge and wasn't sure if she had enough room. I told her to punch it, she'd have enough room. Yes indeed she did. She laughed and started looking for opportunities to open the throttle.
entry 603 - tags: debugging, heater, fuel | | | 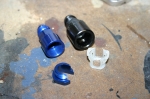 | July 4, 2011 - Preventative maintenance.
The fitting on the right is a push-on fitting that allows me to connect a braided fuel line to the factory fuel rail. The plastic connector is the same sort of thing used by the millions on factory cars.
But Russell, the manufacturer of this part, seems to have got something wrong in their implementation. I had one of these fittings pop off on the Targa Miata. Three times. I've heard from another FM customer who had a similar problem, and it turns out it's actually pretty well known. Since the result of a pop off is a big fat line full of high pressure fuel being pumped directly on top of a hot engine, it's a poor scenario. Especially when you're on the track, like I was with the race car.
The solution is the fitting on the left. It's a brand new design from Russell and it locks into place with a threaded aluminum insert instead of a couple of plastic teeth. I found out about it through the LS1Tech forums and managed to get some from the first production batch. The part on the MG has never given me trouble, but now it can't. I'll give the old one to the cats to play with.
entry 622 - tags: fuel, safety | | | .jpg) | July 24, 2011 - It wasn't all fireballs and oversteer yesterday.
Janel spent most of the day running around town in the little car, and seems to have quite enjoyed it. The car still has a tendency to pop out of reverse (and will continue to do so until I pull the transmission to fix it) so she planned her stops as pull-through only.
Until we were driving home from the track. I was leading the way in the Targa Miata, enjoying the view of the little tiny black car in the rear view mirror when she suddenly pulled over the side of the road about a half mile from the house. The mysterious fuel problem had returned.
Checking the fuel pressure revealed the problem - 20 psi. It's supposed to be about three times that. Between the inoperative fuel pressure gauge and the spill earlier today, I (once again) decided the best thing to do was to fill up the tank. And this time, it worked. Instant 60 psi pressure and the car came to life after a couple of tries. We took it home, then ran around town some more with the car at night without any problems.
I'd really like to know more about what's inside that fuel tank. No baffling, that much is clear. But where is the pickup? Janel described the car as losing power after a right turn, which would have sloshed fuel away from the side of the tank that has the pickup. And it just didn't come back all the way. If the extra fuel in the tank hadn't fixed the problem, I was going to see if I could bleed off any air bubbles in the system. But that may have to wait until the car fails again.
As a possibly related problem, the car sometimes doesn't start quite right. It'll pop once and then just crank. Cycling the key brings it back to life. I really want to know what's in that tank, as everything else in the system is something I'd consider to be a known quantity.
The car really does look cool out on the streets, especially from a distance. It gets a huge amount of attention. And Janel quite enjoys the effect of the accelerator. A hot-rodded vintage pickup passed us in traffic, and I thought Janel was going to rear-end it when things cleared. She was quite disappointed that his big fat tires were mostly for cruising up and down the strip.
The picture has nothing to do with driving around town, it just shows the car on track and not on fire.
entry 633 - tags: fuel, testing | | |  | May 22, 2012 - The car has been sitting for quite a while.
There have been a few reasons, but the biggest ones center around the fuel tank. Janel wasn't a big fan of the whole fireball escapade on the track for some reason. The fact that the car also stranded her on the side of the road on the way home didn't help.
Of course, we also took some time to run the Targa Newfoundland.
But it's time to get back at it. I really wanted to get a look inside this tank. So I yanked it out, filled it with water and used a Sawzall to cut the top off. The water was to force out any gasoline vapors, which could have caused extra excitement. It worked.
entry 635 - tags: fuel tank | | | 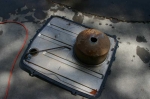 | May 22, 2012 - There was a big surprise waiting inside.
A BIG surprise. This giant canister. That's the top of the tank, upside down. The line running under the tank is the one that was originally attached to the charcoal canister. There's an itsy bitsy hole in the top of this canister, probably to prevent heat expansion from forcing fuel into the canister.
Great. But there are two problems with this. One was a big aftermarket dent in the bottom of my fuel tank. It kinda looked like someone had tried to jack the car up via the tank. This was perfectly placed to close off the hole in the bottom of the canister. You can see where it's been pressed up against the bottom of the tank.
The second problem is that I was using that charcoal canister fitting as my fuel return. I'm amazed any fuel got returned into the tank at all, and that's probably where my oddball fuel starvation problems came from.
This was quite a surprise.
entry 636 - tags: fuel tank | | | 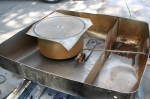 | May 22, 2012 - Here's a view on how the giant canister was placed in the tank.
You can see a couple of dents in this shot as well as the one baffle that was in place. It's to keep fuel from sloshing around and upsetting the fuel gauge, I assume.
But here's a neat trick. The fuel filler dumps into that right side section of the tank. And there's only one hole joining it to the rest of the tank. That hole doesn't go all the way to the bottom. So once you're down to a gallon or two, fuel doesn't transfer across. The fuel pickup is on the other side. So the pickup will continue to suck fuel out of the left side while the right continues to show fuel in the tank.
It's like MG wanted people to run out of fuel on the side of the road.
entry 637 - tags: fuel tank | | | 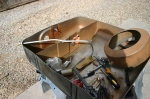 | May 22, 2012 - Time for some re-engineering.
The big canister has been repurposed - more on that later. I decided to move both the fuel pickup and return to the right front corner of the tank for better exhaust clearance. I used 3/8" and 5/16" brake line to form the lines, and kept the fuel pickup in the original location. I put a Miata "sock" on the pickup to replace the small MG one. Here I'm just starting to shape the pickup line.
The dents in the bottom have been hammered flat by this point.
entry 638 - tags: fuel tank | | | 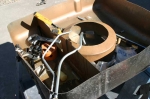 | May 22, 2012 - The lines have been shaped.
The big canister is now a big round baffle. There are some angled flaps on the bottom to make it easy for fuel to run in but a bit more challenging for it to run out. The return line also dumps into the canister to ensure it's got fuel in it. The lines take two different routes to avoid the float for the fuel gauge.
I'm not really planning on spending much time on the track with this car, but I couldn't resist making it better.
entry 639 - tags: fuel tank | | | 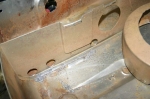 | May 22, 2012 - To avoid the problem of the baffle segregating the tank into have and have not sections, I drilled a few holes.
They won't allow rapid flow of fuel from one side to the other, but it will be enough to let me use the full tank capacity. Between this and removing the giant sealed off canister, I've probably doubled my tank capacity.
Once this was done, I cleaned out the tank and started welding. First, the big round baffle was tacked into place. Then the fuel lines were welded in. The original fuel pickup was welded shut. And finally, the fun job of welding the top back on again. I used a MIG welder for this which does usually leave some pinholes, but I did my best to get a good seal. I also spread some gasoline-resistant liquid metal over the seam to catch any little leaks. The seam is right at the top of the tank so it's unlikely to ever be wet on the inside, but I still don't want any leaks!
entry 640 - tags: fuel tank | | | 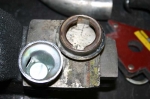 | May 22, 2012 - With the tank back in, it's time to sort out the spitting fuel problem.
That's what led to the fireball at the track. I probably should have put some baffling inside the filler neck to avoid any splashes, but instead I decided to borrow yet another Miata part.
The filler on a Miata has a spring-loaded flap in it. Perfect. I cut one out of a Miata filler and welded it into the MG neck, just below the cap. There are two small vents on each side that act as drains and a place for air to escape when you're filling up. They're usually attached to a separate pipe, but I decided to just let them go into the main filler neck. There's a small chance of some splashing through them, but it's going to take some real effort to make that happen. I think it'll be a decent solution, and it's invisible.
As an added bonus, the MG now looks like a modern car that drinks unleaded when you unscrew the fuel cap.
entry 641 - tags: fuel tank | | | 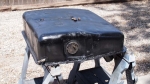 | June 3, 2012 - Hang on a second, the tank is supposed to be in the car.
The car was running just fine...until I had it backed out of the garage and it died. No fuel pressure. I jacked the car up there and started running diagnostics. Of course, the first thing you suspect is the thing you just did. But because it was such a pain to weld the tank back together, I started looking elsewhere.
And I found something. It appeared that the regulator had died on me. When I disconnected it, I got a good gush of fuel out of the pump. Huh. The regulator is built in to a stock Corvette fuel filter that should be good for extended use - but maybe something from the tank plugged it. So I swapped in a new one. Nope. The pump struggled to get up to 40 psi (slowly) when it should have popped up to 60.
So I plugged a new hose on to the pump inlet and dropped the other end into a bowl of fuel. Voila, instant 60 psi. I'd tried this earlier without success, but I think I had the bowl too low so the pump couldn't suck it up. So out the tank had to come.
When I cut the top off, I didn't see anything obvious. But plugging the end of the pickup and blowing in the other end revealed the problem. A small pinhole in the new line where it had been tackwelded to the interior baffle. Not much, but once the pump was pulling hard it let in air instead of fuel. A half second zap with the welder and the pickup line was nicely airtight. Argh.
Welded it all back up again, smeared liquid metal around the seam again (to cover any pinholes in the welds) and the tank went back in. I tested it with a couple of gallons in the tank and again, 60 psi. Excellent.
Then the car refused to start. It cranked and backfired, then went "clunk" and wouldn't crank anymore. I'd been working the battery pretty hard during testing, so I threw on the charger. Just to check, I stuck a test light on a hot terminal in the engine bay. Nothing. Hmm.
I checked across the battery terminals, no problem. I checked from the grounding point to the terminals, no problem. But then I checked from the bumper to the battery. Nothing. Closer inspection showed that the main grounding point (a bolt running through the sheetmetal) was a bit loose. I tightened that up and all of a sudden I had power through the car.
If you remember back, the car's had the habit of not always starting on the first attempt. It would backfire and pop, and then would fire happily if I just cycled the key. It also had a habit of occasionally stopping at the side of the road. I'm thinking the loose ground strap may have been the culprit for the first, although we'll see if that behavior continues. The latter might have been related to that heavily restricted return line inside the tank. That's certainly not a problem before. We'll see what happens now. At the moment, the car is on "close to home" probation.
entry 642 - tags: fuel, troubleshooting, wiring | | | 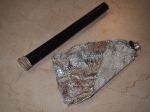 | June 6, 2012 - Insulation time!
The exhaust has to run just below the main fuel feed at one point. I had it insulated with the foil-backed fiberglass insulation at right, but figured it wouldn't hurt to improve it. The rubberized...umm... stuff is the same sort that's used for protecting wiring for oxygen sensors, so it's easily able to deal with high heat. It's actually from a company that also made parts for the space shuttle, only that version had more Kevlar and looked cooler. Anyhow, it was a fairly short job pop the fuel line off the filter/regulator and slide the black insulation over top. Let's here it for quick-release fuel fittings!
The silver insulation shows no sign of heat damage, so this may not do anything. But it won't hurt.
entry 644 - tags: fuel | | |
|

 THE DIARY