| THE MG |
|
|
 | | 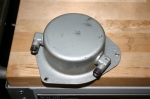 | June 8, 2010 - A mysterious device I found while connecting the return line.
I think it's a swirl pot of some sort - it was mounted vertically with one of the fittings (marked "IN" here) at the top. The return line from the regulator came into this upper fitting, then the lower one returned to the tank. The little doodad was sitting higher than the tank, so that would work.
Anyone know for sure?
entry 343 - tags: fuel, mystery | | | 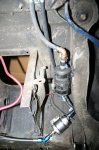 | June 8, 2010 - The fuel system is done!
It looks pretty nasty in this picture, partly due to the random wires of various sizes floating around and also due to some weird angles. The angles were chosen so I could use 45 degree fittings instead of 90 degree for less restriction. I also had to squeeze all the components into a fairly small space, of course.
The fuel comes from the tank through the 3/8" feed line, the leftmost one at the top of the picture. It's then adapted up to 1/2", because that's the size of the inlet on the pump. I didn't use 1/2" for that entire stretch because the actual line coming out of the tank is probably 5/16". The fuel then runs to the Corvette fuel filter, which doubles as a regulator. The braided stainless line at the bottom is a -6 AN line (3/8") that runs all the way up to the engine. The return line runs back to the tank through the factory swirl pot mystery cylinder at the moment. The stainless feed line runs through the transmission tunnel and is well anchored to keep it safe and to keep it from sawing through other things.
It took a remarkably long time to get all this done. Not only did I keep having to source adapters, but even securing the stainless line involved crawling under the car, measuring for a hole, drilling from above, crawling underneath to check the location, crawling back out to tack-weld the bolt into the hole, then going back under to bolt it up. Then move on to the next spot and do it again. Add to that the usual "whoops, I left my pen/ruler/wrench/fitting/drill on the table" up and down routine, and it seems as if I spent most of my day simply going under the car and back out again!
entry 344 - tags: fuel | | | 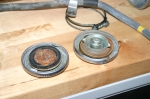 | June 9, 2010 - Mystery solved!
The "swirl tank" is actually a vapor separator as part of the emissions control system. What I thought was a return line was actually a vent for the fuel tank. The vapors collected in the separator traveled up to the engine bay into a charcoal canister and were eaten by the engine. Having the separator in place kept raw fuel from getting fed to the charcoal canister when a full fuel tank would expand from heat.
I can hijak the system to work as my return line - but then there's no venting capability for the tank. Older MGBs had a vented gas cap that let the pressure in the tank stay constant regardless of temperature fluctuations or fuel use. The downside is that they can drool fuel with a full tank on a hot day.
Luckily, the green MG parts car that lives outside is a 1969, and comes with the vented cap (on the right) and appropriate fuel filler tube. Since the charcoal canister from the 1972 car was damaged when I got it, that's my best solution. Looks like I might need to get a new cap though.
entry 345 - tags: fuel | | |  | June 16, 2010 - Wiring time!
This means I'm referencing a handy four-page schematic of the Camaro wiring, the one-page diagram for the MG and referring to the big 100-page book of Miata wiring once in a while. The Camaro wiring is actually going pretty well. The biggest problem is hunting down and fixing a couple of connectors that were damaged either when I pulled the engine or beforehand.
Integrating it into the MG wiring is a bit more challenging, although it did help when I figured out I was trying to reinstall the MG harness the wrong way in the car! I think I need to make a photocopy of the MG diagram and start identifying which sections to keep and which ones will be deleted.
Sharp eyes (and real obsessives) might notice that I've flipped the fuel rail over on the engine. This puts my fuel feed on the passenger's side instead of the driver's. It's just a bit easier to run it that way. Let's hear it for symmetrical intake manifolds!
entry 346 - tags: wiring, fuel | | | 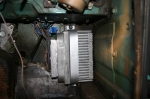 | June 16, 2010 - One of the big roadblocks to the wiring was figuring out how to mount the massive ECU.
As you may remember, I was originally going to put it in the engine bay, but that was a pretty tight fit. I was also trying to reuse the stock bracket, and that was proving to be difficult. There's a bracket from the S10 or some sort of van that is a bit easier to mount in a non-standard location and arrangement, but I finally realized I could simply mount it with a solid strap, as seen here. It's solid and secure, but easy to remove when needed.
The ECU is located at the end of the passenger's footwell, which means the wiring harness can easily drop down through the hole that would have been used for the pedals in a RHD car. Cool. I'll probably put a plate over top of it to hide the ECU and give the passenger a good solid foot rest - but not yet.
entry 347 - tags: ECU, wiring, packaging | | | 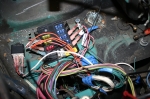 | June 16, 2010 - The GM computer needed a few new circuits.
The MG only has five fuses (that I know of) in the entire car, but I wanted more than that! To be fair, one of the fuses in the new box is a duplicate of the fuel pump fuse in the old one - I'm not sure if I'm going to retain that particular one.
The wire colors here are the GM ones, they're quite fond of pink wires. Thus the labels. The wires will be corraled further when I'm done as well, right now they're just being roughly loomed together.
The new fuse box sits in the engine bar, where the pedal box would be on a RHD car. The square hole at the bottom of the picture is the one that lets the wires run down to the ECU, which is just barely visible in there. I'll adapt the factory cover to make this look good.
entry 348 - tags: wiring | | | June 16, 2010 - Order of operations.
One of my hang-ups recently has been a dilemma. If I do all the wiring and plumbing necessary to make the car run now, I'm going to have to tear it all apart again so I can repaint the engine bay and interior. But I want to make noise and get the car running! The problem was the paint.
Until I realized I didn't need to use automotive paint from a gun. In fact, there was a better option: POR-15. This anti-rust paint is one I've used in the past on both the Seven and the Land Rover. Brushed on, it gives a surprisingly good finish. You can apply it over rust and it's very strong - it'll give much better protection to the metal than normal paint. And of course, since I can apply it with a brush, I can do things like paint under the new fusebox and then mount it permanently without having to worry about dealing with overspray.
entry 349 - tags: paint, logistics | | |  | June 19, 2010 - The rear axle, fuel tank and panhard bar have all been given a coat of POR-15.
So has the pedal box. I also hit some of the brackets welded on the car to use up some of the leftover paint. Once the tank is dry, I can do the final installation and not have to take it out again. Woohoo!
entry 350 - tags: paint, fuel, axle | | | June 23, 2010 - Work continues, but not too quickly.
I've been moving slowly - but the main power lines from the trunk-mounted battery to the starter, alternator and main breaker are now all in place. The breaker can be tripped manually so I can kill the power to the car if required.
I'm now trying to figure out how to run the original MG wiring harness up to the front of the car. It'll continue to handle housekeeping chores like brake lights, fuel level and turn signals. The problem is the hot exhaust criss-crossing under the car - I want to keep the wiring clear of it. The main power line runs through the transmission tunnel, but the MG harness is about 4-6" too short to work that way. I'll play with it again tonight and see if I can find a bit of extra length.
entry 351 - tags: wiring | | | 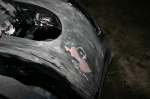 | June 28, 2010 - I haven't been working on the MG of late, but I've been acquiring more skills that will come in handy.
I've had to do a bit of bodywork on another car and it's forcing me to develop the ability to lay down paint nicely and also develop more patience! The car in question is a deep, deep black that I'm going to use on the MG, so it's teaching me just how unforgiving black can be.
Once this is resprayed to an acceptable finish, I'm going to dive back into the MG. But I don't think it's going to be driving in a month and a half, an unofficial target I'd set for myself. Not unless I really start to focus and maybe take a few days off work. Sigh.
entry 352 - tags: body, paint | | | 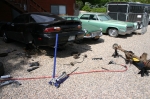 | July 17, 2010 - Okay, there's that done.
The black bumper was painted, then sanded down again and painted again. I learned a huge amount about sanding on compound curves, surface prep, paint gun setup and the general unforgiveness of shiny black paint. But now I'm in pretty good shape to paint the MG. Not that I'll remember any of this when it comes time to paint! I also made a trip back to Canada for a week or so.
But now it's time to get cracking. I have to drop a differential off at the drivetrain shop for work, so I figured I'd bring the Camaro and MG axles in for their diff swap at the same time. I don't know how to set up a rear end and I'm happy to let someone else do it for me. So I jacked up the Camaro and had at it with the tools. An hour later, the rear end was free in the driveway.
Note the very large boards underneath the jackstands, this car is not going to sink into the gravel, fall off the stands and kill me.
entry 353 - tags: Camaro, differential, rear axle, paint | | | 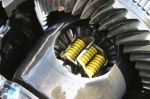 | July 17, 2010 - Here's a peek at the differential from the Camaro.
In 1998, the Z28 came with a Positraction differential. In 1999, that was changed to a Torsen. This is a Posi, although I do have to admit to resorting to Google to make sure I wasn't looking at some sort of Phantom Grip nastiness.
Miatas used Torsens from 1994, and it's a great differential. Very easy to drive. But the V8 cars we've been building at Flyin' Miata have been using a differential from a Cadillac CTS-V, and I've been very impressed with their ability to lay down power. The theoretical increase in turn-in understeer hasn't been a problem. I'm pretty sure it's a very similar Positraction to this one. So I'm happy that my donor came with this unit.
entry 354 - tags: differential, rear axle | | | 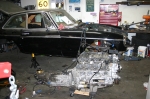 | July 18, 2010 - Progress!
Although it doesn't look like it. I pulled the engine and transmission out one more time. This will let me finish the sheetmetal work in the engine bay and elsewhere in the transmission tunnel. I'll also finish some welding on the frame and then paint everything.
Meanwhile, the transmission has to come off so I can change the lines to the slave cylinder. The sealed one-piece setup from the Camaro isn't going to work, so I'm going to do something similar to the setup used by Flyin' Miata. The MG master is the right size (lucky!) and so I just need to find the right banjo bolts.
Once the chassis is prepped and ready, I'll stuff the engine back inside for what will hopefully be the final time!
entry 355 - tags: assembly, clutch | | | 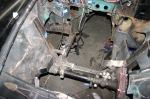 | July 20, 2010 - Welding time!
I've started to panel the engine bay. This will increase the rigidity of the front end, which is my primary goal. You can see the right front corner (on the left in this picture) is done, including some special bulges to clear the control arm. The left rear is also done, leaving a large hole for the headers to pass through. I could make this hole smaller, but then I'd only be able to remove the headers when the engine is out of the car. I can see that particular problem coming back to bite me! For a bit of extra strength, there's also a 1" square tube along the top of the left rear plate.
You can also see the unusually shaped motor mounts, including the one that has to reach over the steering column. Or at least, you could if I'd managed to take the picture in focus.
The engine bay looks pretty awful right now with all the different colors. I also have to admit that some of the welding to the original sheetmetal is not well done. But it'll be strong enough, and a bit of time with the grinder, some seam sealer and a POR-15 paintbrush will make it all look good. First, I have to finish some more patching and a bit more bracing.
entry 356 - tags: engine bay, sheetmetal | | | 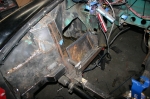 | July 27, 2010 - More welding.
I was hesitant to add this photo, as it shows some pretty ugly welding. I cut that front plate a bit too short and had to do some filling in with the welder. It's not structural and it'll look fine when ground down, but it sure looks nasty right now. At least the important stuff is good.
Anyhow, the sheetmetal in the engine bay is moving along. I still need to add some reinforcements and patches in various places, as sharp eyes will attest. It's hot, dirty work, but it's pretty rewarding.
entry 357 - tags: sheetmetal | | |  | July 27, 2010 - I had to move the VIN plate on the car.
The intake tube wants to go through the middle of it. It was covered in 2-3 layers of paint and looked pretty nasty, so it got a quick trip through the bead blaster. Voila!
entry 358 | | | August 4, 2010 - More welding.
It's hot and dirty work doing the fabrication and welding in the engine bay and under the car, but I'm gradually getting through it. The engine bay is almost completely paneled now, but I still have to do some finishing. Then it's underneath to finish up some frame rail work.
I did pick up the rear axle from the driveline shop today, though. All new bearings, all set up with the Positraction rear. All I need to do is stick the axles in, mount the brakes and voila, that's done. It wasn't a cheap visit to the driveline shop, but at least I know everything's done right and I shouldn't have to do anything to it for a long, long time.
entry 359 - tags: axle, differential, fabrication | | | 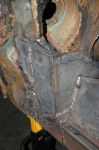 | August 12, 2010 - Welding, welding, welding.
I'm working my way through the car, finishing up all the half-welded sections and fabricating patches for the various holes I had to cut. Some of that work is pretty complex, too - this section of the driver's footwell is assembled out of 9 pieces, including one that wraps around into that big circular cutout for the steering column. Some of the welding isn't pretty. That's what happens when you're trying to work inside/under a car that's on jackstands and hasn't been bead-blasted to nice clean metal. This was some awkward work. I actually sat on the steering rack for some of it.
The good news is that I'm almost done! I just have to finish welding in part of the transmission tunnel and I can move on.
entry 360 - tags: fabrication | | | 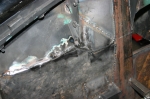 | August 12, 2010 - All of the seams on the cockpit will be sealed with seam sealer to ensure they're air/water tight.
Some of the others in the engine bay - like this one - will simply get ground down before paint. Not all of them need to be, but the ugly ones do. The only piece of stock sheetmetal in this picture is the bit at the upper left with the leftover Aqua paint on it and a little bit at the upper right!
entry 361 - tags: fabrication, engine bay | | | 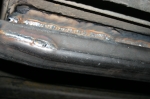 | August 12, 2010 - While I was playing with the welder, I decided to take one more shot at welding the new rear frame rail to the bottom of the car.
Previously, I'd found it almost impossible to weld the two together without burning through the floor. So the rail was attached with rosette welds through the top. But it just looked wrong when you peeked underneath.
With a different technique, I was able to make this happen. I'm much happier with that.
entry 362 - tags: frame rails, suspension | | |
|

 THE DIARY