| THE MG |
|
|
 | | 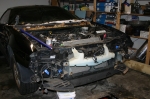 | December 26, 2009 - The first thing I did - which took about an hour - was to pull off the front bumper and other bits in the nose.
This made it a lot more comfortable to work on the engine as I could get close to it instead of having to deal with that stupendous schnozz. Seriously, it's like someone dared the designers to make the least space-efficient car possible.
entry 233 - tags: Camaro | | | 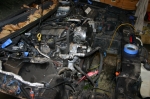 | December 26, 2009 - With the AC and radiator out, you can really see how far back the engine sits.
Remember, I've already removed at least a foot of proboscis from the car. Nice work Chevy on getting the engine so far back, but serviceability is definitely a problem.
entry 234 - tags: Camaro | | | 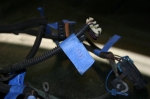 | December 26, 2009 - Naturally, all the wire connections (that I was able to identify) got labeled for future reference.
This will hopefully make life a lot easier in the future. Of course, as I went to actually remove the engine I discovered there were a number of connections right on the back of the engine. The sort that you only find out about as you're pulling an engine and it just doesn't want to move - and as far as I can tell, that's also the only way to access them!
entry 235 - tags: Camaro | | | 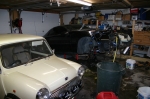 | December 26, 2009 - Due to the tight constraints of the engine bay, you have to pull the intake manifold off as well as remove the engine from the transmission to pull it out the traditional way.
The drivetrain was really intended to come out through the bottom. So I took a page from the Book of Working On Classic Minis and basically lifted the nose of the car off the engine, transmission and drivetrain as a unit. I dropped the engine on to some furniture dollies so I could simply roll it out from underneath.
I'm not sure the two cars have a whole lot more in common than than.
entry 236 - tags: Camaro | | | 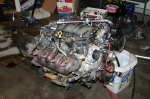 | December 26, 2009 - A fairly non-compelling but obligatory picture of the liberated engine and transmission.
The whole process took about 9 hours from starting with the shovel to saying "okay, that's enough for now".
I learned quite a bit about working on Camaros, slowly and methodically. One thing is that they have a clutch hydraulic setup that's basically sealed. I had to pull the master cylinder and a remote reservoir out along with the engine - and let me tell you, you can stretch that factory braided clutch line pretty far without it breaking! Also, the car has a "torque tube" that's very similar to that of a Miata, but it only locates the differential and not the transmission. I guess the fact that the differential has to move up and down in the live axle would make the more solid Miata solution unworkable.
I made an unholy mess as part of the process. Transmission fluid (whoops, didn't cap the output shaft), power steering fluid (whoops, broke a line when I tried to separate the engine from the subframe) and of course, my usual mess of coolant. It's all soaking up with kitty litter right now and I'll put the subframe back in the car tomorrow so I can push it back outside and reclaim an enormous amount of garage real estate.
I've mentioned before how this is a garage build, not one done with exotic tools or expensive facilities. This engine pull would have been a lot easier with a lift. As it was, I had ice water puddled all around underneath the car as it thawed out despite my best attempts to clean off the car. As I worked on the rusty exhaust on a creeper, the sleeves of my sweatshirt would dip into the water to give me a nice surprise the next time I'd move. Sometimes, for variety, I'd dip my pantleg in it instead.
The next person who claims I have access to special tools is going to get a poke in the nose.
entry 237 - tags: Camaro | | | 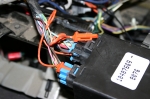 | December 31, 2009 - After the big dramatic day of pulling out the engine, I continued to work.
That great engine is worthless without the wiring to run it, so I spent several days pulling out what I needed. Yanking out a wiring harness without chopping it up requires fairly substantial disassembly of the car, including pulling the dash.
GM made some weird choices when it comes to connectors. Some are the excellent GM "Weatherpak" ones. But some of the parts that appear to be sourced from the outside use a wide variety of completely different connector designs. It's a bit ridiculous, making the wiring harness appear to have been designed by a half dozen teams that never actually talked to each other.
A number of connectors are locked in to place with a secondary pin. In the picture, the orange insert needs to be pulled out (which, in this case, involved a dental pick to depress the small and difficult to access tangs) before the blue section can be removed. Why? It certainly makes the car harder to assemble and to work on. Most of the other connectors have a more common clip that can be released easily. But for some reason, there's a guy at Chevy who's paranoid about how secure a connector has to be.
entry 238 - tags: wiring | | | 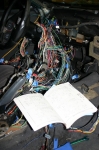 | December 31, 2009 - I'm trying to isolate the wires I need so I don't need to pull the entire harness from the car.
There are probably easier ways to go about this - more on that later - but I figure I'd rather put in the extra effort just in case.
Remember those disparate wire harness engineering teams that wouldn't talk to each other about connector design? They also didn't communicate on wire colors either. There simply aren't enough colors to go around, and the common trick of adding a stripe to distinguish between say, a white wire and a white wire with a green stripe. Adding the stripe increases the number of distinct wires dramatically. Instead, the instrument cluster has two white wires coming out of it. One is for the skip shift system, the other is the speedometer signal. Both go to the Powertrain Control Module or PCM. Thanks Chevy!
Now, the easier method. I just remembered that Painless makes an LS wiring harness. In fact, it turns out they make one for the unique 1998 Camaro PCM. It includes everything you need to run the engine and nothing else - even a fusebox - and is designed for jobs like mine. As a bonus, they'll also reflash your PCM for free, disabling the need to use a key with a particular resistor stuck inside or turning off the need for rear O2 sensors. The total is right around $500. When you consider I've probably taken $500 of potential resale out of the Camaro (should it remain a viable car, anyhow), I'll have to pay for the software to reflash the PCM and I may end up spending some money on a fusebox, it may have actually been a money-saving choice to make. Oh well, I'm committed to this plan now.
entry 239 - tags: wiring | | | 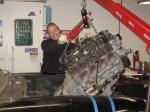 | December 31, 2009 - Because I was tired of wiring, and the engine was sitting right beside the car, I decided it was time to stick it in!
Janel came to help, as there's no way I could have done this myself. The MG is sitting sideways across the end of the garage, so first we had to carefully sneak the suspended engine and transmission around the front of the car, then push the crane sideways to feed the engine into the chassis.
It was a bit of a tight fit. Pulling the complete shifter out would have helped, but with some careful tilt/move/tilt/move we were able to wiggle the engine in to place. Well, almost.
Janel likes to be around for the big dramatic moments. Almost exactly a year ago, she was helping me hollow out the engine bay and pull the dash.
entry 240 - tags: Janel, engine, installation | | | 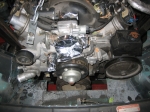 | December 31, 2009 - Here's why I knew I needed to fit the real engine instead of just my plastic one.
The pulleys and water lines and accessories make things more complex. And it became apparent pretty quickly that I needed to open up the front of the engine bay a bit more. Time to chop a bit more off the car!
entry 241 - tags: engine, destruction, first fitment | | | 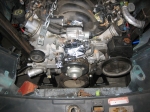 | December 31, 2009 - Voila!
A minute with Mr. Sawzall and the offending parts are removed. I have some structure to put back in to ensure the bumpers don't fall off the car, but the engine slipped in to place.
I also had to open up the hole in the interior for the shifter. It's in the perfect place, but the Hurst shifter on our T56 is a bit larger in diameter than the hole.
entry 242 - tags: engine, destruction, first fitment | | | 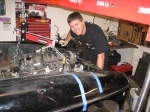 | December 31, 2009 - Janel felt there should be a picture of yours truly in the build diary.
Hi Mom!
entry 243 - tags: Keith | | | 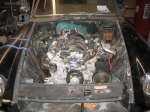 | December 31, 2009 - And voila!
The engine is installed. Not for the final time, as I'm going to have to pull it to finish welding up the frame and some other bits. There's also a cross piece in the transmission tunnel that wants to be just a little bit smaller - I've cut it once, but not quite enough. That will let the whole drivetrain level out.
It's a tight fit in spots. The distance between the oil pan and the steering rack is minuscule. The transmission tunnel is shrink-wrapped around the trans. And I'm really not sure how to fit the exhaust - even coming out the fender wells is going to be tight, I'll have to make sure there's enough clearance for the tires. The oil filler looks like it's making a bit of contact with one of the stiffening ribs in the hood. But these problems can be overcome!
But there it is - a complete LS1/T56 in a 1972 MGB.
entry 244 - tags: fitment, first fitment, engine, transmission, destruction | | | 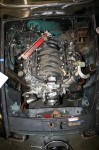 | January 1, 2010 - I spent a bunch of time today simply crawling around the car, figuring out what needs to be done.
The short version: lots.
By doing a bit of reworking to the heater box above the transmission tunnel, I think I can pull the drivetrain back by another .75". That will give me a bit more room on the steering crossmember and move the shift lever back to the back of the factory hole instead of in the center. I can deal with where the engine is now but I'd prefer just a little bit more room at the front.
While the engine is out so I can cut the heater box, I'll fully weld and reinforce the front frame so it can deal with the load of the engine. That's going to be a bit of a tough call, but I think I can do it.
This is a very tight fit overall. The exhaust routing will definitely be through the fender wells, and I'll have to make sure it doesn't interfere with the tires. The accessories all fit nicely, that's a bonus. I'm trying to figure out how large a radiator I can stuff in here, and how the fans will fit. Brake hydraulics will be a big challenge if I want to keep power assist.
So much to do.
entry 245 - tags: fitment, first fitment, space | | |  | January 3, 2010 - I pulled the engine out again so I could chase down the fitment problems.
Step one was to reinforce the front end and finish up the welding. Previously, the steering crossmember was only tacked into place and the clearance cuts were unfinished. So I filled them in, added some diagonal braces/fillets and finished the welding. I also closed off the front of the frame rails.
Not visible in the picture is the beginning of the connection between the vertical suspension member and the unibody. The driver's side is partially done. I've also spent some time figuring out the design up the upper shock mounting tabs, as I need to make sure they're in place when I finish the bracing.
entry 246 - tags: frame | | | 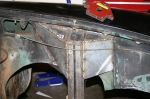 | January 7, 2010 - More sheetmetal work today.
I continued to reinforce the shock towers (for lack of a better term), tying them firmly into the chassis. The existing sheetmetal is welded to the outside edge of the upright tube, and the plates tie it in on the inside. I think it'll be strong enough, although I'm still going to put a few bars running across and back to the firewall, depending on fitment. There's also one piece missing that will be added as soon as I know exactly what's going on with the exhaust routing.
I also attached the upper shock mounting points for the front, so I now have a complete front suspension. When the passenger's side shock tower looks like this, I'll basically be done with the front.
entry 247 - tags: sheetmetal, suspension | | | 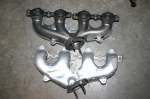 | January 7, 2010 - The exhaust manifolds that came off the Camaro were odd - they were made out of a couple of pieces of stamped steel welded together.
They also put the exhaust on the passenger's side right into the footwell. Not cool.
Just for fun, I brought these guys home. They're the manifolds that come off the LS3 crate engines we use at Flyin' Miata. I'm not sure exactly what they're originally for, but they're pretty nice looking. The driver's side (bottom in the picture) has a dent to clear the steering column, and the passenger's side runs downwards instead of back. If I can use them, it'll save me a huge amount of work.
entry 248 - tags: exhaust | | | January 7, 2010 - Dumb.
Remember my trip to the junkyard to pick up some Rabbit fenders so I could scavenge the arches? At the time, I thought the rears might actually work pretty well but the yard wanted a pile of money for them.
Well, it turns out you can get patch panels to repair Rabbits. New front fenders are available from JC Whitney and others, but even better Rabbitparts.com carries a rear arch repair panel that's exactly what I need. They're only $48 each and brand new steel. I'm going to pick up a pair to see how they work, and I may end up ordering another pair to replace what I have if the shape looks a bit better.
Yeesh. Never thought to check before.
entry 249 - tags: body | | | 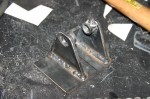 | January 10, 2010 - It was a day of fabrication.
I spent the whole day cutting weird shapes out of cardboard, duplicating them in steel and then welding them in. The stock inner fender sheetmetal is fairly thin, so it takes a certain amount of finesse not to burn through it.
I finished up the shock tower on the passenger's side, and I'm happier with how this side came out. I was smart enough to tie the inner metal directly to the upright first, then add the new braces. I have some work ahead of me inside the wheel well on the driver's side. Still, the front end is obviously much more solid now and I'm pretty much done with it for a while.
The guy in the picture is an upper shock mount for the rear. I went through a couple of designs for this, and this is the final version. The plate will be welded inside the wheel well and will help spread the load somewhat. The spacers on the inside of the mounting tabs help keep the tabs clear of the adjuster on the shock, allowing me to put a wider base on the tabs than I would otherwise.
entry 250 - tags: suspension | | | 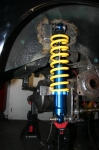 | January 11, 2010 - A rear shock in place!
Very exciting. The place where I mounted the plate for the upper shock mount is well tied into the structure of the car and is very solid - although there is some carpet just on the other side at one point, which I got a little warmer than the designer intended. The mount on the axle is only tacked in place, but that's an easy thing to change. I have to pull the rear end out to put a lower mount on the driver's side.
The upper mount is positioned so the shock is almost bottomed out when the stock bumpstop - visible above the axle in this shot - is compressed and the other wheel is at full droop. Worst-case scenario, of course. But there's a problem. When I assembled everything, I discovered that I only had about an inch of droop travel at my expected normal ride height. I've been spending so much effort on making sure I have lots of compression travel, and with my 5" long shock travel I assumed I'd have good droop. Nope.
Maybe my worst-case scenario was a little too worst-case. I'll have to do quite a bit of surgery to the stock wheel well to make that happen. Heck, I knew that already. Still, I do have an option. AFCO sells a replacement upper rod end that's an inch longer than the ones I have. This would cut an inch of my compression travel (would it be missed?) and give me another inch of droop. We'll see how things work when the car hits the road. For the time being, I'm just happy that I have suspension on three corners now!
entry 251 - tags: suspension | | | January 13, 2010 - Good question.
Someone on the Grassroots Motorsports forum asked about the relative difficulty of building a car like my Seven or the MG. For those who don't want to go read the discussion on the forum (there are some good points from other folks to do with registration and the like), here's what I answered. Note - I don't usually refer to the Seven as a Locost because I didn't build the frame. But that's what it is. Warning, long!
Here's a point-by-point comparison.
The Locost is basically a clean sheet when it comes to packaging, and the frame is built to accommodate whatever powertrain will go inside. Before the first piece of metal is cut, there are no constraints. This can cause a problem for some people, as design paralysis can kick in But it does side-step some problems right from the start.
The MG, on the other hand, is heavily constrained. The new drivetrain has to fit into an existing package. In my case, I'm making dramatic changes to the car to build what I want to build, but I still have to fit everything into the body and deal with things like the pre-determined position of the fuel tank or the steering column. Of course, this also means I don't have to deal with problems like trying to figure out where to place and how to mount the fuel tank. But just think of the exhaust - on a Locost, you stick it out the side of the car. With the MG, it's going to have to go under the car and thread through the suspension.
The Locost is very simple. It's a car, distilled. There's nothing there that isn't required. This makes life easy.
The MG, not so much. It's expected to be a real car with a heater, a certain amount of sound and noise insulation and the like. Of course, most of the hard work has already been done - the windows roll up and down, it's carpeted, it has a heater and ventilation plumbing, etc. Some care is required to retain all this.
The Locost is built out of clean steel. The MG has 40-year-old undercoating. Yuk.
With the Locost, you're responsible for everything. Need fenders mounted to your wheels? Make a bracket. Need seats? Figure 'em out. Need a steering column, a fuel filler, a scuttle, etc - it's all you. You've got some design freedom, but nothing comes for free. You have to solve every single problem involved in designing a car. This is the biggest part of the work.
With the MG, I only have to deal with the parts I'm changing. I don't need to figure out how to hang doors, mount the headlights or deal with airflow management behind the dash. That's been done for me. This helps. Of course, it would have helped more if I hadn't tossed the stock suspension away!
So which is harder? From a problem-solving point of view I'm going to say the MG, due to the existing constraints. For example, I'm not only going to have to figure out a steering column, but I have to figure out how to make it work with the existing firewall and column mounting. But it's a pretty close race, and if I'd decided to do a more traditional 302 or Rover swap into the B - which would have retained the suspension front and rear - then it would have been the other way around. My MG is a pretty extreme makeover. It helps that I have the knowledge that I gained during the Locost build, I suspect, but it's difficult to quantify that as I always assume when looking back that I knew then what I know now.
Time is hard. I didn't build the Locost frame, and I was single then. Instead of building in my own garage living on my own, I'm building in a garage that's attached to the house I share with my wife. This means no late-night grinding and hammering. It also takes me longer to do simple things like make dinner! I'm going to estimate similar time overall.
Money? That's such a variable. I think it's actually going to be pretty close. I could have found a cheaper MG (heck, a free one found me recently that would have been a perfect starting point) but I also bought my Locost frame. I don't pay attention to the total costs, I don't want to know. I just try to do everything for the minimum cost to do it right.
In terms of skills, I'd put them at a wash. I'll have to do more fine bodywork on the MG (no rivets here) due to my need for flares, but overall the basic skillset of shaping and welding metal, wiring, plumbing and painting is the same. Had I found a different MG to start with, I expect rust repair would have been a new skill I'd have to learn. But it's just an application of the metal and body work.
entry 252 | | |
|

 THE DIARY