| LIFE OF A GT |
|
|
 | | 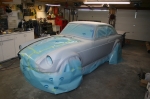 | June 15, 2011 - And voila!
A coat of primer. Unfortunately, only one coat instead of 2-4 because I ran out. It's amazing how much better it looks already. I'll go pick up some more primer so I can give it a bit more. Some of it is still wet in the picture, thus the darker area around the front wheel.
Having the whole car one color makes it obvious where I've done well and done badly on my shaping. On the passenger's side, it looks quite good and I'm happy with that. The driver's rear needs some more work, mostly because I'm dealing with the skim coat put on by the previous painter. So I'll do some quick touch-up there and try again.
Much more sanding to come - but this will be much quicker than before.
entry 572 - tags: body, primer, paint | | | 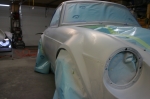 | June 15, 2011 - Here's a look at the shape of the front flares.
I'm happy with how they turned out, especially this right front that gave me so much trouble.
The ragged line in front of the flare will be covered by the stainless trim along the side of the car, so just ignore it.
entry 573 - tags: body, primer, flares | | | 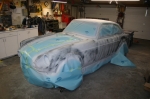 | June 15, 2011 - Some vandal defaced my paint job!
Oh, no, wait. That was me. I shot a thin coat of black primer over the white as a guide coat.
Well, first I gave the car a couple of extra coats of the white primer to build up the coat. Then the guide coat. Now I sand the guide coat off. The purpose of this is that it will highlight any low spots in the paint as the high points sand to white and the low spots stay black. Thus allowing me to find and address problems that will show up in the shiny final paint.
I should point out that this isn't a "how to paint a car" tutorial. I've done a couple of cars in the past, but I'm still very much an amateur. In fact, this is the first time I've done a primer coat like this.
Luckily, primer is made to be sanded. So this is actually a very satisfying job.
entry 574 - tags: primer, paint, body | | |  | June 15, 2011 - Here's an example of how the primer has helped with the shape of the car.
This is the transition from the side of the car to the fender flare in the rear. The different colors are different layers, with the yellow body filler on the bottom. In order to get that guide coat fully off, I had to sand down further in one section of the flare. The result now has a smoother shape to it, cleaning up a bit of a step in the angle that was invisible before. There's still a bit of guide coat visible at the right of the picture, I'll get it later. You can see the amount of material that's been sanded off at the left - getting this car dust-free again for the color coat may be a challenge.
The primer coat is proving to be fantastic at finalizing the shape of the car. Sections that were just a little rough are cleaning up and everything is flowing together really well. I'm really happy with it. It's also moving quickly because the primer sands so well. I'm using both 240 grit paper and some fine sanding blocks for this step. The foam sanding blocks are great for dealing with those compound curves, while the paper on longer blocks help make sure everything's flat.
entry 575 - tags: primer, body, flares | | |
|

 THE DIARY