| THE MG |
|
|
 | | 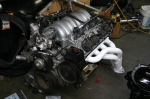 | August 19, 2010 - I've also been playing with the engine.
The most obvious is the new white headers. They were starting to pick up some surface rust sitting around the garage, so I grabbed a can of high temperature header paint to give them a nice coat. Black would have hidden the welding better, but I'm a sucker for white headers as followers of the Targa Miata know. I think they look awesome. Why paint and not ceramic? Because that's expensive and I've had pretty good luck with this paint. It'll do for now.
I also swapped the original Camaro intake manifold for my Corvette one. This isn't due to any sort of performance increase, but because I painted it to look like aluminum! Of course, it's not completely convincing. But it's a nice change from the usual black plastic and I think it'll look even better as it ages - ie, gets a little bit of dirt on it.
The Corvette manifold does have two differences, though. First, it doesn't have a hole for an EGR fitting, so I won't need to plug that. Good. Secondly, it doesn't have threaded holes for the throttle cable due to the drive-by-wire Corvette. Umm, bad. I'll fix that.
With the dressed engine sitting beside the painted rear axle and with the car freshly painted up, things are looking really nice!
entry 366 - tags: engine, paint | | | 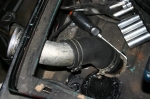 | August 23, 2010 - Exciting stuff - the fuel filler is in place.
Well, actually, this is exciting. It means the gas tank is bolted into place for the last time. The assembly I'm doing now is final assembly, and that's the exciting part. Real progress: the pile of parts around the car is shrinking!
Originally, the fuel filler on the tank entered the trunk floor straight below the filler neck. You can see the patched and repainted hole in this picture - it'll be covered by sound deadening or carpet when the car is assembled. Since I had to move the tank over to make room for the exhaust, I had to make the filler wiggle over a few inches. A bit of back-room shopping at NAPA yielded a filler hose with a 45 degree angle. It worked out perfectly.
entry 367 - tags: fuel | | | 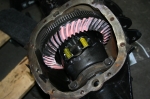 | August 24, 2010 - The differential in its final home.
Quite colorful! Hopefully, this will be the last glimpse of it I see for a while, it's time to button this thing up.
entry 368 - tags: axle | | |  | August 24, 2010 - Before I can install the axles for the final time, it's time to put the studs in.
I tried to overthink this and attempted to press them in with my big bench vice. Whoops - one broken vice. I couldn't get the geometry right to press them in with the press at work. So I figured I'd try what I considered the last resort and use a lug nut to pull them in. That spacer has a nice thick wall so it's strong, and the washer lets the lug spin against it.
And whaddya know, it was quick and easy. I hit the lug nut with the impact and the stud just sucked into place in a couple of seconds. Why did I try so hard?
entry 369 - tags: axles, stud | | |  | August 24, 2010 - I found my driveshaft wouldn't give me the ability to get full droop out of my suspension.
That's not good! The problem was two little bosses on the yoke at the transmission end. A couple of minutes with the die grinder and now I have a full range of motion all the way around. The bosses weren't structural as far as I can tell.
One step further! I did a bit more painting with POR-15 under the car tonight and did the final connections on the gas tank, so it's almost time to stuff that axle under the car and call it done. Well, I know it'll come out again for various reasons. But maybe not for a long time.
entry 370 - tags: axle, driveshaft | | | 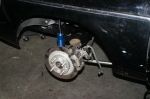 | August 29, 2010 - As promised (threatened?
), the rear axle has been installed. It's full of fluid, has the axles installed, brakes bolted up - it's all looking quite serious now! I still have a few things to do back here, such as working out how to make the Miata and the MG emergency brake systems and locate the platform for the bumpstop. You can see it here sitting on top of the axle. The bumpstop is installed on the chassis. I have to set things up so the bumpstop reaches full compression right before the shock bottoms out. Thus the lack of a spring, so I can do range of motion testing.
I pulled one of the bumpstops off a while back to play with it, and haven't been able to get it back on since. They fit over a mushroom shaped stud, so they have to deform to pop into place. Well, I finally got a brainstorm - I sprayed a bit of Simple Green on the bumpstop (great for lubricating exhaust hangers as well), held it in place, then used a jack to push the axle up. The axle pressed the stop into place with an easy little pop. Sometimes the thinking is much harder than the doing!
entry 371 - tags: bumpstop, rear axle, brakes | | | 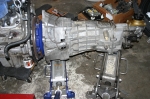 | August 29, 2010 - It's almost time to put the engine in.
But first, I need to get at the slave cylinder. See, the Camaro uses a sealed hydraulic system and I need to mate it to the MG (or a different) master cylinder. It's also hard to bleed the system with the transmission mounted in a small car, or at least that's the fear. So I used the same setup that Flyin' Miata uses in their V8 Miatas. It's a new braided line with a banjo fitting on the end and a second long hose with a cap on it, used for bleeding. Easy enough - but I had to split the engine and transmission to do it.
The T56 transmission is a heavy beast, about 140 lbs. So I used a pair of jacks to hold it level as I pulled it free from the engine. And here's the first surprise - a Spec clutch. Normally, the smart thing to do when you've got your engine and transmission cracked apart is to put in a new clutch, but this one felt pretty good in the Camaro. So it's going to stay.
I thought there had been a change in slave cylinder designs, so I had a new one of the latest design ready to pop in. Well, turns out this car had the same design. It may have dated from the installation of the Spec clutch (remember, this engine was rebuilt about 30,000 miles ago) but whatever the reason, I may not have needed that new slave. Oh well, in it goes.
With the two-jack technique, the transmission slipped right on to the engine smooth as silk. It's never that easy. Which means something must have gone wrong.
entry 372 - tags: transmission, clutch, slave, hydraulics | | | 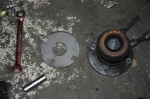 | August 29, 2010 - Of course there was a problem.
After I had the transmission all tightened down, I picked up the old slave cylinder and turned it over - and discovered this spacer hiding underneath. It's laser-cut steel, definitely not stock. It was probably installed with the clutch. Since the Camaro worked, it's also probably required as the old and new slaves are the same part number. So I had to pull the transmission out again. At least I was just working with an engine sitting on the floor!
Naturally, I ran into other problems. I pulled the slave off, installed the spacer and went to bolt it up again. And stripped out a thread on the aluminum transmission casing. With the spacer in place, there was less thread engagement. I ran a tap down the hole and dug through my collection of fasteners until I found a bolt that was long enough to make up the difference of the spacer. That worked fine, so then it was just a matter of reassembly. Sheesh.
Let's hope this all works!
entry 373 - tags: transmission, hydraulics, clutch | | | 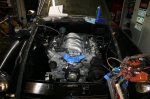 | August 29, 2010 - The next big step - a really big one.
The engine is now installed, hopefully to stay! Janel came in to help me wrestle the big beast into place and it was one of those situations where it looked like there was no way it was going to work - until it just slipped into place.
Now feel like I can really make some serious progress. Anything I do from now on stays done! Exciting? Oh yes.
entry 374 - tags: engine | | | 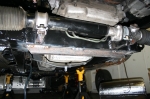 | August 29, 2010 - Of course, the first thing I did with the engine in place was to grind off some of that new paint.
The oil pan drops below the steering crossmember slightly, and I wanted to protect it from potential impacts. It should be 5" off the ground, but still. A piece of 1" square tubing welded to the bottom of the cross member does the job perfectly, offering to sacrifice itself in the event I meet a big obstacle. I'll paint it up again once I've done a couple of other things.
The piece of steel was actually part of the shipping crate the Seven arrived in. There's a little bit of each of the cars going into this one!
entry 375 - tags: oil pan, protection | | | 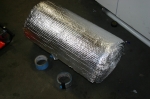 | August 29, 2010 - Before I start installing the exhaust, I want to add a bit of heat resistance.
I'll have some inside the car under the carpet, but the headers run pretty close to the footwell. Enter Reflectix: a great heatshield for use under the car. It's basically bubble wrap with an aluminum coating, making it very light and completely weatherproof. It's also inexpensive (I think this roll was under $20) and super-light. I've been running it in the transmission tunnel of the Targa Miata for a few years and it's working well.
entry 376 - tags: heat insulation | | | 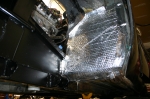 | August 29, 2010 - The Reflectix in place.
It's held in with foil tape - the kind that's actually waterproof enough to install underwater. Again, something I've tested on the Targa Miata. This is the driver's footwell from the viewpoint of the wheel.
I realize I should have sprayed a bit of black paint on the original panels here to make it look better. And I might have to replace this stuff after the fender flares are added. Whoops. Still, you have to admit it looks awesome.
entry 377 - tags: heat shielding | | | 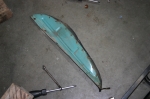 | August 29, 2010 - Before I could cover the passenger's footwell with the Reflectix, I had to fix this panel.
It attaches to the car's unibody and seals off the inside of the fender. Sort of, anyhow. But this one was all bent up. A bit of time with a vice and that problem was solved. It's a nice reminder of the original color of the car though!
entry 378 | | | 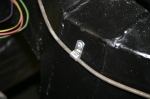 | August 29, 2010 - I'm having to pay attention to what I'm doing now.
A lot of this work is going to essentially be on display in the future, so a bit of time thinking on the cleanest way to do something will make a big difference. This is a new anchor for the hood release cable. I was going to use a plastic anchor, but this aluminum one just looks so much better!
In a similar vein, the hood latch itself went into the bead blaster and got a new coat of paint. It's front and center in the engine bay, why not?
entry 379 - tags: details | | | 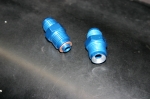 | August 31, 2010 - I'm often accused of having an unfair advantage when building cars because I work at Flyin' Miata.
The advantage is access to exotic tools and knowledge. I've discussed the exotic tools before, but what about the knowledge? Well, I spend all day sharing that knowledge with other people, but it is coming in handy at this step.
I needed to hook up the power steering lines. A GM pump and a Miata rack. Luckily, this is the exact combination used in the V8 conversions at FM. So I used my special insider knowledge and went to the FM website to get a parts list of what I'd need. Yup, special insider knowledge that's shared with the entire world!
These two parts are the adapters to convert the fittings to common AN-6 ones. The one the right is specially machined to mate with the flare on the Miata rack, the one on the left is off-the-rack with a special washer as the usual o-ring doesn't seal. My advantage was that I didn't have to order them and wait for the parts to arrive, but I was able to simply go pick them off the shelf for instant gratification. I'm still missing one 90 degree adapter - the different packaging of my setup requires different hose routing - but it's almost all hooked up now.
entry 380 - tags: steering | | | 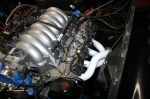 | August 31, 2010 - I'm working on routing all the various hoses and wires, and I have to make sure they stay clear of the hot stuff.
Which means it's time to bolt the headers on. And oooooh, do they look good. Yum!
However, I did discover a problem. When I built the headers, I bolted the flanges on to the head using just the two end bolts. I did the same every time I checked fitment as well. Except this time, when I decided to put in another couple. And that's when I realized that I'd welded the flange on upside down on the driver's side! The end holes are symmetrical, but the others aren't. Oooops.
Luckily, there's a lot of meat on the flange and so all I have to do drill some new holes. I can use the gasket as a template. So at the moment, it looks as if my mistake won't be difficult to fix.
entry 381 - tags: headers, mistake | | |  | August 31, 2010 - I may not need it, but I fitted a cooler to the power steering loop.
It's a small transmission cooler. It's anchored at one end to the support under the hood latch and supported by the power steering lines on the other. Works nicely. The fins are pretty fragile so I've wrapped it in cardboard to protect it for the time being.
entry 382 - tags: steering | | | 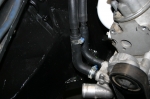 | August 31, 2010 - The heater connections are two different sizes (3/4" and 5/8") and aim straight sideways at the frame rail.
This happens in Miatas as well, so I grabbed the same hoses used on the Miata builds. The big one is necked down to 5/8", then they're both dropped to 1/2" to mate up to the MG heater.
entry 383 - tags: heater | | | 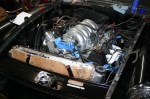 | August 31, 2010 - The current state of the engine bay.
The radiator is in and fully hooked up - it took me a while to remember how I'd intended that lower hose to work! Power steering is all plumbed in other than the one missing 90 degree fitting. You can see the heater hoses looping around the left side of the picture. I'll anchor them down shortly to give a nice clean install. You can also see the refreshed hood latch and the relocated VIN tag at the bottom of the picture.
Okay, that's enough playing around with the big, fun, rewarding stuff. Time to work on the wiring.
entry 384 - tags: radiator, heater | | | September 3, 2010 - Janel commented a while ago that "there didn't seem to be a sense of urgency about this one".
She's seen me consumed by my projects before - she met me just around the time I started the whole Seven project, and the Targa Miata really sucked me in. Well, that was true. I've been taking my time with this one.
But now the fever is upon me. I'm doing things for the final time and I can see real progress happening. So I've fallen upon the car with vigor and enthusiasm, and Things Are Getting Done.
entry 385 | | |
|

 THE DIARY