| LIFE OF A GT |
|
|
 | |  | January 22, 2010 - It's time to make sure I have room for some real brakes.
The car originally came with unboosted brakes, and long-time readers will remember that I rebuilt the master cylinder. That was back when I thought I'd be driving the car as a four-cylinder for a while. Ah, those were the days.
Purists, of course, claim the unassisted brakes are superior in almost every way. But those who are sensitive to subtle hints may have noticed that I'm not much of a purist. I have several cars with unassisted brakes (interestingly, they're all British or replicas thereof) but this car will have a fairly intense power/weight ratio, and I want power assist. Besides, the whole braking system has been replaced with Miata parts, and my rear discs take more pressure to operate than the previous drums.
The problem is twofold - first, there's not much room for a booster underhood. And secondly, the original pedals put the masters above the driver's feet - so there's simply no room for a booster at all in that setup. There are such things as remote boosters which are intriguing. A number of newer vans (and other packaging-challenged cars) also use a "hydroboost", which steals hydraulic pressure from the power steering pump for assist.
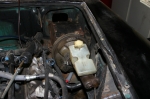
But there's an easier way. In 1974 or 75, MG added power assist to the MGB. And in order to do so, they used a very small brake booster, a master cylinder with an angled top to clear the hood, and a different pedal box that put the brake hydraulics in front of the pedal. And it's a simple bolt-in to the earlier cars - although most MG owners go the other way, installing the unassisted setup. I found a complete pedal box, booster and master on the MG Experience website and had it in my hands a week later.
The first trial installation showed that it's a perfect fit. The front outlet is fairly close to my shock tower mount, but a well-placed divot would take care of that. The rubber line that runs close to the booster is actually the vacuum line on the engine. It's just sitting there, I can easily route it with lots of room.
I need to do a bit of figuring with pedal ratios (looks like it's in the 4:1 range) and master cylinder sizes (0.75", apparently) and see what that does for my brake pedal travel. I may want a larger master, as the Miata has a similar (4.1:1) pedal ratio but runs a .875" master. I'll measure the MG one more carefully tomorrow. Luckily, mounting a Wilwood unit is fairly straightforward. So there may be no reason to put that dent in the sheetmetal anyhow.
First, I'll stick this setup in the bead blaster and make it all pretty!
I've been puzzling on the best way to package this for a while, looking at various booster combinations. But I'm really happy with this result. I think it's going to be very clean.
entry 258 - tags: brakes, hydraulics | | | 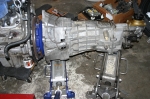 | August 29, 2010 - It's almost time to put the engine in.
But first, I need to get at the slave cylinder. See, the Camaro uses a sealed hydraulic system and I need to mate it to the MG (or a different) master cylinder. It's also hard to bleed the system with the transmission mounted in a small car, or at least that's the fear. So I used the same setup that Flyin' Miata uses in their V8 Miatas. It's a new braided line with a banjo fitting on the end and a second long hose with a cap on it, used for bleeding. Easy enough - but I had to split the engine and transmission to do it.
The T56 transmission is a heavy beast, about 140 lbs. So I used a pair of jacks to hold it level as I pulled it free from the engine. And here's the first surprise - a Spec clutch. Normally, the smart thing to do when you've got your engine and transmission cracked apart is to put in a new clutch, but this one felt pretty good in the Camaro. So it's going to stay.
I thought there had been a change in slave cylinder designs, so I had a new one of the latest design ready to pop in. Well, turns out this car had the same design. It may have dated from the installation of the Spec clutch (remember, this engine was rebuilt about 30,000 miles ago) but whatever the reason, I may not have needed that new slave. Oh well, in it goes.
With the two-jack technique, the transmission slipped right on to the engine smooth as silk. It's never that easy. Which means something must have gone wrong.
entry 372 - tags: transmission, clutch, slave, hydraulics | | | 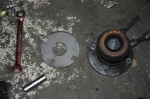 | August 29, 2010 - Of course there was a problem.
After I had the transmission all tightened down, I picked up the old slave cylinder and turned it over - and discovered this spacer hiding underneath. It's laser-cut steel, definitely not stock. It was probably installed with the clutch. Since the Camaro worked, it's also probably required as the old and new slaves are the same part number. So I had to pull the transmission out again. At least I was just working with an engine sitting on the floor!
Naturally, I ran into other problems. I pulled the slave off, installed the spacer and went to bolt it up again. And stripped out a thread on the aluminum transmission casing. With the spacer in place, there was less thread engagement. I ran a tap down the hole and dug through my collection of fasteners until I found a bolt that was long enough to make up the difference of the spacer. That worked fine, so then it was just a matter of reassembly. Sheesh.
Let's hope this all works!
entry 373 - tags: transmission, hydraulics, clutch | | |
|

 THE DIARY