| THE MG |
|
|
 | |
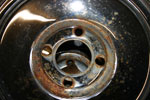 | April 21, 2008 - A little surprise awaited me when I pulled off the old wheels.
They weren't intended for this bolt pattern. Someone egged out the holes to make it fit. Dodgy. It turns out these wheels were originally intended to be fake wire wheels, but the wire overlay is missing.
Between the questionable aesthetics, the completely dead tires and the ugly bolt pattern work, they're going to the scrapyard.
entry 32 - tags: wheels |
| |
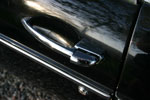 | April 21, 2008 - Typical of the little jobs ahead, the driver's door handle needs fixing.
Nothing major, I'm sure, just something else to take up a pleasant hour or two of fettling. I enjoy this kind of thing, as while it's easy to get used to a wonky door handle like this, it feels really good the first time you walk up to the car and the handle works perfectly.
entry 33 |
| |
 | April 23, 2008 - Time to change out the badge on the grille.
The first step is to figure out how the original one is attached. So I disassembled the grille, only to discover that the original was stuck on with double-sided tape. A prod from behind with a screwdriver popped it out.
entry 34 - tags: grille, badges |
| |
 | April 23, 2008 - The old and new badges are not identical.
The new one (the red) is completely flat and has a bevel on the back side. The black one does not have the bevel and is ever-so-slightly larger. A bit of time spent with a grinding wheel and lots of test fitting, then a touch-up of the edges with black marker and it pops right into place.
entry 35 - tags: grille, badges |
| |
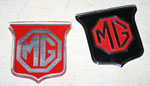 | April 23, 2008 - Side by side, there's a surprising difference in the badges.
Not just in terms of color scheme - that's obviously a personal preference - but in execution. The red badge that came with the grille was sloppily made, with a couple of clear voids between the silver and the red. It was also a simple flat piece that had the colors applied to the back.
The new one actually has some relief to it. The silver sections are raised (or embossed if you look at the back) and there's much finer detail in the design. The raised silver bits catch the light and make it look like a fine piece of work, as opposed to a cheap printed unit. It's also made to a higher quality level, with no gaps or voids.
The clear strip along the top is the result of my preliminary sanding efforts that took some black paint off the back.
entry 36 - tags: badges |
| |
 | April 23, 2008 - The new old badge in place!
A bit of attention with a grinder - being careful not to hit the edges of that chrome border! - followed by a touch-up with a marker and it dropped right into place. It looks far better.
Instead of using double-sided tape to attach it, I used some 3M badge adhesive. Not the best choice really, it did some slight damage to the paint that's visible in this picture. Not that anyone else will see it, but I know it's there. Of course, now I remember where I put the tape...
entry 37 - tags: grille, badges |
| |
 | April 23, 2008 - Time to stop messing around with badges and grilles and time to fix a real problem.
The brakes. The master cylinder leaks badly and has to be rebuilt. I picked up a rebuild kit from The B Hive.
The first step is to remove the master. It's a bit of a puzzle really. It will come out, but you have to discover just the perfect way to twist it. I went a little further in disassembly than I really had to, but I got it out!
entry 38 - tags: brakes |
| |
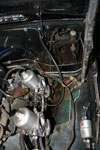
 | April 23, 2008 - A side discovery when gaining access to the brakes was that there are no air filters on the car.
Seriously? This is the second time I've purchased a car from California to discover there are no filters installed. What is it with that state?
entry 39 |
| |
 | April 25, 2008 - The master is out of the car and on the bench.
Time to rebuild it!
entry 40 - tags: brakes |
| |
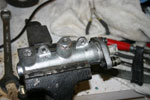 | April 25, 2008 - The first thing I did with the master was stick it in the bead blaster.
I haven't actually done anything to repair it yet, but it looks almost new now!
One thing I did do was install some Time Serts into the mounting flange. The factory used nuts and bolts here, and the lower nut is almost impossible to access. The Time Serts - similar to Helicoils - will let me use bolts that thread right into the master cylinder. Much easier. These particular inserts are too long to be ideal, but they'll work. Tapping the holes in the flange would probably also have been just as effective.
entry 41 - tags: brakes |
| |
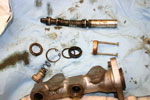 | April 25, 2008 - The master is mostly disassembled.
There are two snap rings that could be easier to reach! A pair of small needle-nose pliers did the trick, though. There's also a nylon spacer that is very reluctant to come out, so I borrowed a trick from the MG Experience forum and inserted a couple of screws to yank it out. A replacement came with the rebuild kit.
The next step was to take the piston apart to replace a couple of the seals. This was the most difficult part of the job. The assembly is held together by a couple of tiny roll pins, and it's difficult to gain access to them without marring the steel. It took a lot of effort (and some frustration) but I eventually won. I used a modified "precision screwdriver" as a punch and ground it down to the perfect diameter after some trial and error.
entry 42 - tags: brakes |
| |
 | April 25, 2008 - The inner bore of the master looked very good, much to my relief.
So I gave it a quick hone with this honing tool then put everything back together.
Of course, on reassembly, I had to remove the master a couple of times before I was done. Every time it had to come out, it fought me more. More frustration and I never did clean out the pedal box area as well as I should. I'll get the pressure washer in there soon and give it a good blasting.
entry 43 - tags: brakes |
| |
 | April 25, 2008 - Time to get rid of the teal "lips" left over after the original grille was removed.
I had a can of glossy black auto paint that was used to paint the Mini's arches, and it proved to be a very good match to the MG. A quick bit of masking and voila! No more lips. Sure, it's not a Pebble Beach concours job, but you have to be on your knees in front of the car and about a foot away to notice. Which I believe is how things work at Pebble Beach...
entry 44 - tags: grille, paint |
| |
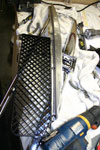
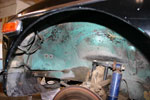 | April 25, 2008 - While I'm painting things and I have the wheels off, it's time to take care of these teal wheelwells as well.
I used a different black for this - a satin color. After all, they're not supposed to be shiny. Just dark.
Note the tube shock conversion in the front. That was a surprise!
entry 45 - tags: paint |
| |
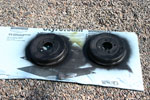 | April 25, 2008 - More painting!
This time, the rear brake drums. They were ugly and rusty and very obvious behind the new wheels. So a shot of satin Rustoleum and we're good. You might notice that this is three different types of black paint so far. I used four, but I forget what the other was for! Oh right, the cover for the pedals.
So, how did the brakes turn out? Well, it took a bit of cleverness to get them bled properly with the dry master, but once we got a bit of fluid moving through they pumped up nicely. So it looks as if my brake master was a success, at least in the short term.
entry 46 - tags: paint, brakes |
| |
 | April 25, 2008 - I gave the car an oil change to get rid of the 6-year-old oil in the sump.
The oil filter definitely did not want to come off, but eventually succumbed to a screwdriver hammered through. Crude but effective. I went to drain the oil cooler and - yuk.
So the cooler got cleaned (lots of brake cleaner did the job) and cleaned again. I also discovered that it had been mounted with a couple of sheetmetal screws run through the tapped holes in the body. Oh, and mounted crooked. Nothing but the best! So I ran a tap down the four mounting holes, got four matching bolts and installed it properly. All the holes lined up perfectly - there was just a real hack working on this car at some point.
entry 47 - tags: engine |
| |
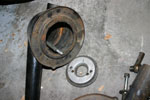
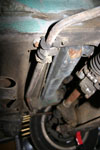 | April 25, 2008 - While underneath the car to change the oil, I discovered the state of the sway (or anti-roll) bar.
Looks as if it was used to drag the car on to a tow truck or something, a long time ago. Oh well, that's an easy fix. I was going to change the bushings anyhow.
entry 48 - tags: suspension |
| |
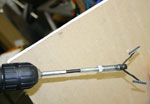
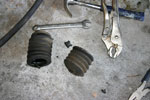 | April 26, 2008 - One of the steering boots was broken, so it got replaced.
Easy enough, although the "precision engineered" replacement from NAPA (it said so on the box!) was anything but. It was a bit of a fight to get the undersized small end over the surprisingly hefty tie rod, but I won. I always win. It's just depends how badly the car has to lose.
entry 49 - tags: steering, suspension |
| |
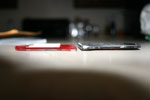
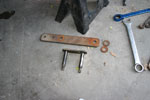 | April 26, 2008 - Time to change the shackles while the car's up in the air.
On top, one of the monster ones the car came with. On the bottom, a stock GT shackle. It's about 2.5" center to center, by the way.
Interesting note - the droop of the suspension doesn't seem to have changed with the new shackles. I suppose that's because it's basically limited by the shock. But it sure compresses a whole lot further. The car sits much more level and the rear wheels are nicely tucked into the wheel wells.
entry 50 - tags: suspension |
| |
 | April 27, 2008 - With the new shackles on the rear, the car sits very close to level.
I haven't checked with a tape measure yet, but it looks right. With the rear wheels tucked into the wells, it's obvious that there isn't room for a massive spacer to move them outboard. It looks much better than it did lifted anyhow.
One thing that's apparent is that something's not right with the rear suspension. It's rock solid, with almost no give at all. I'd swear it was sitting on the bump stops but inspection shows that is not the case. It's not seized, as there's definitely movement when I lift the car. But when I push on a fender I get almost no deflection. I wonder if the aftermarket tube shocks are too long and are bottoming out internally? I'll pull apart a few components and see what I can figure out.
The new grille is fitted, although not yet permanently. The bumper overriders make a big difference visually, so they're probably going to stay. It sure looks a lot better than it did when it arrived! The car's coming together visually pretty well.
entry 51 - tags: suspension, wheels, grille, styling |
| |

 THE DIARY