| THE MG |
|
|
 | | 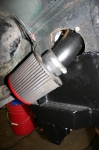 | October 26, 2010 - Here's where the filter lives, tucked in just below the headlight and behind the turn indicator.
It'll get splattered with debris from the front wheel at the moment, but clever use of a metal shield will solve that problem.
You can really see the difference between the new, POR-15 covered sheetmetal and the the 38-year-old original stuff!
entry 411 - tags: intake | | | 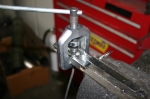 | October 26, 2010 - With the intake done, it's time to work on the brakes.
The master cylinder and the calipers are in place, but every line has to be custom-built. It's not the first time I've done this - I've built the braking systems on two of my cars from scratch and modified a couple of others - but that doesn't make it easy.
I started by picking up a roll of brake line. You can buy pre-flared lengths of line with the fittings already installed, but you get a cleaner fit if you cut and flare your own. I've learned the hard way that brake flaring tools are one spot where it makes sense to spend money. A good tool makes better flares, is easier to use and won't break in half after a couple of tries like a good one.
entry 412 - tags: brakes | | | 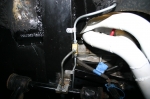 | October 27, 2010 - The front lines are done.
The upper line in the picture drops straight down out of the master cylinder and through the body. The header is pretty close to that master, so I wanted to get the line away from it as quickly as possible.
I originally had a different routing that seemed really clever as I put it together. As soon as I was done, I took a look at it and it was obvious how it should run. So I took it apart again...
The line for this wheel (the left front) joins up with the flex line at the pivot point for the upper control arm. The bracket is actually a Miata part that's originally used to perform the same job on a clutch line. The flex lines are standard Miata parts, and that OE mounting makes for a nice solid connection.
The line for the other wheel is fairly convoluted. It drops down, through another hole in the sheetmetal, over a frame rail, along the back of the steering crossmember and under the oil pan, then back up the way it came to a similar bracket on the right side. Not an easy one to make, but it's done now. The lines are anchored as much as possible to keep them from vibrating. I used some aluminum brackets that can be shaped to fit, but I'm going to keep an eye on them to make sure the brackets themselves don't fatigue.
entry 413 - tags: brakes | | | 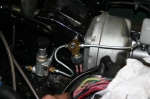 | October 27, 2010 - With the front lines finished, I moved on to the rears.
First, I needed to plumb in the pressure switch for the brake lines and the adjustable proportioning valve. The correct front/rear bias makes a huge difference to the effectiveness of a brake system, so I want to be able to fine-tune it for this particular mongrel. I considered mounting it in the cockpit as I did on a couple of my other other cars, but a street car like this one shouldn't need constant tweaking like those track-biased beasties. Besides, the routing works better this way.
The line from the master takes a bit of an odd route, circling around the body of the master. This gets the line away from the header and also gives me a chance to anchor it down. As an added bonus, it also gives more room for the vacuum line that feeds the booster.
entry 414 - tags: brakes, proportioning | | |  | October 31, 2010 - The brakes are done!
There's one long line that runs from the proportioning valve, over the brake pedal box, through a new grommet in the body, down to the bottom of the footwell, along the outside sill, through another grommet and finally to a hard line anchor like this one by the rear axle. Whew!
Once it gets to the rear axles, there's a tee and the line splits to the left and right rear brakes. Unfortunately, I couldn't figure out a way to run a hard line straight to the calipers. They use a banjo fitting, and the only banjo-to-flare adapters I could find were AN fittings.
This drives me nuts every time I work on brake systems. Modern cars use metric brake fittings. My local auto parts stores only have SAE fittings. And the performance aftermarket only uses AN. It's ridiculous. No matter how much I try, I simply can't use a consistent type of fitting through the whole car.
To make things more fun, SAE and metric fittings use a 45 degree flare. AN fittings use a 30-something degree one. They're not compatible, and you need a separate flaring tool to make the AN flares. So in order to adapt my hard lines to that AN-to-banjo piece, I'd have to buy another flaring tool. I don't know why the racing industry worships at the altar of AN fittings, they're only nice to have if you don't have any production items in the whole car. Otherwise you end up mixing and matching.
So, in order to deal with this banjo fitting on the calipers, I decided to use off-the-shelf Miata flex lines. A flex line is not needed here because there's no relative movement between the axle and the caliper, but they'll do the job and are easily replaced if the need arises. For the connection between the hard line and the various flex lines, I used some brackets off a wrecked Miata. It's interesting to note that this particular design of anchor is the same as used on the MG in the first place. Well, it works!
So, the plumbing is all done. I'll have to bleed them at some point in the future, and then I'll undoubtedly find some problems...
entry 415 - tags: brakes | | | 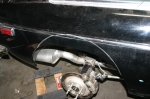 | October 31, 2010 - I was doing some testing on bumpstop length, and decided it would be a good idea to mark how much fender cutting will be required.
A piece of string with a loop at each end, a bolt to act as a center pivot and a silver Sharpie and voila! Here's the cut line. The inside of the fender actually has a lot more room, as I'm using the factory MG bumpstop and smaller diameter tires. But I pushed them outboard, of course.
entry 416 - tags: body, fenders | | |  | October 31, 2010 - Here's the cut line for the front fender.
This one's a bit more complex because the wheel has to move, but I'll cut this much first and then play with wheel angles.
entry 417 - tags: body, fenders | | | 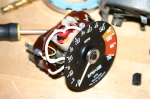 | October 31, 2010 - I've been learning about MG tachometers.
It's fairly normal to have trouble with older tachometers and LS conversions due to the signal from the GM computer. The usual problem is a voltage one, and the solution is a pull-up resistor. That didn't work.
So I asked the folks on the Grassroots Motorsports forum, and it turns out it's the tach used in the MG. Up until sometime in 1972, they used an inductive loop inside the tach to measure the ignition pulses - that's it with the white wire and the copper winding. Well, this works well with points but not with newer ignitions, it would seem. And of course, our 1972 MG has the old style, identifiable by an RVI part number on the face.
One piece of information I found suggested that dropping the number of loops of the white wire would help, but that didn't work. I suspect that's for when you change from points to an electronic ignition, and the distributorless setup from the GM computer is just too different. I guess this problem is well known in MG circles.
Luckily, there's no shortage of MGBs that have been turned into parts cars. There's an "RVC" tach on eBay right now with an identical face design, and it'll play nicely with the GM computer. I may still need the pull-up resistor, but we'll see when it gets here.
An interesting little side trip into gauge electronics, I have to say. And one that can be sorted out fairly inexpensively.
entry 418 - tags: tach, instruments, wiring | | | 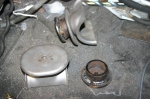 | November 1, 2010 - I didn't feel much like working on the car tonight, but I figured I'd wander into the shop and just do one thing.
Like bolt up that lower control arm that was next on the list before I had to stop yesterday. Arm bolted up, mission accomplished. Then I decided to trace out the cut line for that fender. And then I decided to pop the stainless steel trim off the side of the car to get an idea of how hard it would be (answer: easy). Then I saw the bumpstop targets on the workbench and decided to work on them for a bit.
This is how stuff gets done. By accident!
The bumpstop "targets" are the flat plates on the rear axle that the bumpstop bangs into. I took them off the MG axle. I'm sure they have a better name. Anyhow, I know I need to raise them up a bit for the new suspension. The AFCO shocks can damage their seals if they're allowed to bottom out, so I need to make sure I get this right. But unfortunately I can't tell exactly how much those bumpstops will compress. So the solution is to make them adjustable.
First, I welded a nut to the bottom, underneath the hole that MG thoughtfully left here for this purpose. This gives me the ability to bolt on spacers of various thicknesses. I'm going to start with a 1" pedestal. That's a bit conservative, but I can use a travel indicator to tell how close I'm getting to full shock compression and adjust from there.
entry 419 - tags: suspension, rear axle | | | 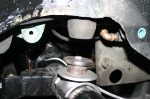 | November 1, 2010 - Here's an image of how the bumpstop target sits on the axle.
The middle of the bumpstop is nicely hollow to allow for the bolt head to fit inside. Notice how clean the 39-year-old bumpstop target is? The bead blaster strikes again!
entry 420 - tags: rear axle, suspension | | | 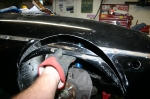 | November 3, 2010 - Time to make some room in the fenders!
For some reason, this cut filled me with a certain amount of trepidation. It's not like I'm dealing with a pristine automobile here, it's undergone massive reconstructive surgery. But this is the first cut that's visible from outside.
Sure didn't take long. Both front fenders are cut now.
entry 421 - tags: fenders, body | | | 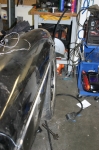 | November 3, 2010 - Here's a peek at the front wheel at full compression.
I have clearance for full lock and full bump, so that's good. It looks pretty cool like this. In fact, it almost looks as if I could have just stretched the fenders slightly. Not really, but it looks that way.
entry 422 - tags: body, fenders | | | November 3, 2010 - Today was a frustrating day.
I had the day off, so I planned to do lots and lots of work on the MG.
Last night, after chopping the fenders, I was playing with the rear axle and realized it was time to install the driveshaft. First problem: it's too long. At normal ride height, it's fully seated in the transmission with no room to compress. I suspect the Camaro ring and pinion has a slightly longer pinion yoke than the S10 part that was on the car when I made my measurements. Whoops. Well, at least it's easier to shorter a driveshaft than it is to make it longer. I dropped it off at the driveshaft shop to have an inch taken out.
While the driveshaft was in, I also discovered that the fuel line and main power line also rub against the driveshaft slightly. So they'll have to be moved.
Then I went out to my Toyota truck and discovered that it had developed an oddball ailment of trying to run the starter all the time. Of course, today was the day the "for sale" ad for the truck showed up in the paper. So I spent the entire day trying to chase down a weird wiring problem without any wiring diagrams. I haven't found it yet, but I did manage to chew up my entire day.
Like I said, frustrating. Today, entropy won.
entry 423 | | | November 6, 2010 - Progress has been resumed!
The recalcitrant Tundra has been vanquished. The driveshaft is an inch shorter. The fuel line and main power line have been rerouted to give more clearance for the shaft.
They might fight, but they don't win.
entry 424 | | | 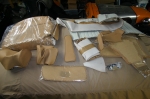 | November 7, 2010 - A giant package arrived from the UK.
This is a complete interior for the GT! What makes it special is the fact that it's "biscuit", a color that's not offered for the GT from Moss Motors and thus not from anyone else in the US. I don't know if it was a factory color for the GT or not, but it's what we have (well, it's the color of our seats and the rest of the interior was spray painted to match) and we like it. I bought it off eBay from Chase MG, and it looks really good.
Basically, it will replace every panel below window level including seat upholstery. All for around the price of one seat from Moss. Nice.
entry 425 - tags: interior | | | 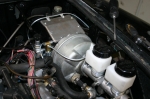 | November 7, 2010 - The braking system is all buttoned up.
The Camaro's vacuum line for the brakes was larger than that of the MG, but a 90 degree elbow with a couple of hose barbs took care of that. It's not the prettiest setup, but I'll sort that out later.
You can also see the convoluted rear line routine - out from the rear fitting on the bottom of the master cylinder, around the master, into the brake pressure switch, into the proportioning valve, then up and over the pedal box to disappear under the fender. Convoluted perhaps, but well anchored and it works.
entry 426 - tags: brakes | | | 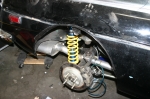 | November 7, 2010 - With the brakes all plumbed in, it's time to bleed them.
Unfortunately, I still have a mismatch of front brake pads (1994 Miata), brake rotors (1994 Miata) and caliper brackets (1990 Miata, which uses smaller brakes). I have a set of the later brackets on the way, but with Janel available to help me bleed I wanted to do something. Well, the Seven was just sitting there with an engine problem awaiting my attentions, and it uses the 1990 size brakes. So I grabbed the rotors and pads from that car and voila! Front brakes.
I've also cut the rear arches away to clear the tires on full bump. There's a double skin to the body here so some black duct tape was used to seal it up until I weld in an insert to join the gap. It was gratifying to see how clean the metal inside that cut section is. That's a rust spot for the cars, and mine was pristine inside. Was.
Time to bleed the brakes! All the suspension pivots have been torqued up and the springs are in place. Does it seem as if I'm working towards something here? Perhaps.
entry 427 - tags: brakes, suspension, body, fenders | | |  | November 7, 2010 - The brakes proved problematic to bleed.
I think I have one bad flare which will have to be sorted out, and it took forever to get the rears working. But I got them to the point where they'd stop the car, so it was time.
I bolted on the wheels, checked tire pressures, attached the hood and dropped the car to the floor. It's always fun how much smaller they get when they're sitting on their feet. This car's been on jackstands in the garage for a long, long time. The springs are 8" 375 lb in the front and 10" 250 in the rear, mostly because that's what I have. I snugged the spring perches up to the springs at full droop and nailed the ride height almost perfectly.
After a lot of shuffling around and shoving of bits and pieces into handy corners, I was able to free the MG and point it towards freedom.
entry 428 - tags: first drive, brakes, suspension, springs | | |  | November 7, 2010 - The first drive!
You can watch it on YouTube.
Overall, the first drive was a big success. Nothing broke. Nothing (unexpected) leaked. The car worked as expected. Cue the big celebration!
The car does feel very, very powerful and very light. The Miatas with a similar engine feel a bit beefier, possibly due to much fatter tires. The brakes were definitely not up to snuff - you can see me check them as I leave the garage. They were good enough for this little tour though.
The suspension was not noticeable, which means it was working! Obviously, tougher tests will come. No noises, clunks or anything worrisome. The clutch worked well once we both got used to where it engaged - the bigger problem was the gas pedal which is currently sitting much too high. The sound is excellent. The transmission did try to pop out of reverse, which is a trick it had been doing in the Camaro. There, I thought it was a matter of shifter adjustment and I spent some time fine-tuning that. But I was wrong. I'll look into that.
It wasn't a long drive, just a proof of function. And it did just that!
entry 429 - tags: first drive, video | | | 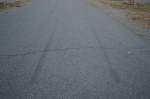 | November 7, 2010 - Well, you have to don't you?
I gave the car a bit of throttle and both rear tires immediately lit on fire. They're not great tires - Azenis 215s from 2006 or so - but it was still pretty spectacular. I don't have the rear seat in the car or the panel that covers the old battery boxes, so the inside of the car immediately filled with blue smoke. Very entertaining.
We did not get this on video, unfortunately. And we'd attracted enough attention the first time! There will be opportunity enough in the future.
entry 430 - tags: burnout, first drive | | |
|

 THE DIARY