| THE MG |
|
|
 | | 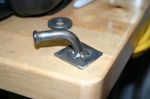 | March 16, 2010 - I needed a way to attach hangers to the bottom of the car.
The flat floor is a bit tough to weld to, so I welded the hanger to a small plate. The hanger itself is a piece of 1/2" bar bent to shape. I tried both a small kink and a bead around the end to keep the rubber from sliding off. Both seem to work pretty well.
entry 313 - tags: exhaust | | | 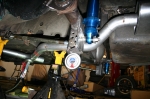 | March 16, 2010 - Once the muffler was in place, I was able to figure out the routing of the rest of the piping.
It's fairly straightforward. The only problem is the trailing arm bracket on the rear axle housing. It's nicely in line with the outlet on the muffler. The muffler is also higher than the axle at full droop.
A 45 degree piece out of the muffler, rotated about 45 degrees from vertical and mated to another 45 degree piece wiggled the pipe nicely around the obstacles. Nice and simple. I used jack stands to support the exhaust under the car - lots of jack stands. Once I figured out how, it went pretty quickly.
entry 314 - tags: exhaust | | | 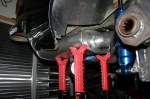 | March 16, 2010 - With one side of the exhaust done, now I have to do it all again - and make it symmetrical.
Uhoh. The first step is to position the muffler in exactly the same place. It's the most visible part of the system so I have to get this right. I won't weld hangers on this one until it's hooked up to everything else, to make sure I don't accidentally put a bit of variation in the system.
entry 315 - tags: exhaust, muffler | | | 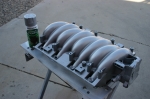 | March 24, 2010 - I can't do any work on the car for the next little while that involves flying metal, which is surprisingly limiting at this point of the build.
So instead, I took advantage of a nice sunny day to cast a spare intake manifold in aluminum. At least, that's what I'm hoping the result looks like. I figured the engine looks a little too plastic for the old car, so I shot my spare intake manifold with paint.
After some test sprays I decided a light hammered finish looked the most like metal. I think it'll be pretty good. I have to find some way to hide the coils that look appropriate. The proximity of the brake booster makes this a challenge. Maybe if I mount them remotely...
entry 316 - tags: intake | | | May 3, 2010 - Work has finally resumed.
I took some time off for lasik eye surgery (highly recommended), some engine work on the Targa Miata, a trip to Laguna Seca with three days at the track, etc, etc. But it's time to dig back into things.
I didn't get a lot of work done tonight - I repositioned the muffler in the perfect location again, then figured out how to snake the exhaust pipes past the Panhard bar mount on the axle at full droop and cut a couple of pipes - but it was a start. Expect more progress! Will the car run by the end of the month? It's possible...
entry 317 - tags: exhaust | | | 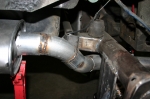 | May 10, 2010 - This was a fun little section to do on the exhaust.
The pipe has to twist around the Panhard bar mount on the axle and wiggle up to the muffler. And I had to do this while putting the muffler in the perfect place. The end result did have me welding up a bit of a gap - you can see the ugly resulting weld - but it'll do the job! It's just tacked together now, I'll clean everything up later.
Next step: hangers for this muffler. Then for the X-pipe. Then I do the headers.
Janel has a new job that keeps her traveling quite a bit during the week. This has shifted the timeframes I have available to work on the car - evenings are much easier to do, but weekends are pretty much out. I'm figuring it out now, so work should continue apace.
entry 318 - tags: muffler, exhaust | | | 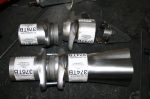 | May 12, 2010 - Exhaust work continues.
I now have the system complete up to the entrance to the x-pipe. Now I have to figure out the headers. My collectors have a 3" outlet and the rest of my exhaust system is 2.5", so I plan to use these ball flanges to neck things down while also providing a good spot to disassemble the exhaust. The problem is that the whole assembly is pretty long as you can see. I've cut down most of the parts and taken a significant amount of length out since this photo was taken. You can see the conical insert from Dynatech that should drop the sound level by around 2-3 dB.
I'd prefer to be using a slip-on collector as they're a lot easier to deal with than this minimalist one - but unfortunately, I don't have any. So I'll have to cope with it.
entry 319 - tags: exhaust, collector | | | 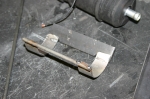 | May 12, 2010 - I'm also looking at laying out the fuel system and the packaging involved.
Not a big problem, really - more on that later. But first, I need a bracket for my fuel pump.
The pump is a Pierburg unit that should have no trouble with the big engine - I hope. It's a round piece with no mounting points. So, with the help of a short piece of exhaust tubing cut in half, I made this little doodad. I'll weld it on to the car and let it cradle the pump.
entry 320 - tags: fuel pump | | | 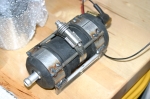 | May 12, 2010 - The pump is secured to the bracket with a clamp.
That's why the round bars connecting the two "hoops" for the pump. Sharp eyes will notice that the previous photo only had one bar. The reason is that the pump was able to rock too much with the clamp in place. Adding the second took care of that problem.
This is what it's like to build this car. Solving one small problem after another. It's fun. Now, where to put it?
entry 321 - tags: fuel pump | | |  | May 16, 2010 - Time for the headers!
I've built a couple of headers before - most memorably, the one for the Targa Miata - so I have a fairly good idea what I'm doing. In this case, packaging is my biggest problem. I'd love to do a nice equal length, long-tube header for maximum power but I simply don't have the room for it. So I'm going to settle for simply fitting everything in place. I figure it'll be lower restriction than the stock stuff (hopefully) and it's certainly not tuned length.
The key to making this relatively easy is the Ice Engine Works "header lego". It's a box full of little blocks that snap together. They come in straight and in 2", 3" and 4" radius bends. Each block is 1" of tube, which really helps when it comes time to make primaries of a particular length. In this case, I'm just trying to get things to fit. There's a fairly massive length difference between the front and the back cylinders.
The initial mock-up was done on the car and transferred to the work bench.
entry 322 - tags: header, exhaust | | | 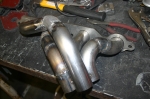 | May 16, 2010 - With a wave of the magic welder, the plastic mock-up has been transformed into metal!
Well, the magic welder, magic chop saw and magic sawzall. I tweaked the design a little bit to make it work better and to take into account the various diameter bends I actually had on hand. It worked out well, there's a bit of art to the way the front two tubes work together and it all comes together nicely. These are 1.75" tubes, by the way.
entry 323 - tags: exhaust, header | | | 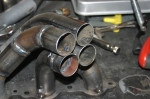 | May 16, 2010 - All four primaries come together nicely.
The next step is to fit the collector on. Since my collector is a cheap bent piece of pipe instead of a nice slip-on, I'll have to weld up the hole in the center as well as make sure they seal well in the deep gaps between the tubes.
This is the driver's side, which has the steering column and the brake booster to deal with. When I think about it, I didn't really have to do anything to cope with those parts, so I could probably make the passenger's side as a mirror image of this one. I don't know if I have enough 2" radius bends to make that happen, but it might be worth trying simply to avoid problem-solving a second time.
entry 324 - tags: exhaust, header | | | 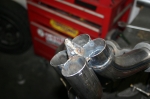 | May 18, 2010 - Before attaching the collector, I had to seal up the gaps where the four pipes come together.
This little pyramid might help the flow from the four primary pipes merge. Or maybe not - but it won't hurt.
entry 325 - tags: exhaust, header | | |  | May 18, 2010 - The passenger's side header wasn't a mirror image of the first, partly because the right head sits a bit further back than the left one.
I decided to try building this one out of metal first. I used the header lego to figure out the general layout of the tubes (cleverly coming up with almost the exact same tube routing as the other side) then built them tube by tube. This is more traditional way to build a header than the lego method. It ended up being about the same level of difficulty, although having the lego helped out considerably when it came to figuring out the length of various bends.
The big advantage to this method is that I was able to be more precise in placing the collector than I had been when I built the other version on the bench. It was close, but this one was better.
entry 326 - tags: header, exhaust | | |  | May 18, 2010 - The first three tubes were tacked into place with the flange bolted to the engine.
The fourth one was test fit on the car, then I did the finishing placement on the bench. It ended up perfectly placed - the two long tubes are nicely parallel, which means nothing for flow but looks pretty.
When it came time to put the collector on, it was exactly where it needed to be.
entry 327 - tags: exhaust, header | | | 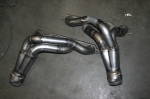 | May 18, 2010 - The two finished headers.
You can see where I had to cheat the angle of the collector on the driver's header (seen here on the right side) a little bit, but I'm pretty happy with the result. They fit well, give me full access to spark plugs, can be installed without removing the engine and should give decent performance even if they're not all equal length. I just have to finish one more more 2.5" tube to connect the right header to the X pipe, add a couple of O2 sensor bungs, and the exhaust will be complete. Woohoo!
entry 328 - tags: exhaust, headers | | | 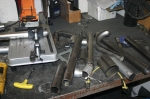 | May 18, 2010 - The debris of header building.
They were built out of mandrel U bends. If I have the count right, it took one with a 2.5" radius, one 2" radius, four 3" radius and a couple of other bits and pieces that were left over from previous projects. The primary tools were a chop saw and a belt sander.
entry 329 - tags: headers, exhaust | | | 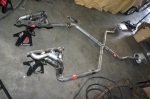 | May 22, 2010 - The exhaust is finished!
After making sure all the tack welds were strong enough and wouldn't shift, I dragged the whole thing out from under the car and finished the welding. It's built in five pieces - the main one with the X and the mufflers, two short hockey stick pieces with the ball joints for the headers, and the headers themselves. Right now, it's all hung with five hangers and I'll probably up that number somewhat.
But it's done! Woohoo!
entry 330 - tags: exhaust | | | 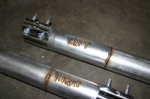 | May 22, 2010 - The two hockey stick pieces are pretty much clones of each other.
They should be identical. But just in case they're not, I labelled them!
entry 331 - tags: exhaust | | | 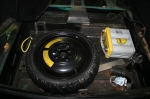 | May 22, 2010 - The batteries (yes, there were originally two) in the MG are supposed to live in some nicely hidden battery boxes just in front of the rear axle.
It's a pretty good use of space, they sit on each side of the differential nose which is easily a wasted area. But unfortunately, my exhaust system just touches the boxes on the bottom. I can raise the bottom of those boxes, but my Odyssey battery is just a bit too tall to allow me to do that.
In stark contrast to that particular packaging cleverness, there's a big empty space under the trunk floor. It originally held a full size spare and, well, not much else. Random tools, I suppose. If I install a space-saver spare in there, there's enough room for my Odyssey battery to lie down in the corner. I'll close in the battery boxes and use them for hidden storage, and this makes a bit of use of that weird basement to the normal trunk.
entry 332 - tags: battery, packaging, spare tire | | |
|

 THE DIARY