July 6, 2011 - Whoops. For those who are confused by the last two updates, they were attached to the wrong car! The rally intercom and HANS safety devices are for the Targa Miata race car, not the MG. If anyone was expecting me to start rallying the MG, well, no. The rally car does have the same power/weight ratio, though... entry 625 - tags: oops
July 6, 2011 - After work today, I decided I just had to take the MG for a run. I hadn't seen it outside the garage since all the sanding and the complete assembly. I gave up on trying to fabricate excuses and just took off.
It certainly is a lively little thing.
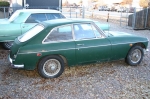
Anyhow, here's Nigel. Did I ever mention the car's been named Nigel Brimstone? Well, he has. So here's Nigel all assembled. Mirrors, side trim, badges. There are no elements that look unfinished or require apology. And he looks good! Sure, the paint isn't perfect. But in the real world with a bit of dust, out of the merciless fluorescent lights, he looks just fine. Time to start working on the driving experience a bit more. entry 626 - tags: paint, body
July 9, 2011 - Cruise night! As a general rule, I don't go in for cruise nights. I prefer my gasoline burned at wide open throttle on a racetrack, not burbling up and down a busy street or squandered in burnouts. I also find that only a particular type of car shows up, and there are only so many 1960's American cars patterned after the same template I can take at one time. But there was an event last night just down the street from my house and so Janel and I took the excuse to get the MG out for some exercise.
I'm glad I did. There was a great mix of cars, from the usual cruise night fodder to a nice survivor 356 coupe. No other MGs, and nobody else with a set of worn R-compound tires other than my friend Brandon's bike-engined Locost and the MG. The reaction to the MG was pretty fun to watch. I had it parked with the hood up and there were a lot of double takes. A lot. After the masses saddled up to idle up and down the main drag, we took off and went to dinner with Brandon and his girlfriend Leigh. The MG behaved like a normal car with working windshield wipers, headlights, turn indicators and even a full-time fuel pump! Janel drove it for part of the night and displayed a tendency to use significantly large amounts of throttle without any provocation. She approves of the car's sprightliness.
Unfortunately, the paint does not look good at all when it's shined up and out in the sun. I got caught in some rain on the way home from work yesterday and it seems to have taken a lot of the shine off the final buffing, really showing up the wet-sanding marks. Even the flattened paint where I managed to get rid of all the sand marks with 2000 grit had no sheen. I tried to give it a quick polish but to no avail. So it's back to the buffer soon. Still, the car is a driver and that makes it a lot more fun than when it was stuck in the garage for paint! entry 627 - tags: paint
July 13, 2011 - Naturally, the first thing I did after the cruise night was put the car up on jackstands. I wanted to see if I could fit a rear sway bar. Then I decided to look for the point where the exhaust was touching the body. And while I was at it, I gave the whole car a good look-over.
Good thing, too. This is the passenger's side upper shock mount. This has to support the entire weight of that corner of the car, and it's been gradually twisting. It's possible that my springs were going into coil bind, but a telltale I'd put on one of the coils says no. However, I did have a set of 8" 225 lb springs on the car for a while, which would have had potential for coil bind. I suspect that's what happened here. Interestingly, the other side doesn't have any problem - and I welded along the top edge of that one, but not this one.
There is a design problem with my mount when I look at it. It doesn't have any reinforcement above the shock mounting point, which is right where it needs it the most. And that gave me my solution. I welded up the crack and added a brace that runs upwards from the shock bolt to another plate welded to the wheel well. I think it'll make all the difference. Naturally, I forgot to take a picture when I was done. I didn't do the driver's side today, I'll get it later.
It's inevitable that things like this will show up. This is a pretty heavily re-engineered car. That's why I like to poke around under the car once in a while to see how things are working.
While I had the shocks off to fix this, I changed the 300 lb springs for my 10" long 250s again. Yes, they've been on the car before. In fact, I think the current spring setup (375/250) is what I originally installed when I built it! entry 628 - tags: suspension, damage
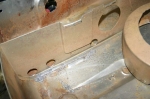
July 13, 2011 - I found something else while I was under the car: my vibration. It wasn't the exhaust as I've always thought. I discovered that the block is actually hitting the driver's side footwell. Not very much of it, but you don't need much. That's where the deep vibration under power comes from. Unfortunately, it's in a spot that's pretty much inaccessible.
There's no way you can reach it from the engine bay. From inside the car, I just can't figure out how to cut the panel to give myself the needed 1/8" of clearance. The interference is right beside the throttle pedal, where there's a nice deep insert for the steering column. I just can't get in there.
Using a prybar to open up the clearance a bit isn't an option either. The multiple folds of the sheetmetal and a nice 90 degree seam mean that this is one very solid piece of car. Besides, even if I did manage to move the sheetmetal I'd probably have trouble getting the throttle pedal clear.
Two options present themselves. One, pull the engine and grind down the offending protrusion on the block. Ugh. Two, see if there's any slop in my motor mounts that will let me rock the engine over slightly. Or maybe I could shim it. Come to think of it, this could be because of my change to rubber motor mounts. I'll see what I can do there. entry 629 - tags: motor mounts, interference
July 13, 2011 - So how did the new spring setup work? Beautifully. I'm not sure what's changed from the first time I had this combo on the car, but the car has a beautiful fluidity over bumps and a well-controlled ride. It's as if I've discovered some secret suppleness setup. It's not perfect yet - the car is a bit disconcerting on turn-in. It's almost as if the rear takes a moment to catch up to the front. I think part of the problem is very responsive steering and too much power assist. If the steering had a bit more heft to it, it would be more in line with the way the rest of the car works. This is something that's been on my to-do list for a while. Soon!
I also beefed up the front sway bar while I was working on things. Since I can't figure out how to package my rear sway yet, I figured I'd let the front do the work. That seems to have worked out nicely.
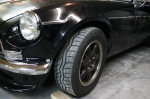
I also changed rubber. The RA1s that were on there were really just temporary, but they helped the car stick to the road. But I'd picked up a set of Azenis RT615s a while back for a killer price, and they were just sitting in the garage. I'm not a huge fan of the Azenis as I find they heat-cycle too quickly and have a very stiff sidewall. But that's based on my experience with the original RT215, and I had these just sitting around. They certainly look better than the well-worn Toyos and the 10mm narrower width means they fit the flares perfectly. Is this where the change came from? No matter, I'm a happy camper right now. entry 630 - tags: tires, suspension
July 18, 2011 - I spent most of the weekend on other things, but I did crawl under the MG to take a shot at solving the vibration. One of my thoughts was that I might be able to slot the motor mount holes to move the engine slightly. So I was quite happy to see that they were already slotted, and that I had lots of room to move the engine in the direction I wanted to move it.
After some wrenching, levering and jacking, I had the engine tightened back up in my new location. The gap between the body and the offending bump on the block was a bit larger. A test drive showed that the vibration was dramatically decreased. I'm not even sure if it's still hitting - there's still a bit of a rumble under certain conditions, but it seems to be more restricted to certain RPM ranges which tells me I'm dealing with an acoustic resonance. So, good progress then! entry 631 - tags: motor mounts, interference
July 24, 2011 - Track day test! I was at the track testing the Targa Miata, and Janel stopped by with the MG. It garnered quite a bit of attention - all you have to do is park this car with the hood up and it will cause some double-takes.
And of course, I took it out on the track to see how it would do. Not to see how fast it would go, but the track is the ideal place to test the handling of a car safely. And as you can see in the video below, I did have a bit of fun. The first wobble coming on to the front straight was because I provoked the car to see what it would do. I was a bit slow on unwinding the counter-steer. Oops. But the suspension coped with the bump coming back on to track just fine, working as designed. Once I was recalibrated, I was able to hang the back end out fairly consistently when I wanted to. The biggest problem was that the body did move around a bit as the car was hooking back up, so you can't pitch it around like you can a Lotus Seven. Well, you can't really do that with anything.
The brakes were the weakest point. It feels as if the pads aren't properly bedded. They did feel stronger on the street after the track session, which would back that up. I'll take the car out and bed them again.
And of course, the excitement at the end. Fire! A couple of laps in, I heard a bit of a bang from the back followed by the smell of burning rubber. Yes, well, after the way I'd been driving burning rubber was to be expected. But this wasn't molten tire from spinning, this smelled like someone had actually lit rubber on fire. My first thought was that a tire was rubbing badly on something, so I started to back off a bit and come in. When I came towards the pit entrance, I was greeted by a very excited Brandon waving me down. Apparently I'd blown a big fireball and run around with the back of the car trailing flames for a bit.
It was pretty easy to figure out what had been going on. The vented fuel cap had been leaking a bit of fuel under hard left turns, and it eventually lit off. The burning rubber was the rubber gasket around the filler neck getting wobbly. No permanent harm done, but it did mean the track time was over for the day. I'll find a way to stop that from happening again. Not a major problem, but it sure was dramatic!
July 24, 2011 - It wasn't all fireballs and oversteer yesterday. Janel spent most of the day running around town in the little car, and seems to have quite enjoyed it. The car still has a tendency to pop out of reverse (and will continue to do so until I pull the transmission to fix it) so she planned her stops as pull-through only.
Until we were driving home from the track. I was leading the way in the Targa Miata, enjoying the view of the little tiny black car in the rear view mirror when she suddenly pulled over the side of the road about a half mile from the house. The mysterious fuel problem had returned.
Checking the fuel pressure revealed the problem - 20 psi. It's supposed to be about three times that. Between the inoperative fuel pressure gauge and the spill earlier today, I (once again) decided the best thing to do was to fill up the tank. And this time, it worked. Instant 60 psi pressure and the car came to life after a couple of tries. We took it home, then ran around town some more with the car at night without any problems.
I'd really like to know more about what's inside that fuel tank. No baffling, that much is clear. But where is the pickup? Janel described the car as losing power after a right turn, which would have sloshed fuel away from the side of the tank that has the pickup. And it just didn't come back all the way. If the extra fuel in the tank hadn't fixed the problem, I was going to see if I could bleed off any air bubbles in the system. But that may have to wait until the car fails again.
As a possibly related problem, the car sometimes doesn't start quite right. It'll pop once and then just crank. Cycling the key brings it back to life. I really want to know what's in that tank, as everything else in the system is something I'd consider to be a known quantity.
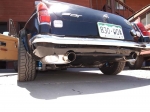
The car really does look cool out on the streets, especially from a distance. It gets a huge amount of attention. And Janel quite enjoys the effect of the accelerator. A hot-rodded vintage pickup passed us in traffic, and I thought Janel was going to rear-end it when things cleared. She was quite disappointed that his big fat tires were mostly for cruising up and down the strip.
The picture has nothing to do with driving around town, it just shows the car on track and not on fire. entry 633 - tags: fuel, testing
December 17, 2011 - MG for sale! No no no, not the V8 one. The parts car. I'm thinking I'm probably done with it, and it needs to move out to clear some room in the driveway.
It's a 1969 with a straight body, no title problems and no engine or transmission. A perfect candidate for an engine swap, actually. There's a small bit of rust on the sills and the paint appears to have been applied with a brush, but the floors look clean and it's a southwestern car as far as I know. A few of the parts have been removed, but it's mostly complete. I do have a new set of taillights of the 1972 style ready to be installed as well as a few bushings and brake lines intended for the MG suspension. If you're interested, drop me a line.
The black MG has been resting for some time, mostly due to the Targa Newfoundland and the chaos that surrounds it. If you read about this car but not the Targa, you might want to see how that went. After the fireball experience on track and yet another stranding episode as the car decided to stop feeding fuel to the engine, I parked the MG for a while. The plan is to build a better fuel tank and fuel system. The current tank has a known pickup problem as well as some major dents in the bottom. It's also close enough to the exhaust that the sensor for the fuel level shorts out once in a while. So that's the big plan for the car. entry 634 - tags: for sale
May 22, 2012 - The car has been sitting for quite a while. There have been a few reasons, but the biggest ones center around the fuel tank. Janel wasn't a big fan of the whole fireball escapade on the track for some reason. The fact that the car also stranded her on the side of the road on the way home didn't help.
Of course, we also took some time to run the Targa Newfoundland.
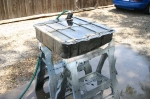
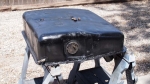
But it's time to get back at it. I really wanted to get a look inside this tank. So I yanked it out, filled it with water and used a Sawzall to cut the top off. The water was to force out any gasoline vapors, which could have caused extra excitement. It worked. entry 635 - tags: fuel tank
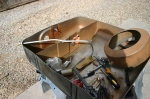
May 22, 2012 - There was a big surprise waiting inside. A BIG surprise. This giant canister. That's the top of the tank, upside down. The line running under the tank is the one that was originally attached to the charcoal canister. There's an itsy bitsy hole in the top of this canister, probably to prevent heat expansion from forcing fuel into the canister.
Great. But there are two problems with this. One was a big aftermarket dent in the bottom of my fuel tank. It kinda looked like someone had tried to jack the car up via the tank. This was perfectly placed to close off the hole in the bottom of the canister. You can see where it's been pressed up against the bottom of the tank.
The second problem is that I was using that charcoal canister fitting as my fuel return. I'm amazed any fuel got returned into the tank at all, and that's probably where my oddball fuel starvation problems came from.
This was quite a surprise. entry 636 - tags: fuel tank
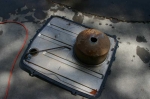
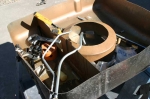
May 22, 2012 - Here's a view on how the giant canister was placed in the tank. You can see a couple of dents in this shot as well as the one baffle that was in place. It's to keep fuel from sloshing around and upsetting the fuel gauge, I assume.
But here's a neat trick. The fuel filler dumps into that right side section of the tank. And there's only one hole joining it to the rest of the tank. That hole doesn't go all the way to the bottom. So once you're down to a gallon or two, fuel doesn't transfer across. The fuel pickup is on the other side. So the pickup will continue to suck fuel out of the left side while the right continues to show fuel in the tank.
It's like MG wanted people to run out of fuel on the side of the road. entry 637 - tags: fuel tank
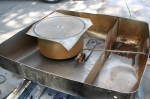
May 22, 2012 - Time for some re-engineering. The big canister has been repurposed - more on that later. I decided to move both the fuel pickup and return to the right front corner of the tank for better exhaust clearance. I used 3/8" and 5/16" brake line to form the lines, and kept the fuel pickup in the original location. I put a Miata "sock" on the pickup to replace the small MG one. Here I'm just starting to shape the pickup line.
The dents in the bottom have been hammered flat by this point. entry 638 - tags: fuel tank
May 22, 2012 - The lines have been shaped. The big canister is now a big round baffle. There are some angled flaps on the bottom to make it easy for fuel to run in but a bit more challenging for it to run out. The return line also dumps into the canister to ensure it's got fuel in it. The lines take two different routes to avoid the float for the fuel gauge.
I'm not really planning on spending much time on the track with this car, but I couldn't resist making it better. entry 639 - tags: fuel tank
May 22, 2012 - To avoid the problem of the baffle segregating the tank into have and have not sections, I drilled a few holes. They won't allow rapid flow of fuel from one side to the other, but it will be enough to let me use the full tank capacity. Between this and removing the giant sealed off canister, I've probably doubled my tank capacity.
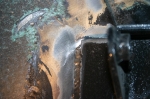
Once this was done, I cleaned out the tank and started welding. First, the big round baffle was tacked into place. Then the fuel lines were welded in. The original fuel pickup was welded shut. And finally, the fun job of welding the top back on again. I used a MIG welder for this which does usually leave some pinholes, but I did my best to get a good seal. I also spread some gasoline-resistant liquid metal over the seam to catch any little leaks. The seam is right at the top of the tank so it's unlikely to ever be wet on the inside, but I still don't want any leaks! entry 640 - tags: fuel tank
May 22, 2012 - With the tank back in, it's time to sort out the spitting fuel problem. That's what led to the fireball at the track. I probably should have put some baffling inside the filler neck to avoid any splashes, but instead I decided to borrow yet another Miata part.
The filler on a Miata has a spring-loaded flap in it. Perfect. I cut one out of a Miata filler and welded it into the MG neck, just below the cap. There are two small vents on each side that act as drains and a place for air to escape when you're filling up. They're usually attached to a separate pipe, but I decided to just let them go into the main filler neck. There's a small chance of some splashing through them, but it's going to take some real effort to make that happen. I think it'll be a decent solution, and it's invisible.
As an added bonus, the MG now looks like a modern car that drinks unleaded when you unscrew the fuel cap. entry 641 - tags: fuel tank
June 3, 2012 - Hang on a second, the tank is supposed to be in the car. The car was running just fine...until I had it backed out of the garage and it died. No fuel pressure. I jacked the car up there and started running diagnostics. Of course, the first thing you suspect is the thing you just did. But because it was such a pain to weld the tank back together, I started looking elsewhere.
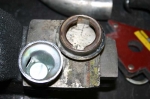
And I found something. It appeared that the regulator had died on me. When I disconnected it, I got a good gush of fuel out of the pump. Huh. The regulator is built in to a stock Corvette fuel filter that should be good for extended use - but maybe something from the tank plugged it. So I swapped in a new one. Nope. The pump struggled to get up to 40 psi (slowly) when it should have popped up to 60.
So I plugged a new hose on to the pump inlet and dropped the other end into a bowl of fuel. Voila, instant 60 psi. I'd tried this earlier without success, but I think I had the bowl too low so the pump couldn't suck it up. So out the tank had to come.
When I cut the top off, I didn't see anything obvious. But plugging the end of the pickup and blowing in the other end revealed the problem. A small pinhole in the new line where it had been tackwelded to the interior baffle. Not much, but once the pump was pulling hard it let in air instead of fuel. A half second zap with the welder and the pickup line was nicely airtight. Argh.
Welded it all back up again, smeared liquid metal around the seam again (to cover any pinholes in the welds) and the tank went back in. I tested it with a couple of gallons in the tank and again, 60 psi. Excellent.
Then the car refused to start. It cranked and backfired, then went "clunk" and wouldn't crank anymore. I'd been working the battery pretty hard during testing, so I threw on the charger. Just to check, I stuck a test light on a hot terminal in the engine bay. Nothing. Hmm.
I checked across the battery terminals, no problem. I checked from the grounding point to the terminals, no problem. But then I checked from the bumper to the battery. Nothing. Closer inspection showed that the main grounding point (a bolt running through the sheetmetal) was a bit loose. I tightened that up and all of a sudden I had power through the car.
If you remember back, the car's had the habit of not always starting on the first attempt. It would backfire and pop, and then would fire happily if I just cycled the key. It also had a habit of occasionally stopping at the side of the road. I'm thinking the loose ground strap may have been the culprit for the first, although we'll see if that behavior continues. The latter might have been related to that heavily restricted return line inside the tank. That's certainly not a problem before. We'll see what happens now. At the moment, the car is on "close to home" probation. entry 642 - tags: fuel, troubleshooting, wiring
June 5, 2012 - So, how does the new fuel tank work? So far, so good. I used the car for some errands today (which somehow required sudden bursts of acceleration for no apparent reason) and it worked fine. It was hot, too - somewhere around 95F and the car managed to keep its cool.
There was one troubling moment - after stopping at an auto parts store, the car didn't want to fire, just crank. Eventually, it did roar into life. But it was an odd moment. Next time that happens, I'll check the fuel pressure. The main fuel line does run awfully close to the exhaust at one spot. Could it be heat soak from the hot exhaust in the high ambient temperatures? entry 643
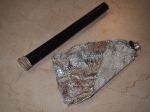
June 6, 2012 - Insulation time! The exhaust has to run just below the main fuel feed at one point. I had it insulated with the foil-backed fiberglass insulation at right, but figured it wouldn't hurt to improve it. The rubberized...umm... stuff is the same sort that's used for protecting wiring for oxygen sensors, so it's easily able to deal with high heat. It's actually from a company that also made parts for the space shuttle, only that version had more Kevlar and looked cooler. Anyhow, it was a fairly short job pop the fuel line off the filter/regulator and slide the black insulation over top. Let's here it for quick-release fuel fittings!
The silver insulation shows no sign of heat damage, so this may not do anything. But it won't hurt. entry 644 - tags: fuel

 THE DIARY
.jpg)
.jpg)