| THE MG |
|
|
 | | 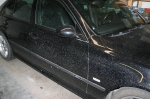 | July 3, 2011 - Buffing is a messy job.
I probably should have moved the other car out of the garage! If the color looks familiar, that's because it's the same one I used on the MG.
entry 612 - tags: buffing, mess | | | 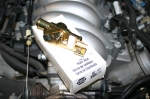 | July 3, 2011 - The hot foot problem has been solved.
This heater valve should let the air passing through the heater core to remain cool. The unusual thing about it is that it works backwards to most valves, which matches the way the control cable from the MG works. Push to open, pull to close if I remember correctly. I haven't run the cable to it yet - I disconnected the cable from the knob under the dash when I wasn't using it earlier - but that's not liable to be a concern until later in the year.
With forecast temperatures above 101F today, I'm glad I have this one fixed.
entry 613 - tags: heat | | |  | July 3, 2011 - More reassembly.
With the paint finished (at least, finished enough for now), it's finally time to put on the side trim. I've been looking forward to this. First, installation of the fasteners. Weird little dome washers that the trim snaps over. The car looks kinda cool with them all in place, like it's got rivets down the side.
entry 614 - tags: trim | | | 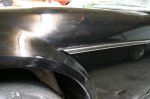 | July 3, 2011 - Of course, the trim wouldn't fit with the new flares.
So I had to trim it. The trim is actually stainless steel, not chrome-plated plastic or some other shortcut. Nice work MG. So it cuts and trims pretty nicely.
Other than one piece (the one you can see here), all the trim is new. It's only $40 from Moss and makes a big difference in how the car looks. The old trim had picked up a number of little dings and scuffs over the years, and it just made the car looks a little bit dingy. Not anymore.
entry 615 - tags: trim | | | 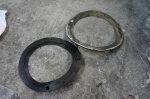 | July 3, 2011 - Along with new trim, I replaced a few gaskets such as these for the headlights.
They all sealed well enough, but there's both primer and black paint on the old one from previous paint jobs. Again, dingy. A couple of new parts make a big difference.
How cool is it that I can still buy these parts for a car that was made nearly four decades ago?
entry 616 - tags: trim | | | 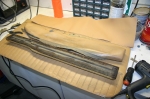 | July 3, 2011 - The logical next step after finishing the side trim would be to take the car out into the brilliant sun and marvel over how good it looks as the finally product.
But I had to reinstall the door panels, and what better time to install the new ones? The main door card went on easily enough with just a bit of fiddling around. The pad at the top of the door, on the other hand, needed to have the new vinyl wrapped around it. Not a hugely challenging task, but one that takes time to do it right. So I spent the rest of the day upholstering four chunks like the one in the picture. But man, do they look good now.
entry 617 - tags: interior | | | 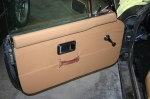 | July 3, 2011 - Ta-daaah!
A complete door. The panel design isn't identical to the original (assuming the previous cards were the original ones, which may not be the case) but it looks good. So I may not win at Pebble Beach. I'll cope. It looks so much better than before, though. The only part visible that was on the car when we got it is the door latch, and Janel's asked me if I can make it look better!
I still have to do the side panels for the rear seats. The upper pads are done, but there's still a bit of work to do behind the panels. Tomorrow, the car will emerge.
entry 618 - tags: interior | | | 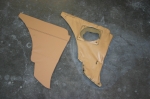 | July 4, 2011 - Before and after.
Yes, I think the interior should look better.
entry 619 - tags: interior | | | 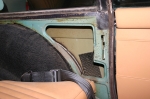 | July 4, 2011 - Removing the side panels in the back revealed this secret smuggling compartment.
That's the outer skin you can see, along with the backside of the welds for the rear flares. A previous owner had cut out part of the inner panel in order to fit a speaker as well.
Seems to me this is a good spot for exterior noise to get in. You can see the large amounts of factory sound deadening.
entry 620 - tags: interior | | | 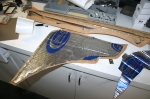 | July 4, 2011 - I'm considering filling that opening with something to absorb noise.
But in the meantime, the back of the new panel was beefed up with the same Cool-It that was used elsewhere in the car.
The final result looks so much better. Janel came into the garage, sat in the car for a while and proclaimed it to be a real car. That's a big step!
entry 621 - tags: interior | | | 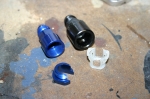 | July 4, 2011 - Preventative maintenance.
The fitting on the right is a push-on fitting that allows me to connect a braided fuel line to the factory fuel rail. The plastic connector is the same sort of thing used by the millions on factory cars.
But Russell, the manufacturer of this part, seems to have got something wrong in their implementation. I had one of these fittings pop off on the Targa Miata. Three times. I've heard from another FM customer who had a similar problem, and it turns out it's actually pretty well known. Since the result of a pop off is a big fat line full of high pressure fuel being pumped directly on top of a hot engine, it's a poor scenario. Especially when you're on the track, like I was with the race car.
The solution is the fitting on the left. It's a brand new design from Russell and it locks into place with a threaded aluminum insert instead of a couple of plastic teeth. I found out about it through the LS1Tech forums and managed to get some from the first production batch. The part on the MG has never given me trouble, but now it can't. I'll give the old one to the cats to play with.
entry 622 - tags: fuel, safety | | | 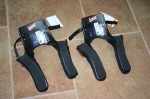 | July 5, 2011 - More useless equipment.
Well, hopefully useless. If all goes according to plan, these will never do us any good. But given the performance of the car, it's better safe than sorry.
For those who don't recognize them, they're HANS devices for Janel and I. If the worst happens, they'll help keep our heads attached to our necks. Not cheap insurance, but better than the alternative.
entry 623 - tags: safety | | | 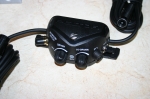 | July 5, 2011 - A new intercom for the Targa car.
This one, a Peltor FMT120, has a few features the old FMT100 didn't. Aux in (for a phone), separate volume controls, etc. Most importantly, it has an audio out. When combined with the new video camera that arrived last week, this means we'll be able to have Janel's instructions as audio for the in-car footage instead of just engine noise. That should make it a lot more interesting to watch.
The old intercom will go into Nancy, the sister car on the team.
Progress on the car should resume shortly. Lots of fine-tuning to do.
entry 624 - tags: intercom, video | | | July 6, 2011 - Whoops.
For those who are confused by the last two updates, they were attached to the wrong car! The rally intercom and HANS safety devices are for the Targa Miata race car, not the MG. If anyone was expecting me to start rallying the MG, well, no. The rally car does have the same power/weight ratio, though...
entry 625 - tags: oops | | |  | July 6, 2011 - After work today, I decided I just had to take the MG for a run.
I hadn't seen it outside the garage since all the sanding and the complete assembly. I gave up on trying to fabricate excuses and just took off.
It certainly is a lively little thing.
Anyhow, here's Nigel. Did I ever mention the car's been named Nigel Brimstone? Well, he has. So here's Nigel all assembled. Mirrors, side trim, badges. There are no elements that look unfinished or require apology. And he looks good! Sure, the paint isn't perfect. But in the real world with a bit of dust, out of the merciless fluorescent lights, he looks just fine. Time to start working on the driving experience a bit more.
entry 626 - tags: paint, body | | | July 9, 2011 - Cruise night!
As a general rule, I don't go in for cruise nights. I prefer my gasoline burned at wide open throttle on a racetrack, not burbling up and down a busy street or squandered in burnouts. I also find that only a particular type of car shows up, and there are only so many 1960's American cars patterned after the same template I can take at one time. But there was an event last night just down the street from my house and so Janel and I took the excuse to get the MG out for some exercise.
I'm glad I did. There was a great mix of cars, from the usual cruise night fodder to a nice survivor 356 coupe. No other MGs, and nobody else with a set of worn R-compound tires other than my friend Brandon's bike-engined Locost and the MG. The reaction to the MG was pretty fun to watch. I had it parked with the hood up and there were a lot of double takes. A lot. After the masses saddled up to idle up and down the main drag, we took off and went to dinner with Brandon and his girlfriend Leigh. The MG behaved like a normal car with working windshield wipers, headlights, turn indicators and even a full-time fuel pump! Janel drove it for part of the night and displayed a tendency to use significantly large amounts of throttle without any provocation. She approves of the car's sprightliness.
Unfortunately, the paint does not look good at all when it's shined up and out in the sun. I got caught in some rain on the way home from work yesterday and it seems to have taken a lot of the shine off the final buffing, really showing up the wet-sanding marks. Even the flattened paint where I managed to get rid of all the sand marks with 2000 grit had no sheen. I tried to give it a quick polish but to no avail. So it's back to the buffer soon. Still, the car is a driver and that makes it a lot more fun than when it was stuck in the garage for paint!
entry 627 - tags: paint | | | 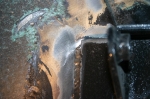 | July 13, 2011 - Naturally, the first thing I did after the cruise night was put the car up on jackstands.
I wanted to see if I could fit a rear sway bar. Then I decided to look for the point where the exhaust was touching the body. And while I was at it, I gave the whole car a good look-over.
Good thing, too. This is the passenger's side upper shock mount. This has to support the entire weight of that corner of the car, and it's been gradually twisting. It's possible that my springs were going into coil bind, but a telltale I'd put on one of the coils says no. However, I did have a set of 8" 225 lb springs on the car for a while, which would have had potential for coil bind. I suspect that's what happened here. Interestingly, the other side doesn't have any problem - and I welded along the top edge of that one, but not this one.
There is a design problem with my mount when I look at it. It doesn't have any reinforcement above the shock mounting point, which is right where it needs it the most. And that gave me my solution. I welded up the crack and added a brace that runs upwards from the shock bolt to another plate welded to the wheel well. I think it'll make all the difference. Naturally, I forgot to take a picture when I was done. I didn't do the driver's side today, I'll get it later.
It's inevitable that things like this will show up. This is a pretty heavily re-engineered car. That's why I like to poke around under the car once in a while to see how things are working.
While I had the shocks off to fix this, I changed the 300 lb springs for my 10" long 250s again. Yes, they've been on the car before. In fact, I think the current spring setup (375/250) is what I originally installed when I built it!
entry 628 - tags: suspension, damage | | | July 13, 2011 - I found something else while I was under the car: my vibration.
It wasn't the exhaust as I've always thought. I discovered that the block is actually hitting the driver's side footwell. Not very much of it, but you don't need much. That's where the deep vibration under power comes from. Unfortunately, it's in a spot that's pretty much inaccessible.
There's no way you can reach it from the engine bay. From inside the car, I just can't figure out how to cut the panel to give myself the needed 1/8" of clearance. The interference is right beside the throttle pedal, where there's a nice deep insert for the steering column. I just can't get in there.
Using a prybar to open up the clearance a bit isn't an option either. The multiple folds of the sheetmetal and a nice 90 degree seam mean that this is one very solid piece of car. Besides, even if I did manage to move the sheetmetal I'd probably have trouble getting the throttle pedal clear.
Two options present themselves. One, pull the engine and grind down the offending protrusion on the block. Ugh. Two, see if there's any slop in my motor mounts that will let me rock the engine over slightly. Or maybe I could shim it. Come to think of it, this could be because of my change to rubber motor mounts. I'll see what I can do there.
entry 629 - tags: motor mounts, interference | | | 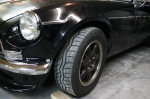 | July 13, 2011 - So how did the new spring setup work?
Beautifully. I'm not sure what's changed from the first time I had this combo on the car, but the car has a beautiful fluidity over bumps and a well-controlled ride. It's as if I've discovered some secret suppleness setup. It's not perfect yet - the car is a bit disconcerting on turn-in. It's almost as if the rear takes a moment to catch up to the front. I think part of the problem is very responsive steering and too much power assist. If the steering had a bit more heft to it, it would be more in line with the way the rest of the car works. This is something that's been on my to-do list for a while. Soon!
I also beefed up the front sway bar while I was working on things. Since I can't figure out how to package my rear sway yet, I figured I'd let the front do the work. That seems to have worked out nicely.
I also changed rubber. The RA1s that were on there were really just temporary, but they helped the car stick to the road. But I'd picked up a set of Azenis RT615s a while back for a killer price, and they were just sitting in the garage. I'm not a huge fan of the Azenis as I find they heat-cycle too quickly and have a very stiff sidewall. But that's based on my experience with the original RT215, and I had these just sitting around. They certainly look better than the well-worn Toyos and the 10mm narrower width means they fit the flares perfectly. Is this where the change came from? No matter, I'm a happy camper right now.
entry 630 - tags: tires, suspension | | | July 18, 2011 - I spent most of the weekend on other things, but I did crawl under the MG to take a shot at solving the vibration.
One of my thoughts was that I might be able to slot the motor mount holes to move the engine slightly. So I was quite happy to see that they were already slotted, and that I had lots of room to move the engine in the direction I wanted to move it.
After some wrenching, levering and jacking, I had the engine tightened back up in my new location. The gap between the body and the offending bump on the block was a bit larger. A test drive showed that the vibration was dramatically decreased. I'm not even sure if it's still hitting - there's still a bit of a rumble under certain conditions, but it seems to be more restricted to certain RPM ranges which tells me I'm dealing with an acoustic resonance. So, good progress then!
entry 631 - tags: motor mounts, interference | | |
|

 THE DIARY