| THE MG |
|
|
 | |  | December 20, 2010 - While the dash is out to work on the speedometer and other wiring, I've decided to remove the crappy tan paint on some of the parts.
Most of the interior of the car was painted pretty well, but the dash itself hasn't weathered well. It's cracked on top too. The eventual plan is to recover it with fresh vinyl (or a metal dash if I can hunt down all the parts), but in the meantime I want to work with what I have.
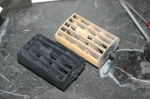
These dash vents are no longer available. But a few minutes in the bead blaster brought them back from ugly to original!
entry 515 - tags: interior | | | 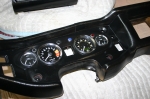 | December 21, 2010 - A peek at the dashboard.
It used to be a very shabby looking thing, it's looking much better now! Not exactly concours-ready - my technique of dealing with a crack above the speedometer was to put some black duct tape over top before painting - but it's worlds better. You can see dusty hand prints above the tach, the paint job isn't as patchy as it looks in the picture.
Although looking at that old shot of the interior, I see I have the location of some of the lights in the wrong place - the right turn indicator and the alternator light seem to have traded spots. That'll be a bit of a pain to change now, as I took a special effort to make sure they're properly anchored!
entry 516 - tags: dash, interior | | | 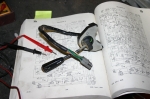 | December 21, 2010 - Time to wire up the wipers.
This should be straightforward, right? Well, no. Things started off easily enough, with one wire for low speed and one for high speed. I'm not exactly sure how to duplicate the intermittent setting, but that's no big deal.
But the Lucas wipers have an extra wire that is for the parking function, to return the wipers to home base if you turn them off halfway through a stroke. It's a 12v signal that is fed back through the low-speed circuit until the wipers are parked. I've been inside a Lucas wiper motor and it's a reasonably intelligent way of doing things mechanically in my opinion, but the problem comes from the fact that there's some switching that needs to be done inside the wiper switch. My Miata wiper switch doesn't have this internal logic. So I need to find some way to have the park wire connected to the low speed wire when the wipers are off, and disconnected when they're on. That's easy enough to do with a relay...except for the fact that I have to have the high speed setting do the same thing.
Finally, after a bit of scratching around, I figured a way to do it with a relay and a couple of diodes, without passing the load from the wipers through the diodes. Out came the soldering iron and it all went together well. There's still one odd behavior, the wipers move fairly slowly in "park" mode even though they're seeing full voltage and theoretically full amps. I'm not sure what's happening there, as I'm pretty sure they worked well before the relay went in. I'll revisit it tomorrow to see what's going on.
I did manage to get the squirter working today, and discovered that it's aimed in completely the wrong direction much to my amusement. As a bonus, the Miata wiper switch includes some logic that swipes the wipers three times after you trigger the washer. Excellent.
Oh, and horns now work as well. Meep meep!
entry 517 - tags: wipers, electrics | | |  | December 22, 2010 - These center vents are supposed to have a chrome lip on them.
At least, I think they are based on checking a lot of photos online. I decided to add one using model paint and a steady hand. Okay, it was aluminum and not silver, but it does the job. And it was a nice relaxing 20 minutes to paint the two vents and the escutcheon that surrounds them.
That's a heck of a word, escutcheon. But according to Moss Motors, that's what the goofy thing is called.
entry 518 - tags: interior | | | 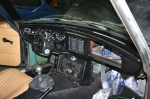 | December 22, 2010 - Lots of detail work on the car today.
While the dash was out, I cleaned up a bunch of wiring, added sound deadening behind the dash (you can see some peeking through the glovebox), refinished a few switches, removed the radio antenna and generally cleaned things up. One of the things I did was repaint the panel in front of the dashboard black, and bead blased and painted the defroster vents in silver. I like how that looks. I also swapped the a-pillar trim for the black set off the parts car. All just little things, but it's making the interior look good instead of rough. There's still a lot to do, of course, but it's much more respectable now.
The switch on the far left of the dashboard is the "brake check" switch. I no longer have that function available to me, and I'm not sure what to do with it. The shape of the switch is like no other on the car, so I can't substitute a different on in its place. Right now, it's just blanked off.
entry 519 - tags: interior | | | 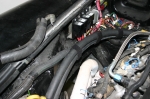 | December 22, 2010 - The cleanup also spread under the hood.
I'm starting to corral the wiring somewhat and bundling it into small harnesses, but I'm going to leave everything accessible until I've done a bit more debugging. Still, it looks better.
The two big hoses in this photo are for the heater. I've strapped them together with velcro strips. It looks pretty good and can be quickly removed and replaced. I'm also using the same stuff under the dash to hold wiring harnesses in place. You can buy rolls of it at Harbor Freight.
entry 520 - tags: wiring | | | December 23, 2010 - The car is now completely assembled and all the debris has been vacuumed out of the interior.
It's certainly not done, but it does look respectable. Before I started, the crack on the top of the dash was barely noticeable with all the other problems. But now the interior looks good, the piece of black tape I just slapped over top is very obvious. Oh well, it's only a temporary fix. One nice touch is that I managed to fit the reset/programming button in where the old choke cable went.
So of course, I took it for a drive. The speedo is reading fast, so I don't have it calibrated correctly yet. A call to Jeremy at Flyin' Miata reveals that the T56 has a 17-tooth trigger wheel on the output shaft, so I'm seeing 17 pulses per driveshaft revolution. Okay, now I can calculate the correct pulses per mile. I had 40,000 in there as a rough guess, looks like it should be 52,209 with my current tire diameter.
The car's quieter. Not exactly a Lexus, but more manageable. As I lay more carpet down in the footwells, it will improve. I think I've also missed some spots under the rear deck, and I may try some rubber motor mounts eventually. But it's pretty good. The new wheel position is a step up, I'm happy with that.
The car is certainly not sorted out from a suspension standpoint yet, though. I'm not sure how much of what I'm feeling is a very high amount of unsprung weight in the rear with that live axle - a 2200 lb car with the rear end from a small truck is certainly hurting in that regard. I think I need a bit more rebound damping on the front shocks, and I should probably start looking at fitting some sway bars. I also have some Falken Azenis 215 tires on the car which have very, very stiff sidewalls on them. There's a set of 615s in the garage ready to go on, but it is really tempting to swap in some wider 15" wheels and a more compliant tire. That means spending a big chunk of change, though, so I'll probably put that off for a while.
While filling up the gas tank, I got in a conversation with a few other guys and ended up popping the hood. I suspect this will become a fairly common occurrence...
entry 521 - tags: testing | | | December 24, 2010 - Janel and I took the MG for some last-minute shopping.
It was kind of fun, the car's enough of a "real car" we can do this now. It's definitely quieter and Janel strongly approves of the new interior look.
Unfortunately, in some stop-and-go traffic trying to get in and out of the grocery store, the car got pretty hot. I didn't hear the fans kick in, even though it momentarily got hot enough that both should have been spinning away. All of my other testing has been at higher speeds and cooler temperatures. I'm going to have to look in to this.
It was by far the coolest looking car in the parking lot, though.
entry 522 - tags: cooling | | | 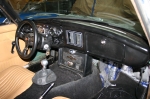 | December 26, 2010 - A (poor) shot of the complete dashboard.
Quite a change from the original look. The overspray on the carpet isn't really noticeable in person, you only see it when it's all lit up with the flash.
There hasn't been any major work on the car in the last few days, I've just been driving it. The defroster got a test on Christmas night when we had to head home after dinner, and it passed. I still need to work on sound levels coming from the back of the car, but a bit more of my silver cladding should help out there. I suspect that this would not be a problem in one of the convertibles, but the coupe body does provide a nice resonance chamber at around 1500 rpm. Still, I've been enjoying it quite a bit so far. The speedo works well and seems to be accurate, the dash lighting is about as good as could be expected and overall the car is working fairly well. The new Bosch H4 headlights I installed put out ridiculous amounts of light, just as I'd hoped.
Just because it's that time of year, I took a look back to see what I was doing around this time in the past. A year ago, I drove the Camaro into the garage for the final time. Two years ago, we decided to disassemble the interior. And this year we used the car to drive to Christmas dinner. I'd call that progress!
entry 523 - tags: interior, testing, looking back | | | December 26, 2010 - I decided it would be a quick and easy thing to check the fans out by just grounding one of the wires on the relay.
I tried it...and nothing. A bit of probing with the test light revealed there was no power at the relays - and a check at the fusebox showed two blown 20A fuses, one for each fan.
Looking at the fan ratings, they're supposed to pull around 13-13.5A. But that's continuous running. I don't have the specs for a startup draw on these particular fans, but one other Spal I've used in the past has a continuous draw of 12.5A and a startup draw of 18A. So it's quite possible that my fuses simply weren't up to the task. The wiring could certainly take it, so I'll just drop in a couple of 25 or 30A fuses and see what happens.
entry 524 - tags: fans, wiring | | | 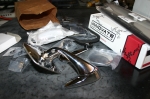 | December 31, 2010 - I was out of town for a while, but the little brown elves brought me some presents!
While driving the MG and working on the interior, I've been keeping a list of bits and pieces that it needs. The mirror is about the most exciting part - that's an earlier mirror that matches the driver's side one off the parts car. It's much nicer looking than the ones that came on the car, gives better visibility and lets me open the vent window all the way. Seems like an improvement!
The other parts are more prosaic. New wiper blades, a seal for the "fresh air door" on the firewall that I don't think will fully close anyhow, light bulbs, etc. Not exotic, but enough to make the car a bit nicer inside.
There's also that Innovate box. That's a pretty cool toy - more on it later.
entry 525 | | | 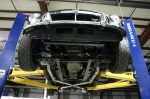 | January 3, 2011 - Air time!
I drove the MG to work today. This let me check out some of the new sound proofing and generally play with the car. More importantly, it gave me a chance to put the car in the air and take a good look at the underside from a bit of a distance, not from the distance you get using a creeper and jackstands.
Looks pretty good underneath, actually. The exhaust is very clear in this photo, but you can also see the new structure under the front of the car. The original frame rails (or the reasonable facsimile thereof found in the unibody) are cut off at an angle just aft of the control arms. The big new 2x4 box section runs from the transmission support forward, and everything ahead of those cut frame rails is new. The tape holding the heat shielding to the driver's footwell failed on the way to work, so it's missing here.
It's funny, the engine looks so small from this angle. That oil pan is tucked up behind an impact bar and should be very well protected.
entry 526 - tags: underneath | | | 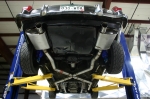 | January 3, 2011 - Here's the view from the rear.
The tight packaging for the mufflers is pretty evident - in fact, that black mark on the right muffler is the insulation from the fuel level wire before I put some heat shielding on it! The new frame members running forward from the trailing arm mounts aren't very visible, but the arms of the lift are lifting from there.
The inspection did reveal a few things. There are a few wires that need to be wrapped up mostly for appearances sake. That fuel level sender wire is still awfully close. The fuel line and main power line also run pretty close to the exhaust (hard to avoid given the giant X!) and really should have some extra heat shielding just in case. But it's pretty good overall.
One thing did come to my attention. The pinion angle seemed a bit off, with the nose of the diff higher than I think it should be. The alignment shop set it, but either the adjustment shifted because the lock nuts weren't tight - they weren't - or they have a different idea of what it should be. The angles of this setup could very well be the reason I'm getting a bit of vibration in the car. Not a shaking, more of a deep rumble that could be the stiff motor mounts, exhaust noise or drivetrain vibration. So I dropped the nose down a bit and we'll see how it works on the drive home. Not tonight, though - a surprise snowstorm marooned the car at work and I went home in a stock 1992 Miata. Regular readers will remember I did almost exactly the same thing two years ago in the Camaro!
entry 527 - tags: snow, pinion, underneath | | |  | January 3, 2011 - The newest toy.
I picked up an Innovate OT-2 over the holidays. It's an OBD-II scanner with a bit of a difference. It packs a little wireless transmitter that can talk to an iPod Touch or an iPhone, allowing the iPod to display real-time data from the car, datalog it, read codes, give efficiency information or even simulate a dyno run. It's pretty cool stuff. I need to recalibrate my engine computer for the MG's tire diameter instead of the Camaro's so some of the readouts are accurate, but it's nice to be able to monitor the car so closely nd then just slip the screen into my pocket when I'm done.
Not many 1972 MGs can talk to an iPod!
entry 528 - tags: innovate OT-2, ipod | | | 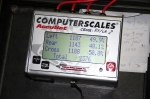 | January 5, 2011 - While I had the car on the lift, I decided to drop it down on to the scales.
After all, it's just about completely done from a mechanical standpoint. There's the bodywork and paint to do, but that's unlikely to add any weight. So we can call this a pretty accurate final weight.
The car has nearly a full tank of gas and even carries a spare tire. So this is a full-on legitimate street weight, not a setup for the lightest possible option. Still, I'm pretty happy. When I first weighed the car a year ago, I estimated 2400 lbs. Looks like I was right!
Check out the balance. 51.9/48.1 front/rear. Even better, perfect corner balancing and side/side distribution. There's no reason for that, I just got lucky. But it's still worth bragging about!
entry 529 - tags: weight | | | January 9, 2011 - A few interesting numbers.
I was looking at various specifications, and came across the original MG ones. Or at least, a reasonable facsimile thereof - it can be hard to find sources for some of this.
Apparently the MGB GT weighs 2443 lbs and has 52% of its weight on the front wheels. The V8 version that appeared in 1973? 2390 lbs - the stock four-cylinder was really heavy. So my car is basically the same weight as the factory V8 job. Of course, it had 137 hp while mine is somewhere around 350-400, depending on the modifications that were made to the engine before I got it.
I was also looking at the hot new 2012 Boss Mustang. It's rated at 440 hp, but weighs as much as the MG and my Seven combined. More eye-opening is the size - it's 35" longer than the MG. Nearly three feet! Wow.
More work to come on the MG soon. I can feel the final bodywork looming. It's going to be a dusty time.
entry 530 - tags: dimensions | | | 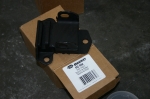 | January 14, 2011 - I spent part of the day today talking paint and bodywork with the local paint shop.
Hightower supply has been very helpful to me. I came home with some new primer and a big bucket of body filler to make those fender flares all pretty.
I also want to try some rubber motor mounts in the car. I think some of my noise is vibration coming through the mounts. I put some competition motor mounts on Janel's street Miata and got a similar noise. Now, the mounts I used were generic small block Chevy (pre-LS1) mounts from Energy Suspension. I went to NAPA, opened up the Big Book Of Motor Mounts, and spotted this on the first page. I don't know what the application is - probably every V8 from General Motors from 1960 to 1997 - but I think that's it. I just hope the softer mounts don't let the exhaust and other bits and pieces lean up against each other.
entry 531 - tags: motor mounts, bodywork, paint | | |  | January 14, 2011 - Big news - I'm going to the Targa Newfoundland.
Long-time readers may remember that the Targa caused a hiatus in MG development in 2008. Actually, it was during that pause that I decided to go with the LS1 instead of a Ford 302. But anyhow...we're going back.
You can read all the details on the Targa Miata website. It's actually going to get an engine swap, and the subject of the swap should be pretty familiar. Yup, there's an LS engine going in. Not an LS1, but the L33 I'd been considering years ago. The power/weight ratio will actually be very similar to that of the MG, so I guess we could call this little car practice. What I learned building the Miata in the first place helped the MG, and I've picked up a few things with the MG that will make the V8 Miata work better. Everybody wins!
However, I need your help. We need more funding in order to make this a reality. If you're enjoying the build of the MG and my other projects, please consider helping out a bit. Of course, the build and the race will be documented just like this one has been. Details
entry 532 - tags: targa newfoundland, help | | | January 16, 2011 - I swapped the motor mounts out today.
It was a reasonably easy job, probably much easier than most production cars. It'll be even easier next time, since I turned one of the long bolts around so it runs back to front instead of front to back. Seems simple, but next time I won't have to pull the alternator...
I believe it was a success. The car doesn't boom and vibrate as much. It's still vocal but you can tell the noise is coming from the back of the car through the exhaust pipes instead of simply through the chassis. A bit more work with sound deadening in the back half of the car and I think it'll be quite good.
entry 533 - tags: motor mounts | | | 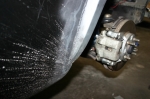 | January 18, 2011 - The flares look pretty good, but there's one line that bothers me.
The trailing edge of the front fenders doesn't blend into the body as well as I'd like. It's not something you'd notice unless you spend hours looking at the car and working on small areas of it, but they don't look factory.
I do have a couple of stubs that were cut off the leading edge of these flares as I was building them. They have a better shape.
entry 534 - tags: body, fender, flares | | |
|

 THE DIARY