| THE MG |
|
|
 | |  | January 24, 2010 - After a fair bit of calculation, I'm starting to figure out my brake options.
From my measurements, it looks like the MG brake pedal has a ratio of 4.48. That means that 100 lbs of pressure on the pedal is transformed into 448 lbs on the master cylinder. It also means that it takes 4.48" of pedal movement to move the master cylinder pushrod by 1". Basically, it's the same as a gear ratio. The Miata pedal has a ratio of 4.1 according to the manual.
I know the Miata setup pretty well, and the Targa Miata uses the hydraulics from a later Miata setup. The standard Miata master cylinder is a 7/8" unit, and the Sport master is 15/16".
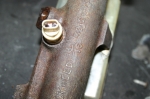
As you can see from the picture, the stock MG master cylinder is 13/16".
So, based on pedal ratios and master cylinder sizes, I compared how much force on the pedal is needed to get 250 psi of line pressure. Why 500 psi? No reason, it's just a constant so I can get an idea of how the different setups would compare in feel for the same amount of braking. I also figured out how far the pedal would have to move in order to push 1 cubic inch of brake fluid, as the leverage ratios and hydraulic multiplication always trade off travel for effort. Here's what popped out of my spreadsheet:
- MG pedal, MG master: 57.87 lbs, 4.32"
- Miata standard setup: 73.3 lbs, 3.41"
- Miata Sport setup: 84.2 lbs, 2.97"
- MG pedal, 1" Wilwood master: 87.7 lbs, 2.85"
So no surprise here, the further you move the pedal the less you have to push on it. Simple leverage. And if you're doing these calculations at home, remember that it's a dual circuit system so you'll get half the pressure and twice the fluid flow as you would with a single circuit of the same size.
According to my calculations, a 15/16" master on the MG pedal (77 lbs, 3.25")would be pretty much right between the two Miata types. But the dual circuit remote reservoir master cylinder available from Wilwood is a pretty unusual piece, and only available in a 1" bore. I need the remote reservoirs to clear the hood, I believe. I do have a few other single circuit master cylinders I can use for test fitting for clearance.
Still, since Janel and I both prefer a nice firm pedal, I'll probably go with the Wilwood 1" setup.
But of course, there's a catch. The booster. All the calculations above give the numbers for an unassisted brake setup. The booster will multiply the force on the pedal to give more force at the master. If the booster has a 2:1 boost ratio, that means it would only take a bit less than 44 lbs of force on the pedal to generate my 500 psi of line pressure, instead of 87.7. And here's the problem. I don't know what the boost ratio of the MG booster is. The Miata one should be around 4.6 according to the manual.
So the end result is going to come down to trial and error, with a bias towards a too-firm pedal instead of a too-soft one.
This stuff is fun. I get to learn all sorts of things.
entry 260 - tags: brakes | | | 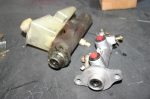 | January 24, 2010 - Sometimes, you have to walk away from a problem for a while.
I don't know why I didn't think of this - the Miata comes with either a 7/8" or a 15/16" master, depending on the application. It has a plastic reservoir that can be removed and turned into a remote setup. And while the bolt pattern isn't correct for the MG, its close enough that I think I could make it work.
I'm also going to make sure the Miata booster won't fit on the MG pedals. If it does, then life is very simple. I'll have a complete Miata brake system with a slightly different pedal ratio. I'll find out tomorrow.
entry 261 - tags: brakes | | | 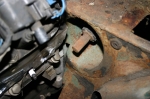 | January 24, 2010 - Next challenge: the steering column.
I'm trying to deal with all of the major packaging problems right now. And this is a good one - the universal joint from the MG that bolts on to this column is so big I can't even slide it into place. It hits the head. As an added bonus, the shaft is a considerably larger diameter than the Miata one at the steering rack.
entry 262 - tags: steering, packaging | | |  | January 24, 2010 - The first possible solution I came up with to the steering column problem was my standard go-to option.
What about a Miata? So I grabbed a Miata column, stuck a wheel on it (I have at least three wheel adapters and a range of wheels that will fit) and started measuring. Turns out it's ridiculously good.
It doesn't look like in the picture, but the lower side of the bracket on the end of the Miata rack lines up with the location of the firewall on the MG. Easy alteration and the lower mount is done. The flat plate that serves as the upper bracket is actually in exactly the right place. Depending on the wheel adapter I use, the two holes on the Miata mounting plate are in the same place as the MG ones. Well, they're about 10mm closer together than on the MG. But this is a very solvable problem. The third mounting point would be easy to add. And the overall length is shorter, which will move that awkward U-joint further up.
entry 263 - tags: steering, packaging | | | 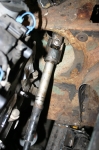 | January 25, 2010 - Just for fun, I checked the length of the lower section of the Miata column.
After all, it's designed to bolt directly into the steering rack. I couldn't believe the result. It's perfect. Not just "close", but bang on perfect. The universal joint tucks into the recessed spot in the firewall, and the rest of the column inside the car is in the correct spot. This could not be better, I really lucked out.
Inside the car, I can play with the final location of the wheel using my various adapters. I'll use the Miata combo switch (ie, stalks) to control the turn indicators, lights and - yet another bonus - the cruise control from the Camaro. I don't think it'll look too anachronistic in the MG interior, and the Miata parts both feel better than the MG ones and give me the controls I need instead of requiring a bunch of extra switches on the dash.
I still can't get over how well this works.
entry 264 - tags: steering, packaging | | | 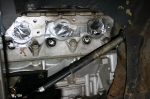 | January 25, 2010 - Another shot of the proposed steering column routing.
It looks as if it'll be fairly simple to arch the exhaust out a bit and run the column between the header and the block.
entry 265 - tags: steering, exhaust | | | 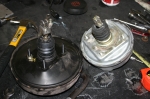 | January 26, 2010 - So, while trying to figure out a few things about the MG booster, it was suggested to me that I try to fit the Miata booster.
As with everything else in this car, make it more like a Miata! Well, my initial reaction was concern that it would fit - the MG part is silver and the Miata one is black in the picture. There's nearly 2" of diameter difference involved.
But I had to try.
entry 266 - tags: brakes, packaging | | | 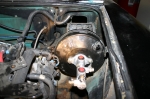 | January 26, 2010 - And voila!
Some light massaging of the inner fender with a 2 lb sledge (about the only part of the inner fender I haven't actually cut off by this point), a new bolt pattern on the pedal box and some clever twisting and turning of the assembly to get it into place, and there's my Miata brake booster installed in the MG.
In researching this, I found that there are actually three brake boosters that have been used over the years, with three different boost ratios. I'll be able to fine-tune my braking effort nicely. Now I just need to source a 15/16" master cylinder from a 2001-05 Miata. Easy enough.
There's just one problem with the fitment of the new booster.
entry 267 - tags: brakes | | | 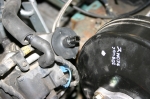 | January 26, 2010 - The booster and the engine end up very close to each other.
Very close. That little port on the head is only about 1/4" from the edge of the booster. It's normally connected to vacuum line that runs from one head to the other, I suppose to prevent pressure buildup on one side.
I looked at a later LS1 and an LS3 in the shop, and I got bitten by the 1998 donor again. In 1999, the heads and valve covers were changed to a center bolt design instead of the peripheral bolt setup I have. This means I can't use a particular Edelbrock coil cover I thought would look great, but that's not important right now. On my engine, both valve covers are the same casting. The little port on the driver's side that's causing me problems is where the oil filler is placed on the other head. On later engines, the driver's side valve cover has a much stumpier protrusion for this port which would give me lots of clearance. This is not a big problem, I'll just whack it off and weld it up. If I decide to keep the connection from head-to-head, I have a few options. So it's not a show-stopper, it's just a bit more work. And it means I'll have to pull that valve cover off - easy to do, just something I was hoping to avoid.
Still, the final result is good. Other than a slightly different pedal ratio, I'm basically running a full Miata brake system. And I know Miata brake systems!
entry 268 - tags: brakes, packaging | | | 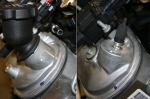 | January 26, 2010 - Here's a peek at where my interference problem is coming from.
The picture on the left shows how the oil filler neck is cast into the valve cover. On my engine, that same casting is fitted with a plastic plug with a vacuum nipple in it. The picture on the right is the newer design, tucking both the casting and the nipple inboard and offering more clearance for applications such as, oh, MGs with power brakes.
After talking with Jon, the V8 tech at Flyin' Miata, it'll be a fairly easy job to make the alterations I need.
entry 269 - tags: packaging | | | 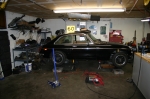 | January 31, 2010 - There's been no actual work on the MG of late because I've been digging into a garage reorganization.
I do this about once a year to try to keep all of the parts under control. With so many current and past projects, the shelves tend to fill up with oddball pieces such as 1966 Cadillac cylinder heads and window regulators from a 323 GTX. The MG, of course, is generating parts from MG, GM and Mazda quite enthusiastically.
As part of this work, I need to move the car. Easy enough, it's on wheels now and I did spend a bit of time finishing the final engine mount so the entire drivetrain is now self-supporting inside the car (woohoo!). But a joker (no, really, his tag is "joker120") on the LS1Tech forum commented that he thought my projected weight of 2500-2600 lbs was too high, and this would be a good time to weigh it. Good point, let's see what happens.
entry 270 - tags: weight, | | | 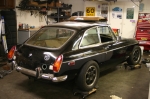 | January 31, 2010 - Before we get to the big reveal, here's a shot of the car's current stance.
Obviously not much suspension travel here as I haven't reshaped the fenders yet. The new wheel offset makes the car look very mean compared to how it looked on the SAAB wheels.
Note the very expensive car dollies. We have a set of Go-jacks at work that cost hundreds of dollars. At home, I have four Harbor Freight furniture dollies that are rated for 1000 lbs each and cost about $10. They work like a charm, letting me slide the car sideways.
entry 271 - tags: stance | | | 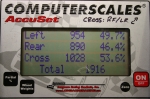 | January 31, 2010 - Here's the big surprise.
1916 lbs. Wow!
My estimate of 2500-2600 lbs for the finished product was based on a published curb weight of the GT of 2401 lbs. If you stuff one of these engines into a Miata, it gains right around 200 lbs with the sort of accessories I'm using. I know the stock MG engine is a hefty one, so I was hoping I might gain a bit less weight than that. But this number is a bit shocking.
So how was I so far off? This is for a car with no cooling system, exhaust, no fluids at all and no interior. It does include the 26 lb box of Camaro wiring that I pulled out of the donor, however, so there may not be a lot to gain with that. Fluids will add around 100 lbs to the car, figuring 10 gallons of gas plus coolant and others - although the engine does have oil. The Optima battery I'm going to use is another 27 lbs. The interior on an MG isn't that heavy and I actually had a Miata seat stuck in the car but it's probably fair to assume there's a hundred pounds to come there. The front bumper is also off the car and there's no spare. All relatively small things, but it adds up.
Still, I may have saved weight somewhere. It could be that my new front end is lighter than stock. Possibly even the rear. The Miata wheels are definitely lighter than the stock MG ones and I remember the front spindles and brakes being painfully heavy.
Should I change my expected final weight? I think I'll drop it down to about 2400 lbs. There could very well be 500 lbs of bits and pieces left to install. But wow. Simply adding the fuel and battery will bring to car to almost 50:50 weight distribution as well.
I'm starting to look at the car with a bit more respect. At 2400 lbs, it'll end up lighter than Elvis, the LS1 Miata I've had the chance to hustle around the track. And that is one fast car.
entry 272 - tags: weight | | | 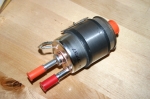 | February 5, 2010 - I'm still finishing up the garage rework and proof-reading the book manuscript again, so no progress on the car.
Seeing it sitting there on its wheels with an engine inside has me pretty inspired, and I cannot wait to dive back in. So I've been planning.
One of the things I need to do when converting from a 80 hp carbureted engine to a 350 hp fuel injected one is make a few changes to the fuel system. I have a good external Pierburg pump to use, that's good. But the LS1 is set up for a fixed pressure returnless system. Here's the answer - a Corvette fuel filter. It has a regulator built into it, so I just pump fuel in one end and it gives me the return line to go back to the tank as well as the feed for the engine. I'll mount it in the rear of the car by the pump. No adjustments do make, either. Just bolt it in and I'm good to go. I also picked up some 3/8" fuel line to feed the beast, I'll spend some time trying to figure out how to run it up the length of the car.
entry 273 - tags: fuel | | | February 8, 2010 - I've been looking at muffler and exhaust options as part of my push to sort out the basic packaging.
Essentially, should I run two small mufflers or one medium size one? The goal is to get the car as quiet as possible, as I want this to be a cruiser. If it costs a few horsepower, that's acceptable. The dual pipes (say, 2.5") are easier to package than a single 3" one.
It's not an easy answer. The problem is the fuel tank. It's offset to one side, so to run twin mufflers I'd have to move it sideways. That's not a big deal, but even with that I'd still need some pretty narrow cans. For the single muffler, I'd be looking at a can of approximately 5 x 10 x 17 at most. Luckily, this is a pretty common size range, and I can choose from Flowmaster (excellent website, not a lot of positive comments on the sound from some people), Dynomax (many recommendations for the Super Turbo), Magnaflow (I have one on the Seven, it's so loud it's a running joke locally) and Hooker Aero Chamber.
Based on the recommendations, I think it's down to a competition between the Super Turbo and the Aero Chamber. The fact that the Hooker doesn't have any packing but relies on internal baffling is a bonus for long life. The good thing is that neither one is terribly expensive so I can experiment if I have to. I'd still prefer a pair as part of a dual exhaust, but I just don't think I can make it fit.
Fun stuff, though.
entry 274 - tags: exhaust, packaging | | | February 8, 2010 - As part of a muffler discussion on the Grassroots forum, a fellow reader pointed me to a very similar car under construction.
Well, similar in concept. It's an MGB GT that's getting the LS1 from a 1998 Camaro based on the pictures. But it's a very different process. First step was to strip the car out completely and bead blast it clean, with pretty much all body panels removed. Between this and his rotisserie, he's got an excellent base for doing nice clean chassis modifications and he's doing a good job of making the car as strong as it should be.
The engine sits much further back than mine. Since the transmission is an automatic, he's not constrained by the shifter location. Nor did he keep the stock heater box. I'm not sure how he's going to fit a gas pedal in the car with that huge transmission so far back!
The rear suspension is a four-link, a design I stayed away from due to concerns about binding. I don't know how legitimate that concern is, but there you have it. Some of his packaging is easier because of it, there's no Panhard bar and the clearance problems I had between the upper mount and the seat bottom don't exist. Having the trunk floor cut out makes life a lot easier when you're fabricating this kind of thing, that's for sure! It looks as if the front suspension is a bolt-in Fast Cars coilover setup.
We're actually at very similar stages right now. He's done a lot of work to fit absolutely monstrous wheels in the car, both in diameter and width, and they're going under the Sebring-style factory racing flares.
Interesting to watch. We're taking different approaches, but with very similar goals.
Jay's MG build
entry 275 - tags: other builds | | | 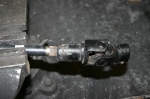 | February 9, 2010 - Time to get some work done on the car!
I started by removing the lower universal joint from the steering rack and welding it to the shaft. There simply wasn't enough room for the cross-bolt used in the original clamp design, the bolt would hit the motor mount.
entry 276 - tags: steering | | | 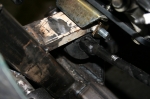 | February 9, 2010 - A peek at the clearance.
This is post-fix, before it was tighter! Installing the steering column is a bit of a pain. I had to lift the engine up, remove the rack, install the shaft on the rack, slide the whole thing back in to place and let the engine back down. I'm trying to make it easy to work on this car, but there's only so much I can do.
That motor mount bracket isn't fully welded yet. That'll happen when the engine comes out next time.
entry 277 - tags: steering, packaging | | | 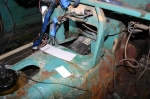 | February 9, 2010 - I also spent some time working on patch panels to cover up the exposed transmission.
I'm not going to be able to put some of them in until the trans is out, so I mostly ended up making plans and a few cardboard templates.
The tunnel is not as rusty as this shot makes it look!
entry 278 | | |  | February 9, 2010 - I wanted to do an ergonomics check, so I installed the driver's seat to see how everything was working out.
The gas pedal was held in place by a vice grip, the brake pedal return spring kept that in the appropriate place and the steering column was clamped on. The initial fit showed that the steering wheel sits very low. That's odd, given that my various collection of test wheels are all significantly smaller than the original. When I checked the MG column against the Miata one, I realized the difference was due to the bracketry on the column. With that taken into account (as seen here), the wheel was just about perfect. It needs to come a bit closer to the driver to be ideal, but that's easy.
The shifter is perfectly placed and everything feels good. I think it'll be a good driver. Don't mind the steering wheel, that's just one of the testing units. Although it's not exactly offensive.
entry 279 - tags: ergonomics, steering | | |
|

 THE DIARY