| THE MG |
|
|
 | |  | February 17, 2009 - Not much work on the car of late.
I'm thinking that I want the full engine with all accessories before I go any further with motor mounts and the like, and that means I need to kill the Camaro. So I'm starting by making storage arrangements for at least one car while I do the work, to ensure I have space in the garage. I may shift my attention to the rear of the car first and get that sorted out, simply to postpone the chaos.
In other news, I brought an LS1 Miata home last night. No, I don't get to keep it! It's been fitted with a big nasty cam and makes a really fun noise. As an added bonus, it also has north of 400 hp. Janel got all giggly when she fired it up in the garage. Too bad we're still breaking in the rear end, so I can't unleash the hounds on this thing. Yes, this requires some self-control.
But I did learn something. It has a modified reverse lockout. The solenoid has been disabled and a different spring inserted. Even when being careful, I bounced off reverse twice while aiming for 5th. Most times I hit the desired gear just fine, but I wasn't too excited about it. So the plan is now to retain the reverse lockout in fully functional form. I'll just have to reshape the transmission tunnel. It's hammer time!
entry 174 - tags: transmission, Miata, Camaro | | | March 29, 2009 - There haven't been any updates for the past month, I know.
That's because I've been working on other things - the Targa Miata went to Laguna Seca for a two-day track event and my editor feels I should be working on my new book instead of hacking up an old MG. So I've been concentrating on that.
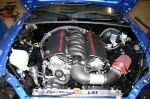
I did pick up a new set of motor mounts, though. They'll give me a little more clearance for the steering column. Not a lot, but hopefully enough. I'm also getting concerned about clearance between the alternator and the steering rack pinion. I know there are a number of accessory mounting options for the LS engines (thank you Car Craft for a well-timed article there) but I'd prefer to maintain the Camaro setup because, well, I have one.
In other news, there's a Austin Healey Sprite in the garage right now. I've been tasked with making the freshly built 1275 engine run. Part of my payment for that is an MGB GT body. Hopefully it'll provide a few useful bits and pieces to help restore Janel's.
So, there's not going to be much work on the MG for a little while yet. I really need to be working on that book!
entry 175 - tags: mounts, fitment | | | 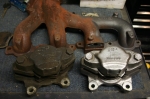 | April 27, 2009 - Happy birthday to me!
I know, there hasn't been any progress on the MG in a long time. I've been working hard on the book instead, to the relief of my editor. But Janel is starting to think I should be spending a bit of time on her little black car - and to help motivate me, she gave me a bead blasting cabinet for my birthday. It's going to make working on 37-year-old MG parts, 15-year-old Miata parts and 11-year-old Camaro parts much nicer.
entry 176 | | | 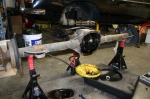 | May 27, 2009 - Finally, some real work!
In a fit of procrastination, I dragged the S10 rear end into the garage to pull the axles out. That'll let me get started on converting them to the 4x100 pattern and also mount the Miata brakes. Then I'll build the 3-link setup.
First step, of course, is to drain the fluid. It actually looked pretty clean.
entry 177 - tags: rear axle | | | 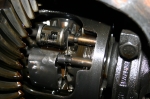 | May 27, 2009 - I was a little surprised when I saw the differential.
Using the classic "turn one wheel and see which way the other one goes" test would indicate this is an open diff. But there's some extra machinery here and what looks suspiciously like a clutch pack. The upper doodad spins when I turn one wheel, and it's spring-loaded and can open up. High rates of spin might lock up the rear or at least bring the clutches into play. At least, that's my theory right now. Interesting little thing though!
entry 178 - tags: rear axle | | | May 29, 2009 - Well, I was right on the function of the differential.
It's a clutch pack that is brought into play with a wheel speed difference of 100 rpm or so, and disengages at over 20 mph. So, might be useful when trying to get out of a mud pit, but not so much for our use. Thus the original plan of using the Camaro differential remains.
entry 179 - tags: rear axle | | | 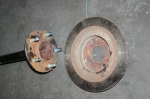 | May 31, 2009 - The next step with the rear end is to figure out how to fit Miata brakes and wheels to it.
There's an obvious problem here - too many studs! The Miata uses a 4x100 bolt pattern. The diameter of this flange and the raised "hub" in the middle also need to be cut down. So I've passed it off to a machinist to make everything fit work. I don't think it's too hard a job with a lathe, but without a lathe it's pretty tough!
It's not really a big step, but having Miata wheels mounted to the rear end with brakes will make me feel like I'm really getting somewhere. Plus Janel approves of the fact that the S10 rear end is no longer in her way near the garage door.
Anyone need an MGB rear end?
entry 180 - tags: rear axle | | | June 4, 2009 - Well, apparently my hope of having the stock axles modified was a bit premature.
The machinist says the center bore can't be brought down all the way to Miata diameter, so my rotors would also have to be machined for a bigger bore or I'd have to use a different rotor - one off a Civic might do the trick, for example, as they have a larger center bore. The estimated cost is around $245 for the work.
Meanwhile, Moser Engineering will make a set of brand new high strength axles for $295. I think I'll go that way.
Of course, if I'm buying new axles, I could simply have done that in the first place and shortened the Camaro housing and saved a bunch of money. I didn't look into the price of custom axles ahead of time. Still, with the S10 housing, I'm assured that everything is straight and aligned which will avoid some potential problems.
entry 181 - tags: rear axle | | | 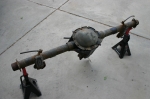 | June 7, 2009 - The rear axle has a few brackets on it that I won't need.
The brake line brackets and the two big spring mounts are going to go. I'd like to reuse the brake mounting tabs at each end if I can, a well-designed adapter should let me simply bolt the Miata parts on. At least, that's my theory.
entry 182 - tags: rear axle | | | 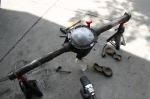 | June 7, 2009 - An hour or so later, the housing has been reworked.
Those spring mounts were extremely solidly welded on, let me tell you. Lots and lots of bead. Still, nothing an angle grinder and a hammer wouldn't fix. I also wire-wheeled the axle tubes to clean them up as I'm going to be welding on them and, well, it's just more pleasant dealing with clean parts. The rear cover was also thrown into the bead blaster to get the worst of the junk off, inside and out. It'll all get painted black, as I'm not really looking to emphasize the differential.
As soon as I can get my axles back and make a couple of measurements, I'll get those new ones ordered. That will let me mount the brake rotors and work on the brake brackets. It'll also let me bolt on wheels so I can start work on positioning the axle and building the three-link rear.
entry 183 - tags: rear axle | | | June 9, 2009 - I was thinking about the best way to proceed on the car, and decided it was time for a few parts.
First, of course, I need to order those axles. But I had to retrieve the stock ones from the shop that had looked at the possibility of turning them down.
So while waiting for that, I figured I'd look at building the brackets under the car. But before I could do that, I had to get my hands on the rod ends I'd be using for the arms on the suspension. Actually, they're not rod ends. They're similar to rod ends with a threaded end on them, but they have bushings in them instead. Better manners for a road car, you see. I should have them before too long, then I can start working on the bracketry on the car.
This order involved a lot of time poking through various fascinating circle track catalogs. It's a very specialized but standardized field, and I have no idea what some of these parts do. It's fun trying to figure it out!
entry 184 - tags: rear axle | | |  | June 18, 2009 - I spent the day building the mounts for the lower trailing arms.
This is actually going to include a new frame rail, basically, welded to the bottom of the floor and running forward to the crossmember about halfway up. I'm using Dan Master's beautiful GT as a guide here. The new tubes are 2" x 2" with a 1/4" wall. Beefy suckers, but pretty much all the driving force is going to be delivered through these two links.
Let me tell you, if I were doing this for a living, I'd starve to death.
entry 185 - tags: rear axle, frame | | | 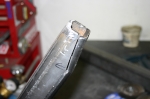 | June 18, 2009 - The crossmember tapers right where the new rail butts up against it, so a bit of pie-cutting, enthusiastic hammering and welding gave me a rail with a matching shape.
Shown here between steps 2 and 3 of course.
Now, when it comes to mounting the rail to the car I'm going to deviate from the Fast Cars setup used on Dan's car. As far as I can tell, they used a c-channel for the rail and stitch-welded it to the floor. The big radius on my tube makes that pretty much impossible, never mind the hassles of welding thin sheet metal to 1/4" steel while lying under the car. So I'm going to drill through the floorboard and use rosette welds. I'll have an easier time getting a good weld and the extra metal in my tube will make the final result stronger. Both ends will be welded up as well, one to the crossmember and the other to the factory spring mounts.
I was about to start doing this when I realized that I should paint the inside of my tube first. It'll be a lot easier now than when it's on the car. I'll put a drain hole in it as well. Not that the 1/4" steel will rust through before the rest of the car collapses into iron oxide from simple humidity, but still...
entry 186 - tags: rear axle, frame | | | June 18, 2009 - I ordered the custom axles today.
It took a fair bit of back-and-forth with Moser to determine that my cunning plan of narrowing the axle by making the radius on the back of the flange thinner wasn't going to work. So they'll be the standard width instead of the slightly narrower setup I'd hoped for. Oh well, there's a 1/2" of tire clearance gone. The good thing is that the standard length axles are $245 instead of $295. They'll be here in a week!
entry 187 - tags: rear axle | | | June 19, 2009 - I welded the new frame rail to the car last night.
It's not really a frame rail, most like a lower suspension mounting point that's two feet long. But still. 30 or so rosette welds plus a solid connection at each end, I think it should work well enough.
It sure looks weird peeking under the car and not seeing any visible connection between this new rail and the floor. But I know it's there!
entry 188 - tags: frame, rear suspension | | | June 25, 2009 - I just realized that I goofed.
I picked up some nice 4-bar ends from Speedway Motors a while back to serve as the ends of the various suspension arms. I prefer these for a street car because they'll be quieter than the more typical rod ends. Hopefully I can get replacement bushings for them! Anyhow, I ordered 6 without realizing that there's a left-hand thread version. The latter is pretty hard to find on the Speedway website and I only stumbled across it after some pretty determined digging.
And of course, the pretty swaged steel tubes I was going to use for my chassis arms come with a right/left thread. So I've ordered 4 of the left hand ones now - I've decided to use a pair on the Panhard rod as well as the trailing arms. I'll have two right hand pieces left over when I'm done, but such is life.
Meanwhile, parts are coming in. A set of ARP studs for the new axles arrived today (Camaro ones that cost $12.00 for a set of five, it's not worth buying stock Miata ones for that!) and the axles themselves should be here tomorrow. Once I have them, I'll mount up some wheels and figure out the exact axle location.
Meanwhile, I've been under the car and realized I'm going to have to do some more cutting around the rear bulkhead to make room for my center link. No worries, it just means more time under the car getting showered in metal shavings. The second pickup point is also welded into place now.
entry 189 - tags: rear axle, suspension | | | 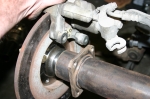 | June 28, 2009 - The new axles have arrived.
Now I can mount the Miata brake rotors and wheels to the S10 rear housing and that opens up a lot of potential work. The picture shows what needs to be done to fit the brakes to the housing - I'll weld a new bracket on to the tube. I'm not sure if I'll try to cut the original one off or not, it'll be a huge amount of work if I do. Depends on the access I have for welding the new one.
I have one wheel mounted on the rear now, I'll install another one soon and roll the whole thing under the car to see how they sit. I already have a pretty good idea, but of course I'm still eager to see it.
entry 190 - tags: rear axle, brakes | | | 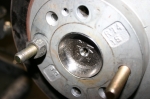 | June 28, 2009 - The picture shows just how tight the tolerances are - check out the fit of that center hub in the brake rotor.
It's absolutely perfect. I have to admit to a certain amount of nervousness the first time I slid the brake rotor over top, but my measurements and Moser's fabrication are just right. The rotors fit as if this was their factory application.
The best part is that, because I didn't change the axle length, it was only $245 to get the new parts made. "Only" because that's a pretty killer price for a pair of high-strength custom axles - far less than the quoted cost to rework the stock ones.
It's hard to explain why I'm so excited to see rotors and wheels on the rear end, but I am.
entry 191 - tags: rear axle | | | June 30, 2009 - Oops.
I decided to install the axles in the differential last night. Imagine my surprise when it became obvious they just weren't going to fit. The inner end of the axles was about 0.035" too long, preventing me from assembling everything. That's a bit frustrating.
An email to Moser and the current theory is that my axles were made with a "button" intended for an 8.5" differential. Mine's a 7.625" setup. So they're going to make another set and I'll return these. Good thing I didn't press all the studs into the flange yet!
entry 192 - tags: rear axle | | | July 25, 2009 - Janel and I took a bit of a break and headed off on a trip for a while.
Three weeks away is great for clearing the head. Plus, it meant that there were a new set of Moser axles waiting for me upon my return.
But I have a problem. Part of the error in the original Moser axles was a C clip groove that was 0.025" too large in diameter. So I had to tap the clips into place. If I had more experience with these sorts of axles, that should have been a danger sign. The result is that I simply can't get the clip off one of the axles. It's the side with the ring gear, which is blocking my access somewhat.
I've been fighting this for a while. Right now, it looks as if the best option will be destructive removal of the clip, and the best suggestion I've heard for that is freezing with liquid nitrogen and then employing a short, sharp shock with a chisel. Cutting doesn't look plausible due to access problems. I'll cut the axle in half if I have to, but I have to figure out how to get in there to do the cutting.
The good news is that the only part of this whole assembly I really need to keep is the housing. If I have to cut the differential apart, so be it.
I also learned yesterday that Z28 Camaros have a Torsen differential. Excellent. No, wait, that's 1999-02 Z28s. Our donor is a 1998. I think that means we have a Positraction. I'm trying to learn more about that now.
entry 193 - tags: rear axle | | |
|

 THE DIARY