June 23, 2011 - Ah, nuts. I spent a couple of hours running around some local roads shooting a bit of video and generally having fun with the car. The exhaust noises started coming back as the car got hot, but otherwise it behaved itself. Even with an ambient temperature around 95F or so, it didn't have any overheating problems. It did act a little cantankerous on a couple of hot starts, but cycling the key solved that. Quick car, let me tell you. The video will be along soon.
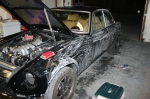
But unfortunately, the fuel problem returned. After running happily for all the video, I was heading home when the car started to stumble and then died in front of a gas station. I pushed the car into the lot where it was safe, and started poking around. My electrical connection seemed fine, but again the pump sounded a bit labored when it ran. I could sometimes get the car to fire up, but it would only fire a cylinder sporadically, just enough to keep it turning over but not much else. So I left the car and occupied myself elsewhere for half an hour.
When I got back, it fired up happily. I made it almost all the way home before it stumbled to a halt again. I parked it by the side of the road and again, a half hour later, it fired up.
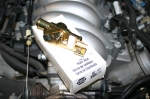
So whatever is wrong is probably related to heat. I'm thinking it might be the pump itself. The pump I'm using is one that was sitting around my garage, and probably last saw action a decade ago. Foolish, maybe. But it's been working happily so far. The pump is fairly well protected from heat, although there is one of the exhaust pipes about a foot away. It doesn't feel hot to the touch, nor do any of the fuel lines.
It's possible that the input screen on the pump is clogged. Because the filter is also the regulator, the pump is pre-filter. It's quite likely there was a bit of debris in the tank despite my best efforts. I'm not sure that would manifest itself quite like this, but I'll investigate it none the less. I'll probably just swap in a new pump of the same type to be sure. entry 600 - tags: fuel, debugging
June 23, 2011 - "You've got to love a level of acceleration that makes you just a little bit nauseous". Bill Cardell, the owner of Flyin' Miata, riding in the MG. entry 601 - tags: quotes
June 23, 2011 - Video time! I spent some time playing with a couple of cameras today and put this together. I think it's fair to say that I'm not going to be getting a call from Martin Scorsese to take over for him, but hopefully it'll give a bit of the flavor of what this thing is like to drive. Yes, I wish there was more engine noise too!
If the video doesn't show below, you can watch it on YouTube in glorious high definition.
June 26, 2011 - I swapped out the fuel pump yesterday. There were none of the hoped-for obvious problem signs - no big chunks of gas tank stuff clogging the inlet, no damaged wiring. Nuts. A drive today in hot (95F) weather unearthed no problems with the fuel system, but it drove fine almost every time before. So the jury's still out. I hate it when things are inconclusive like this.
We did find one definite problem, though. The car is very well ventilated, quite livable even in our hot climate. But when Janel drove it in open-toed shoes, she discovered that increased speed pushes some air through the heater core and directly on to her feet. Now, the heater core is still running coolant through it as I wasn't sure when I hooked things up if the LS engine could do without that particular circuit. Apparently it can, and so I am under orders to fix that particular problem quickly before her feet melt. I'll have to see if I can find the old heater valve again.
Other than the hot toes, she did bond with the car. Especially when she was trying to merge and wasn't sure if she had enough room. I told her to punch it, she'd have enough room. Yes indeed she did. She laughed and started looking for opportunities to open the throttle. entry 603 - tags: debugging, heater, fuel
June 27, 2011 - So much for that nice pretty paint. I decided it was time to start sanding. I hit the worst runs with wet 500 grit, then moved to 1000 to flatten the rest of the car. It's going nice and quickly, although it's easy to see that I've had to remove a lot of the trim I installed just a week or so ago. Sigh. Still, it should look amazing when I'm done. And once this is all smoothed out, I'll be able to install the side trim and mirrors and even some of the new interior panels. Oooo! entry 604 - tags: body, paint
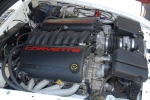
June 28, 2011 - The other LS1-powered MGB. There are a few LS-powered MGs under construction, but there's only one other one I know of that's actually self-propelled. Until today, I'd only ever seen it when it was listed on eBay a couple of times. But I stumbled across a page with some more details and photos of the car yesterday.
It is a motor swap, nothing more. The rear suspension? Stock. Front suspension? Basically stock with some different springs. Brakes? Drums in the rear. Eeek. I'm not sure I'd want to drive that too hard. There are a few other visible touches that concern me a bit, such as the fact that bungee cords are used to hold the intake box together. That's not indicative of a close attention to detail. There are no indications of what the transmission is.
There are some nice touches though. The car uses an MGC hood, which has more room up front. That's how there's space for the intake. The interior is beautifully finished. It's basically a slightly modified MGC from the outside.
I'll bet it's a hit at cruise events, but I wouldn't be willing to take it around the track. entry 605 - tags: other cars
June 28, 2011 - More sanding! I feel like I'll have a masters degree in sanding MGs when this is done. I've gone over the whole car with 500 grit to knock down the worst runs - there weren't as many as I thought - and followed it up with 1000 and 1200. I'm now doing a final run over with 2000 grit. Hard to believe, but there's a visible difference between each one. The car's looking really smooth now.
Next step after the 2000 grit is the buffing. That's where it'll really pop and I'll have the ability to really make mistakes. Foreshadowing? I hope not. entry 606 - tags: paint
June 29, 2011 - Here's the result of all that sanding. The car is super-smooth and satin black. I tried a bit of buffing on the roof and decided that panel simply wasn't smooth enough - there was still a bit of a pebbled surface where I'd hit the top of the orange peel but not flattened it. So I wetted everything down and kept going.
Polishing this weekend. That should be a fairly quick and very gratifying job. entry 607 - tags: polish, paint
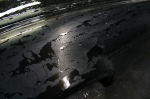
July 2, 2011 - Buffing time! Try to guess which side is the "before" side. I started off with a fairly mild setup, a gentle foam pad and a less aggressive compound. That's the result on the roof there. Not bad, but my initial sanding was with some pretty coarse paper. I followed it up with lighter paper, but either I don't have enough patience (most likely) or the setup simply wasn't aggressive enough.
So, after some experimentation, I ended up with my most aggressive combination of abrasion: some old 3M Product III rubbing compound and a wool boot on the rotary buffer, set on 3.5 out of 6. That did the job.
I did all my experimentation on the hood because I figured that if I really screwed it up, it would be the easiest to repaint. No worries there, I found I didn't burn anything up. One big help was the Meguiars training video, which they've uploaded to YouTube. Sure, there's a lot of advertising for Meguiars in there, but it shows you how to move a buffer properly and a lot of good techniques. entry 608 - tags: buffing, paint
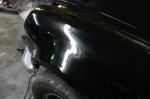
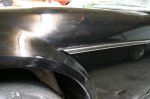
July 2, 2011 - Here's that flare that had the big runs in it. It's not perfect, but it's a whole lot better. I won't have to try to avoid this angle when taking pictures of the car anymore! You can see that my initial sanding marks are still there, even after using 2000 grit and a couple of passes with various polishing compounds. By the way, I followed up that 3M rubbing compound with some Meguiars polishing compound and then a swirl remover. The sanding marks actually kinda make it look like a well-cared-for but old enamel paint job. Instant patina!
I know, I know. But I'm going to call this good for now so I can get the car up and running again. The goal was to get rid of the worst of the runs so I can put the badges and side trim on. I can do some more finishing work later on if I feel the need. Right now, of course, I'm looking at a spotless black car under fluorescent lights.
I did learn some neat techniques for getting rid of runs without wet-sanding the entire car. Although the car did need it due to orange peel. I'll get pictures of them later, as I know I'll probably come across at least one more that will need a touch-up. entry 609 - tags: buffing, paint
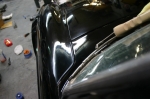
July 3, 2011 - I left one small panel on the car alone so I would have a good before/after comparison. That's it at the base of the windshield. It made a good test for the quality of my buffing too! The untouched panel is visibly rougher but has about the same shine as the fender does, so it's worked out pretty well. entry 610 - tags: Buffing, paint
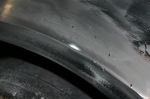
July 3, 2011 - It's not all good news, though. Whilst trying to get rid of the worst of the drips, I managed to sand through the paint. No, not with the rotary buffer that everyone warned me about, but with 2000 grit sand paper. I wasnt trying to sand right on the lip but I must have had the angle just a bit off. Argh.
I left it alone while I continued with the rest of the car. I'll touch it up eventually, but I figured I should make sure there aren't any other spots that will need work first.
Once everything is polished, it's just a small white spot on the lip. Not too obvious in real life. entry 611 - tags: buffing, paint
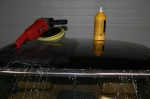
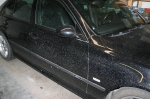
July 3, 2011 - Buffing is a messy job. I probably should have moved the other car out of the garage! If the color looks familiar, that's because it's the same one I used on the MG. entry 612 - tags: buffing, mess
July 3, 2011 - The hot foot problem has been solved. This heater valve should let the air passing through the heater core to remain cool. The unusual thing about it is that it works backwards to most valves, which matches the way the control cable from the MG works. Push to open, pull to close if I remember correctly. I haven't run the cable to it yet - I disconnected the cable from the knob under the dash when I wasn't using it earlier - but that's not liable to be a concern until later in the year.
With forecast temperatures above 101F today, I'm glad I have this one fixed. entry 613 - tags: heat
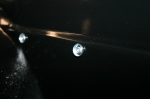
July 3, 2011 - More reassembly. With the paint finished (at least, finished enough for now), it's finally time to put on the side trim. I've been looking forward to this. First, installation of the fasteners. Weird little dome washers that the trim snaps over. The car looks kinda cool with them all in place, like it's got rivets down the side. entry 614 - tags: trim
July 3, 2011 - Of course, the trim wouldn't fit with the new flares. So I had to trim it. The trim is actually stainless steel, not chrome-plated plastic or some other shortcut. Nice work MG. So it cuts and trims pretty nicely.
Other than one piece (the one you can see here), all the trim is new. It's only $40 from Moss and makes a big difference in how the car looks. The old trim had picked up a number of little dings and scuffs over the years, and it just made the car looks a little bit dingy. Not anymore. entry 615 - tags: trim
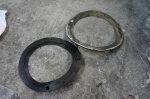
July 3, 2011 - Along with new trim, I replaced a few gaskets such as these for the headlights. They all sealed well enough, but there's both primer and black paint on the old one from previous paint jobs. Again, dingy. A couple of new parts make a big difference.
How cool is it that I can still buy these parts for a car that was made nearly four decades ago? entry 616 - tags: trim
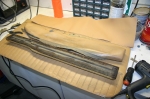
July 3, 2011 - The logical next step after finishing the side trim would be to take the car out into the brilliant sun and marvel over how good it looks as the finally product. But I had to reinstall the door panels, and what better time to install the new ones? The main door card went on easily enough with just a bit of fiddling around. The pad at the top of the door, on the other hand, needed to have the new vinyl wrapped around it. Not a hugely challenging task, but one that takes time to do it right. So I spent the rest of the day upholstering four chunks like the one in the picture. But man, do they look good now. entry 617 - tags: interior
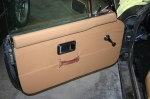
July 3, 2011 - Ta-daaah! A complete door. The panel design isn't identical to the original (assuming the previous cards were the original ones, which may not be the case) but it looks good. So I may not win at Pebble Beach. I'll cope. It looks so much better than before, though. The only part visible that was on the car when we got it is the door latch, and Janel's asked me if I can make it look better!
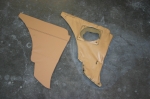
I still have to do the side panels for the rear seats. The upper pads are done, but there's still a bit of work to do behind the panels. Tomorrow, the car will emerge. entry 618 - tags: interior
July 4, 2011 - Before and after. Yes, I think the interior should look better. entry 619 - tags: interior

 THE DIARY