| THE MG |
|
|
 | |  | December 1, 2010 - After the paint was removed from the fender area, the Rabbit part was tack-welded on.
I then reinstalled the wheel, dropped the car back down and double-checked placement.
Just look at how that fender fits the MG body. It's perfect.
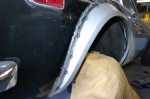
entry 492 - tags: fender, body | | | 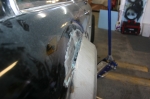 | December 1, 2010 - There's one problem with the flares, though.
They sit high enough on the body that they cross over the line where the stainless steel strakes run. This leaves a gap at the top of the flare where the body steps inwards. These fenders have a little curve where they meet up with the body, so before installing them I used a body hammer to remove the curve and flatten the profile of the flare in this area.
I am mounting these flares higher on the body than I've seen on another car - the only other car I've seen with the Rabbit flares. It could be that my ride height is lower, but aesthetically I'm happy with the placement.
entry 493 - tags: body, fender | | | 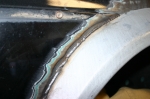 | December 1, 2010 - With the fender properly placed, I welded it on.
Lots of small spot welds to keep the heat under control. I'm really happy with how this turned out.
entry 494 - tags: fenders, flares, body | | | 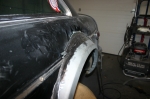 | December 1, 2010 - The solution to the gap was a patch panel.
It's shown here on the other side, because that's where I managed to get a better picture! I used card stock to work out the shape, cut a carefully shaped patch out of the leftover patch panel sheetmetal and welded it in. A bit more attention with the flapper wheel on the grinder and a bit of prep work and it'll look nice and smooth. It also makes the fender flares look much bigger than before!
entry 495 - tags: fender, flares, body | | | 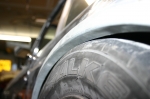 | December 1, 2010 - The new flares have a fairly big lip on the inside edge, typical for production cars.
Unfortunately, it means that my tires hit at full compression. So this lip has to go.
entry 496 - tags: body, flares, fenders | | | 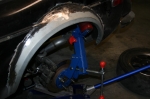 | December 1, 2010 - The solution?
A fender roller. Now, I often get accused of having access to special tools due to the fact that I work at Flyin' Miata. And I have to admit that this is one of those situations. Not that a fender roller is all that exotic, but it's easy to just grab the one off the shelf at work instead of having to borrow it from someone.
The low-tech way to do this would involve a baseball bat or jack handle, of course. I've done that in the past, so I think I've paid my dues!
entry 497 - tags: fenders, flares, body, fender roller | | | 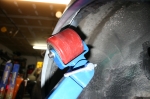 | December 1, 2010 - The roller is a pretty nice tool.
It allows you to slowly and carefully shape the fender, rolling that flat flange upwards so it gives more room without any visible changes. It's easier on an unpainted panel like this, of course, but I've made some fairly spectacular alterations to a couple of Miatas. In extreme cases, you can stretch the fender outwards for more space. I didn't have to do that here.
It might seem a little odd to build a custom fender and them immediately modify it like this, but it's part of getting the best fit.
So how's it look? Pictures will be forthcoming once I get the car out of the garage. Basically, the car's gone from looking pretty cool to just plain badass.
entry 498 - tags: fender roller, flares, fenders, body | | | 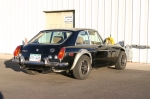 | December 2, 2010 - The final result!
I'll hit it with some black primer to protect the metal and make the shape blend into the body, but I'm really happy with the result.
entry 499 - tags: fenders, flares, body | | | 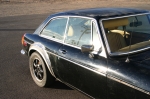 | December 2, 2010 - Another view from the front quarter.
Sorry about the exposure, the Colorado sun is pretty harsh for photography. I'll get some better ones later.
After some playing around yesterday, I decided that rear Rabbit flares (as seen on the rear of the MG) fit the front of the MG better than front Rabbit flares. Of course, I have a pair of junkyard front flares but no more rears. No worries, rabbitparts.com shipped me another set of patch panels yesterday and I should have them within a week. As a bonus, they're nice clean new metal like these instead of junkyard parts.
entry 500 - tags: body, fenders, flares | | | 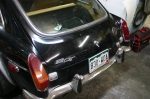 | December 5, 2010 - I had time for some relatively quick and easy jobs this weekend, and I'm still waiting for the new set of flares to arrive.
So I started messing around with little trim pieces. First up was the tail lights. A few people had commented on how the older lights looked better. From pictures, I'd felt that was true for the convertible but not so much for the GT. But the 1969 parts car came with a set of the older ones, and I'd really come to appreciate the shape. So I swapped them over. Here, you can see one new old design light on the left and one old new design on the right.
entry 501 - tags: lights | | | 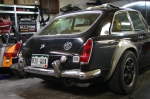 | December 5, 2010 - The rear end with the new lights.
Sharp eyes will also notice that I "shaved" the side markers as well (okay, I removed them and stuck a piece of black duct tape over the holes) and swapped the overriders for the older design. The 1972 ones have a rubber insert. Here's the "before" picture.
I'm really happy with the result. Janel described the older lights are more streamlined, and I think she's right on. They look much better. With all the changes, the car just looks cleaner from the rear. I actually had a set of new lenses for the previous taillights, but this is much nicer.
Of course, this light work wasn't without a certain amount of troubleshooting. The taillights weren't very well grounded, so I added a ground strap to make sure they worked consistently and well. A couple of dodgy bullet connectors also caused me to spend some time cleaning things up. I'll keep an eye on the behavior of those rear lights.
Sometimes it's nice to do the little things that make a satisfying difference. These sort of changes will make the whole car just work better, even if most people can't identify what was done.
entry 502 - tags: lights, wiring | | | 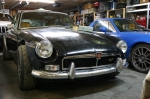 | December 5, 2010 - The messing about wasn't restricted to the rear.
In the front, I swapped the orange one-piece front lights for a set of older two-piece ones with clear lenses. This makes the whole front of the car monochrome with the exception of that MG badge, and again it cleans things up. The lights came with a set of white bulbs, but I installed a set of orange ones in the turn indicators to make them more visible when lit. The overriders were also changed out for the older ones. Again, it's a cleaner look than before.
The grille has been discussed before, a couple of years ago before I started on the engine conversion. It's a 1974 grille with a 1960's MG emblem, chosen because the black opening looks more aggressive than the old design to my eyes and because the newer emblem just looked cheap. Here's what the car looked like when we got it, with the overriders removed.
Less obvious is a set of new headlights. They're a set of European Bosch lights that put out a really nice pattern and let me run H4 bulbs. It's what a European MG would have, and the lighting is much better.
Again, not big changes. But ones that make me smile when I look at the car and will make it look better.
entry 503 - tags: lights | | | 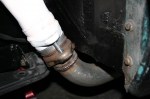 | December 5, 2010 - Time to do some functional work.
I found what is likely a source of a fair bit of exhaust noise - the driver's side header outlet is leaning up against the footwell. Solidly enough to clear the paint off the footwell. So I pulled the header and exhaust pipe off and decided an effective fix would be a simple dent. A slot in the footwell, a few hammer blows and voila, lots of room. Given the shape of the footwell, it's unnoticeable from inside the car. I covered up the slots with seam sealer and I'll put it all together again shortly. I'm excited to see if this makes a big difference to the sound - I suspect it's where a fairly loud rumble/vibration at higher loads and highway cruise was coming from.
entry 504 - tags: exhaust | | | 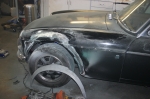 | December 16, 2010 - I've been out of town for over a week, so the MG hasn't seen much action.
But the whole time I was gone, I was thinking about the fact that my new front fenders should be arriving. Less than 24 hours after getting home, I had the new fenders cut up and was doing test fitting.
And here's where I ran into a problem. Cars taper. They tend to be wider in the middle than the ends. Both the Rabbit and the MGB are like this. So the flares are slightly tapered to match. In the rear, I used the rear fenders on their intended sides and so the taper worked out well. But in the front, I had to flip the fender pieces - from a rear Rabbit fender - to the other side if I wanted the taper to work with me. Unfortunately, no matter how I played with them, I just couldn't get them to sit well on the original wheel cutout.
By flipping them back again - left fender on the left side - I was able to get the shape I wanted with a delicious little curl where the flare melts into the body of the car. That's a great detail on the original Rabbit that you can see with the bumpers pulled. But it meant that the flare was tapered the wrong way. The front of the wheel is left more exposed and there's a bit more flare on the trailing edge. Still, I thought it worked pretty well, so that's what I've done. We'll see what I think when it's all painted up and finished.
I did do a lot more trimming on the metal to deal with this and to mold the flares to the body. I usually find tin snips to be terribly frustrating devices but this turned out to be their destined use. A nice change from noisy power tools that are always trying to fling incandescent metal into my eyeballs.
entry 505 - tags: fenders, flares, body | | |  | December 16, 2010 - Just as in the rear, I had to add a filler piece to mate the flare to the body.
However, unlike the rear, it was trying to mate up to a fairly heavily curved fender. It looks a bit weird in the picture, but I think it'll look good when it's all painted.
I hope so anyhow.
entry 506 - tags: fenders, flares, body | | | 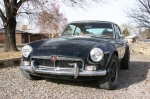 | December 17, 2010 - With both fenders welded up, I hit them with some black primer and brought the car out into the sun to see how it looked.
The answer: Pretty darn good. Obviously they're not finished yet, I only knocked down the high points on the welds so they wouldn't be too distracting.
The two front fenders came out slightly different, mostly in how the extra patch blends in. On the driver's side here, it's a straight line to the fender. On the passenger's side, there's a change in angle. I like the former, so I'll probably go back to the other side and add a bit more steel - I should be able make it work nicely.
The car looks pretty good now! Much less redneck.
entry 507 - tags: body, fenders, flares | | | 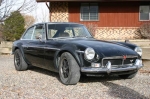 | December 17, 2010 - A view of the passenger's side.
You can't really see the difference in the front flares here. I think the car looks good - my concerns about the taper of the flares were a bit premature, as the final result blends in nicely. The rears still work a bit better in my opinion, but I'm pretty happy. There are so many ways this could have gone wrong.
Check out the strip down the side - it's just foil tape cut to width and stuck on to get a feel for how it will look. After the bodywork is finished and the car is painted, I'll cut down a set of stock stainless steel strips and make them fit.
entry 508 - tags: body, fenders, flares | | | 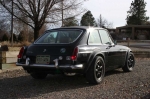 | December 17, 2010 - The best angle.
I want to spend a bit more time walking around the car and getting a feel for how it looks (and learning to photograph it well!), but I'm happy with this. It almost looks as if it should have come from the factory this way, which was my goal. I can see a few things I'd change if I did it again on the fronts (especially now that I've learned a few things about fitting the metal) but that's just my reaction after spending a few days working on them. It's like the stripes on the Targa Miata - I'm not happy with how they flow on one corner or around the rear taillights, but nobody else has ever noticed.
To celebrate, we used the car for a bit of running around town including some grocery shopping. Naturally, my freshly-adjusted latch on the tailgate decided to get ornery and refused to open, so we had to load all the groceries in through the front doors. The car's still fairly loud, but I think I managed to solve the major vibration problem. We'll see when I get it on the interstate. Still have to fix that bit of stiction in the steering though...
entry 509 - tags: fenders, flares, body | | | 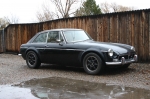 | December 20, 2010 - It's been a busy few days.
On Friday night, Janel and I took the MG out to run an errand or two - which turned into a big grocery shopping trip as well as other events. Of course, I had just adjusted the rear hatch and it refused to open again. So we had to load all the groceries in through the back seat. A tip for those who are planning to use an MGB GT for a station wagon - anything you put in the back is on clear display! Unless you stash it in the smuggler's hole underneath where the spare tire lives. Anyhow, a bit of lubrication when we got home and the problem was solved.
We also got a little hiccup when the engine died a block from home. It fired right up again, but that was a bit odd. My suspicion was low fuel.
The next morning, I jumped in the car to go to the opening of a new car museum close by the house. While sitting at a stop sign, the engine died again and would not restart. Banging on the bottom of the tank gave a very empty BONG, so my chase car (a Miata with a 480 hp LS3, of course) took off to get some fuel. My theory was that the fuel gauge (the original, on the original sender and wiring) wasn't quite calibrated right - or, as a safety margin, it never went completely to E because then it would appear to be not working!
The fuel arrived. That didn't work. Bill Cardell (the driver of the Miata) and I figured out the fuel pump wasn't running. And then it was - there must be a slightly dodgy connection in the system somewhere. I got to the museum and back without incident, but it really highlighted that I'm not just debugging my own work over the last two years, but also a 38-year-old British car that never really functioned fully when I first got it.
I'd like to point out that it's not a Lucas fuel pump, but a good Pierburg unit. Just before the Lucas jokes start...
The photo? I just like the way the car looks!
entry 510 - tags: debugging | | |  | December 20, 2010 - I was asked for a side shot of the flares, showing how they fit over the wheels.
And here it is.
The Lucas bullet connector between the new wiring and the fuel pump has been replaced. The culprit? I don't know. I also discovered that I never tightened down some of the connections on the main power bus, so it's possible that could be a culprit.
entry 511 - tags: body, fender, flares | | |
|

 THE DIARY