| THE MG |
|
|
 | |
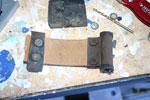
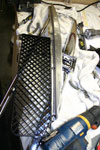
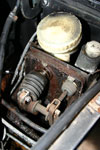 | April 15, 2008 - There's a shield that usually covers the brake master cylinder pushrod.
One of the screws that holds it in place had been damaged by a previous owner, but after a bit of work I got it free. And here's what greeted me underneath. Yuk.
So it's a good thing I ordered a master cylinder rebuild kit yesterday. Moss says the master can't really be rebuilt, but I'm willing to give it a try. It's the difference between a $270 part and a $18 kit.
On a similar note, I got a call today from Gordon Strickland of the B Hive, confirming some of the slightly odd quantities in my order. He was very helpful, discussing some slight differences in the badges that might cause difficulties in my planned grille design.
entry 21 - tags: brakes |
| |
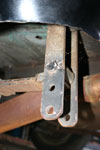 | April 15, 2008 - The back of the car sits quite high.
You can see it in this picture. And this might be the reason. These shackles are very obviously aftermarket, and a quick query on the MG Experience forum (a very helpful bunch) returned the information that the length between the holes should be 2.5 to 4", not the 5+" I have now. If I flip these around and use the bottom hole as the top, I'll get a good idea of if that's too long or two short. It's a distance of just over 3".
I'm guessing a previous owner did this in order to raise the rear and hopefully stop that tire/fender interference.
entry 22 - tags: suspension |
| |
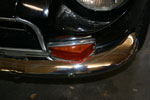 | April 19, 2008 - Ah, the things you learn.
One of the members on MGexperience.net spotted that my turn signal lenses were on backwards. They really look as if they should be mounted this way, but they're not. Quick and easy to fix!
entry 23 |
| |
 | April 19, 2008 - I spent a bit of time welding up the exhaust today.
It's not the prettiest job, but it only has to hold together for a year or so.
It's not the first time this joint has been welded either. Why? Probably due to this exhaust hanger that had separated. There's nothing supporting the exhaust from the engine to the tailpipe as far as I can see.
entry 24 |
| |
 | April 19, 2008 - The solution to the exhaust hanger.
This strap is an axle limiting strap used on Land Rover suspension. It's tough stuff and should easily last a long time on the exhaust system.
entry 25 |
| |
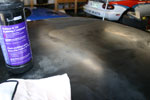 | April 19, 2008 - In what is probably a futile move, I spent a bit of time trying to restore the paint on the roof and hood.
It's badly sun-blasted. With some rubbing compound and various other magical pastes, I was able to bring it back a bit. It's still pretty bad, but it shows a little less than before. And it's all smooth, so it feels good when you pat the car on the head. As you do.
entry 26 |
| |
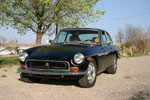
 | April 21, 2008 - New wheels!
I've been planning to install a set of pre-1987 SAAB 900 wheels since I discovered they would fit the car. After all, the wheels that came with it are pretty darn ugly. And a car like this should have a set of Minilites - or a reasonable facsimile thereof, anyhow. So after a bit of searching around, I turned these ones up in Colorado Springs. Janel was up there this weekend and picked them up for me. Well, for her really.
They're actually Carroll Shelby wheels. Yes, that Shelby. Ronal did a version as well. Reasonably but not exceptionally light at 15.8 lbs each according to the UPS scale at work. These came with 5 full sets of lug nuts and some decent Falken tires, a big step up from what we had on the car already. The wheels are 15x5.5 and the tires are a 195/60-15.
If they look suspiciously shiny, it's for good reason. They're polished! I was originally thinking of some way to dull the centers and leave the lips polished, such as bead-blasting or painting the centers. But on the car, they look good. We'll see if that impression sticks around.
When I was looking, I found very few pictures of MGBs with these wheels fitted. So brace yourself, there are a bunch coming. If you want more, just email me.
entry 27 - tags: wheels, saab |
| |
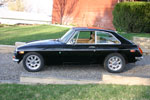 | April 21, 2008 - A side view of the car with the new wheels.
15" is as large as I'd want to go on this body. The SAAB lug nuts fit perfectly, but the ones on the car already were also suited to the SAAB wheels. It's my understanding that the Ronal version uses a tapered lug nut.
I also picked up a fifth, non-polished SAAB wheel to use as a spare.
Janel wasn't so sure about my enthusiasm for the wheels when I first started talking about them, but now that she's seen them on the car she's a big fan. They look right.
entry 28 - tags: wheels, saab |
| |
 | April 21, 2008 - The offset of the new wheels is much greater than the old ones.
This means they're tucked under the car more. That's good, because they're not going to interfere with the body. But I'm tempted to install some spacers to push them outboard a bit. To my eyes, the car needs a wider stance. Not quite as wide as the previous one though!
entry 29 - tags: wheels, saab |
| |
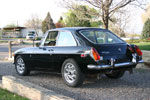
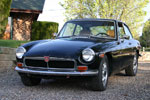 | April 21, 2008 - Check out the nose of the car compared to the last shot!
There's a new grille after several minutes worth of work with a screwdriver. It's the design used from 1973 on. I chose it instead of the earlier 60's grille because the black center looks a bit more aggressive. It popped right into place, although I'm still working out how the upper brackets fit in properly.
I stuck the front overriders back on the car, and we both agree that the car looks better with them on. So expect them to make a reappearance very soon.
entry 30 - tags: grille |
| |
 | April 21, 2008 - The only downside to the late grille is the red badge.
It looks a little downmarket compared to the early black and red design. So I picked up one of the latter as well, and I have plans to fit it to this grille. Somehow.
By the time I'm done, this car will drive the purists nuts.
Okay, the badge isn't the only downside. I'm going to have to do something about that exposed teal paint where the original grille sat. A repaint is definitely in this car's future anyhow, so I'll do something temporary for the time being.
entry 31 - tags: grille, badges |
| |
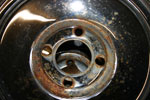 | April 21, 2008 - A little surprise awaited me when I pulled off the old wheels.
They weren't intended for this bolt pattern. Someone egged out the holes to make it fit. Dodgy. It turns out these wheels were originally intended to be fake wire wheels, but the wire overlay is missing.
Between the questionable aesthetics, the completely dead tires and the ugly bolt pattern work, they're going to the scrapyard.
entry 32 - tags: wheels |
| |
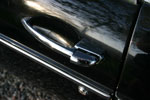 | April 21, 2008 - Typical of the little jobs ahead, the driver's door handle needs fixing.
Nothing major, I'm sure, just something else to take up a pleasant hour or two of fettling. I enjoy this kind of thing, as while it's easy to get used to a wonky door handle like this, it feels really good the first time you walk up to the car and the handle works perfectly.
entry 33 |
| |
 | April 23, 2008 - Time to change out the badge on the grille.
The first step is to figure out how the original one is attached. So I disassembled the grille, only to discover that the original was stuck on with double-sided tape. A prod from behind with a screwdriver popped it out.
entry 34 - tags: grille, badges |
| |
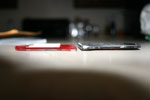 | April 23, 2008 - The old and new badges are not identical.
The new one (the red) is completely flat and has a bevel on the back side. The black one does not have the bevel and is ever-so-slightly larger. A bit of time spent with a grinding wheel and lots of test fitting, then a touch-up of the edges with black marker and it pops right into place.
entry 35 - tags: grille, badges |
| |
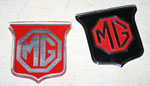 | April 23, 2008 - Side by side, there's a surprising difference in the badges.
Not just in terms of color scheme - that's obviously a personal preference - but in execution. The red badge that came with the grille was sloppily made, with a couple of clear voids between the silver and the red. It was also a simple flat piece that had the colors applied to the back.
The new one actually has some relief to it. The silver sections are raised (or embossed if you look at the back) and there's much finer detail in the design. The raised silver bits catch the light and make it look like a fine piece of work, as opposed to a cheap printed unit. It's also made to a higher quality level, with no gaps or voids.
The clear strip along the top is the result of my preliminary sanding efforts that took some black paint off the back.
entry 36 - tags: badges |
| |
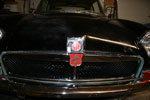
 | April 23, 2008 - The new old badge in place!
A bit of attention with a grinder - being careful not to hit the edges of that chrome border! - followed by a touch-up with a marker and it dropped right into place. It looks far better.
Instead of using double-sided tape to attach it, I used some 3M badge adhesive. Not the best choice really, it did some slight damage to the paint that's visible in this picture. Not that anyone else will see it, but I know it's there. Of course, now I remember where I put the tape...
entry 37 - tags: grille, badges |
| |
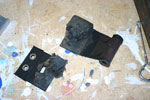
 | April 23, 2008 - Time to stop messing around with badges and grilles and time to fix a real problem.
The brakes. The master cylinder leaks badly and has to be rebuilt. I picked up a rebuild kit from The B Hive.
The first step is to remove the master. It's a bit of a puzzle really. It will come out, but you have to discover just the perfect way to twist it. I went a little further in disassembly than I really had to, but I got it out!
entry 38 - tags: brakes |
| |
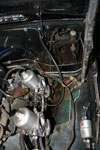
 | April 23, 2008 - A side discovery when gaining access to the brakes was that there are no air filters on the car.
Seriously? This is the second time I've purchased a car from California to discover there are no filters installed. What is it with that state?
entry 39 |
| |
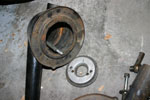
 | April 25, 2008 - The master is out of the car and on the bench.
Time to rebuild it!
entry 40 - tags: brakes |
| |

 THE DIARY