| THE MG |
|
|
 | | 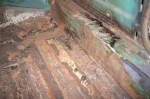 | January 17, 2009 - Unfortunately, the car was not completely rust-free.
Even before all of the asphalt was up, this section came to light. There's a hole in the top of the sill as well as this damage to the floorboard at the base of the sill. Not too much, though, and it's restricted to the area that can be seen here. It's an easy patch job, no need to bother with new panels. I'll probably cut out the floor between the sill and the raised bit, then put an L-shaped piece of steel in to tie them together.
With the rest of the floors cleaned off on both sides of the car, this was it for rust. Everything else looked just fine. There's still asphalt on the raised ribs on the floor in this picture though, and that makes it look a little dodgy.
entry 147 - tags: rust, floors, asphalt | | | 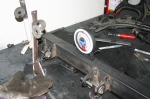 | January 18, 2009 - It was too nice a day outside to work much on the MG.
But I did get the left front suspension started. Here it is in the highly professional jig for the upper control arm placement.
I assure you, the welds look much less dodgy in person!
entry 148 - tags: suspension | | | 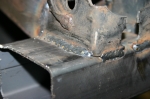 | January 19, 2009 - See?
Not so bad.
entry 149 - tags: suspension | | | 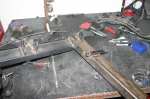 | January 19, 2009 - The left front suspension is all together.
So tomorrow it'll get welded to the car. Then the steering rack support - and then I'll be able to steer the wheels! How exciting.
entry 150 - tags: suspension | | | January 20, 2009 - Whoops.
I got the second frame rail cut to shape and tack-welded into place. Then, just to check my placement, I checked the horizontal distance between the front control arm mounting points.
They were about 10mm too wide.
That's odd, how could I have made that miscalculation? Just for fun, I checked the distance between the rails at the front. Again, about 10mm too wide. But the rails were pushed up tight against the inside of the stock rails, so how could that have happened? A bit of head scratching and then I checked the width of the rails at the firewall. Perfect.
They're splayed.
So I crawled back under the car again to see if one wasn't butted tight against the stock rail, but both were good. Sighting along the new rail showed me the problem, though. The rails weren't straight. In my excitement to put the suspension pickups in place, I'd managed to warp them. Obvious in retrospect, not something I expected at the time. At least it appears I did it nice and evenly, but this isn't good.
So I think I'll try heating up the inside edge of the rails and see if they pull back straight. It's a trick I learned from an exhaust shop - heat up the steel and let it cool, and the hot side will shrink down a bit. Basically, do the same thing that bent them in the first place. Either that or I cut them loose and start over, or cut and weld the rails with an angle correction. Ugh. I'll try heat first.
entry 151 - tags: suspension, frame, ok | | | January 21, 2009 - Some more thinking on the frame rails.
I'm going to replace them, and I'll take the opportunity to bump the wall thickness a bit. Just because. The mounts will get cut off the existing rails and welded on. I know how I can do this without needing to go through all the fixturing again.
This is the smart choice. I was trying to think of easier ways, but it'll only be another couple of hours worth of work, and it's the strongest and best solution.
entry 152 - tags: suspension, frame | | | 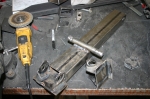 | January 26, 2009 - After a fairly short and noisy period, the frame rails were removed from the car.
I then proceeded to chop them up and remove the brackets. Voila, ready to weld on to the next rails. Slowly, without too much concentrated heat. The only thing I have to worry about is getting the brackets the correct distance apart, and for that I'll simply weld them in with a lower control arm in place.
In other news, I took the Camaro in to work today. Everyone was surprised, as they assumed it had been gutted some time ago. Far from it - they're much more compact when fully assembled! I'll order a coolant temperature sensor tomorrow so I can make sure the temperature problem is sorted out before the engine goes in the new car. And I also noticed the big black car has cruise control. Hmm, how could I integrate that while making it appear completely vintage? That could be a pretty cool addition...
entry 153 - tags: camaro, suspension, frame | | | 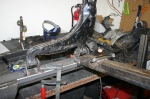 | January 28, 2009 - I picked up some more steel for the frame rails.
This new stuff has a thicker, 11ga wall and is hopefully straight. Step 1 was to weld on the front control arm mounting point, then I bolted up a control arm and used that to fixture the rear. Quick and easy. The relationship between the lower and upper control arms is handled by the fact that the front mounting point remained fixed to the upper one.
entry 154 - tags: suspension, frame | | | 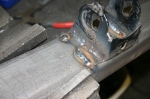 | January 28, 2009 - To minimize the chances of warping, I moved around the pieces to weld them.
The idea was to never let one area get too hot. The thicker wall also helps here.
entry 155 - tags: suspension, frame | | | 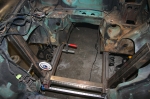 | January 28, 2009 - With the frame rails assembled, I cut them to shape to fit the floorpan, then tacked them into place.
They went in quite satisfactorily and with the angles all looking good. Then, to make sure, I stuck the steering rack crossmember in place after cutting it from a calculated (not measured) length. And it fit perfectly. Everything looks to be centered and the dial level is happy. So we're good! That didn't happen right away, I had to play around with it all for a bit until it all just clicked into place. Sharp eyes will notice that I did have to cut a slot in the frame rails and weld it up, using that to take out a small bit of warp from the welding. It's minor, but spread over a 4' length even half a degree could be problematic. But it's all good now!
I just need to fully weld the frame rails on, then I'll come up with some steering rack mounts. Then, once I know where the steering shaft will run, I can start reinforcing and integrating the new frame into the unibody. I'll also start massaging the transmission tunnel to fit the (huge) T56 transmission.
I feel as if I just unlocked the potential for a large percentage of the project to move ahead.
entry 156 - tags: suspension, frame | | | 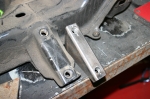 | January 28, 2009 - The next step is the steering rack mounts.
To behind, a fair bit of careful measurement. I want to try to minimize bumpsteer, and the best way to do that is to start with the factory Mazda location and then work from there once the suspension is assembled. I duplicated the factory brackets using a piece of 1x3 rectangular steel. A plate on the bottom will provide some lateral strength.
entry 157 - tags: steering, frame | | | 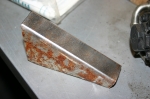 | January 28, 2009 - That 1x3 steel (actually, I think it's 1x2 when I think about it) I used for the steering rack mounts is not new steel.
Far from it - I have some very heavily overbuilt railings that were pulled out of a building under renovation. They live out in the backyard and I chop off a bit when I need it. A bit of quality time under the wire wheel on the grinder and it looks new and ready to weld.
entry 158 - tags: tips | | | 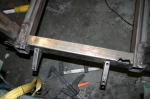 | February 1, 2009 - Time to mount the steering rack, umm, mounts.
I'm still just tacking everything in place, but it's almost time to commit. I did chop a bit of extra frame rail off the sides to clear the rack itself, this was always part of the plan - I figured it was much easier to make them shorter than longer.
entry 159 - tags: steering, frame | | | 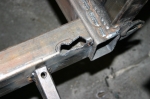 | February 1, 2009 - This cut in the steering crossmember was required to clear the pinion housing on the rack.
It's a bit ugly, these were the chops made to get the clearance I needed.
entry 160 - tags: steering, frame | | | 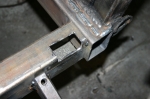 | February 1, 2009 - Once the final clearance was sorted out, I squared off the cut.
Chop chop!
entry 161 - tags: steering, frame | | | 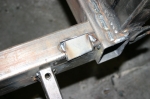 | February 1, 2009 - A small piece of steel was welded in to close up the cut.
It's actually a spare piece of frame rail, the sizing was perfect. Voila, clearance! Once it's welded in completely, I'll clean up the edges with a grinder so it sits flush with the rail.
The steering crossmember could have been smaller, but I wanted the 2x3 tube to give me lots of twisting stiffness for the front of the frame (more than I'd get with a round tube) and to give me a nice flat surface to weld bracing to. Ideally, it should have been 2x2 for packaging purposes so I wouldn't have to do things like this. But that's okay, I think this will end up better overall.
entry 162 - tags: steering, frame | | | 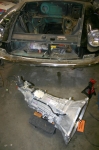 | February 1, 2009 - I borrowed a T56 for some test fitting.
It's a brand new shiny one that should be identical to mine other than the aftermarket shifter. Oh, and a decade of grime! I'm keeping the Camaro together as long as possible.
It's a big boy and weighs about 140 lbs. Quite a contrast from the stock unit, and I'm a bit concerned about fit. But I have a welder!
entry 163 - tags: transmission, Camaro | | | 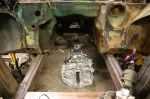 | February 1, 2009 - Here's the transmission sitting in the correct location.
Correct in two dimensions, anyhow. I pulled the bellhousing off because it's much easier to bolt that part to the engine for clearance testing.
Some quick tape measure work tells me that the T56 should fit much, much better than I'd feared. I haven't lifted it up into the car yet (I need to work out a stable way to support it while being able to lift and move it around), but it appears that it should fit into the stock tunnel as if the car was shrinkwrapped around it. Amazing. There's even a crossmember that I think is in the perfect place to support the rear.
entry 164 - tags: transmission, fitment | | | 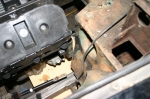 | February 1, 2009 - The plastic engine is back in the car.
I clamped a piece of plywood to the bottom of the framerails to ensure the bottom of the engine will not protrude below. And it's looking pretty good. It needs to come back 1.5" from the current position to put the shifter in the correct location, which will place the right head almost up against the leading edge of the footwell. I can make a little more room there if need be.
On the driver's side, the head sits slightly forward so there's more clearance there. But it does hit this protrusion at the bottom of the footwell. A bit of poking around revealed an odd thing - there's a significant amount of footwell in front of the gas pedal at WOT. Space you simply can't use. Is it left over from RHD versions of the car? That useless space is exactly where I need more room in the engine bay, so this is working out nicely. So nicely, in fact, that it appears very little work will be needed to stuff this giant drivetrain in place. Work beyond rebuilding the frame from the firewall forward, of course. But passenger compartment intrusion will be minimized. Amazing.
entry 165 - tags: footwell, clearance, engine | | | 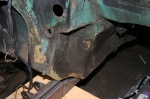 | February 2, 2009 - Time to get out the sawzall, let's get the engine fitted.
This is the passenger's side footwell. This big handy dent is almost perfect. In fact, on initial test-fitting, this side of the car appears to have been factory modified for my needs.
entry 166 - tags: firewall, fitment | | |
|

 THE DIARY