| THE MG |
|
|
 | |  | June 13, 2011 - Before I shoot primer, I'm doing the last bit of body prep.
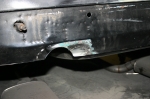
Almost forgot about this - the new exhaust pipe on the right doesn't sit in the same spot as the original. So I welded in a patch. I'll now give it a coat of filler and then sand it smooth. Luckily, it's basically hidden when I'm done so it won't take days of careful shaping.
Check out those spot weld marks hiding behind the stock bumper! They look pretty random.
entry 568 - tags: body | | | 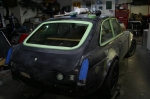 | June 13, 2011 - While I waited for the last coat of filler to dry on the exhaust cutout, I started masking from the back of the car.
Maybe it's because I grew up in the 80s, but I'm digging this neon green and bright blue on black color scheme.
I've gotta get out of the garage.
Always use good tape when masking. It's awful to discover you had a leak and now there's black paint all over your stainless steel trim, for example. I bought a couple of rolls from Harbor Freight and it's worthless. Real painter tape makes all the difference.
entry 569 - tags: body, masking | | | 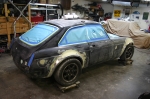 | June 15, 2011 - More masking.
I've decided I really like the angle on this shot!
entry 570 - tags: body, masking | | | 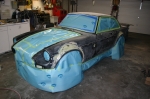 | June 15, 2011 - Okay, the car's all masked.
The paint's been wiped down with grease remover. It's time to make it all the same color.
entry 571 - tags: body, masking, paint | | | 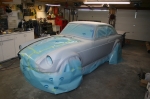 | June 15, 2011 - And voila!
A coat of primer. Unfortunately, only one coat instead of 2-4 because I ran out. It's amazing how much better it looks already. I'll go pick up some more primer so I can give it a bit more. Some of it is still wet in the picture, thus the darker area around the front wheel.
Having the whole car one color makes it obvious where I've done well and done badly on my shaping. On the passenger's side, it looks quite good and I'm happy with that. The driver's rear needs some more work, mostly because I'm dealing with the skim coat put on by the previous painter. So I'll do some quick touch-up there and try again.
Much more sanding to come - but this will be much quicker than before.
entry 572 - tags: body, primer, paint | | | 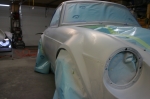 | June 15, 2011 - Here's a look at the shape of the front flares.
I'm happy with how they turned out, especially this right front that gave me so much trouble.
The ragged line in front of the flare will be covered by the stainless trim along the side of the car, so just ignore it.
entry 573 - tags: body, primer, flares | | | 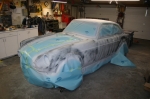 | June 15, 2011 - Some vandal defaced my paint job!
Oh, no, wait. That was me. I shot a thin coat of black primer over the white as a guide coat.
Well, first I gave the car a couple of extra coats of the white primer to build up the coat. Then the guide coat. Now I sand the guide coat off. The purpose of this is that it will highlight any low spots in the paint as the high points sand to white and the low spots stay black. Thus allowing me to find and address problems that will show up in the shiny final paint.
I should point out that this isn't a "how to paint a car" tutorial. I've done a couple of cars in the past, but I'm still very much an amateur. In fact, this is the first time I've done a primer coat like this.
Luckily, primer is made to be sanded. So this is actually a very satisfying job.
entry 574 - tags: primer, paint, body | | |  | June 15, 2011 - Here's an example of how the primer has helped with the shape of the car.
This is the transition from the side of the car to the fender flare in the rear. The different colors are different layers, with the yellow body filler on the bottom. In order to get that guide coat fully off, I had to sand down further in one section of the flare. The result now has a smoother shape to it, cleaning up a bit of a step in the angle that was invisible before. There's still a bit of guide coat visible at the right of the picture, I'll get it later. You can see the amount of material that's been sanded off at the left - getting this car dust-free again for the color coat may be a challenge.
The primer coat is proving to be fantastic at finalizing the shape of the car. Sections that were just a little rough are cleaning up and everything is flowing together really well. I'm really happy with it. It's also moving quickly because the primer sands so well. I'm using both 240 grit paper and some fine sanding blocks for this step. The foam sanding blocks are great for dealing with those compound curves, while the paper on longer blocks help make sure everything's flat.
entry 575 - tags: primer, body, flares | | | 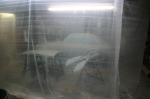 | June 16, 2011 - The primer sanding is done, and it's time for the big, gratifying step.
Yup, paint booth time. The booth itself is nothing more than plastic hung from the roof of the garage. Before the plastic goes up, though, the cleaning happens. Lots of sweeping up dust. Then sweep again. All that dust I've been creating for months has to be corralled, lest it become a pimple on the MG.
I love this part. Big visible changes happening fast.
entry 576 - tags: paint | | | 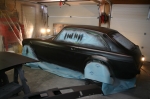 | June 16, 2011 - And it's black!
This is an epoxy/sealer coat, so it's nowhere near as glossy as the final result will be. One nice thing about this is that it's a good practice run for the next couple of stages, as I learn how to move over the car. The C pillars beside the hatch are problematic to do well, I'll concentrate on getting them right with the color coat. I can also tell that the arches aren't as smooth as I thought, as wet black paint under fluorescent lights is a much harsher judge than the previous flat white.
But look! It's black!
entry 577 - tags: paint | | | 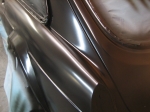 | June 16, 2011 - The color coat is on.
This laid down really well. It's not a glossy black, sort of a trendy satin. But pretty smooth.
Isn't this a cool angle for the car?
entry 578 - tags: paint | | | 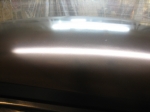 | June 16, 2011 - A shot of the roof.
I've painted two complete cars in the past, both Miatas with hardtops. But this is the first time I've painted a car where I couldn't unbolt the roof and put it on a stand! It's a lot more difficult. Still, the finish came out pretty well.
entry 579 - tags: paint | | | 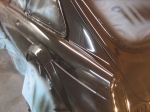 | June 16, 2011 - And finally, the clearcoat.
Here's that rear 3/4 shot again. Not bad at all.
entry 580 - tags: paint | | | 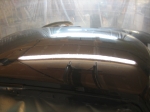 | June 16, 2011 - And the roof.
Quite a difference! There's a little bit of debris visible, but I'm happy with how this turned out. And I never did lean up against the side of the car while painting the roof! I was being very cautious about that, let me tell you. I have no idea how people do it with big cars or trucks. Ladders or climbing apparatus, I assume.
entry 581 - tags: paint | | | 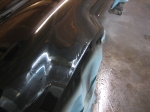 | June 16, 2011 - It's not all sunshine and daffodils, unfortunately.
The last car I painted had some dry spots in the clear, which are dull instead of shiny. So I concentrated on putting down a nice wet coat. I used the same speed on my strokes as with the other coats, but the clear decided to run in several spots. This is the most tragic of them. Nothing that can't be fixed, but it didn't make me happy. Oh well, it just means more sanding. And it's also not going to keep me from putting the car back together!
Note the wet floor. That's to keep dust under control. I also swept the paint booth between each stage. Interestingly, the sealer was the dustiest. But there always seems to be some dust in the clear. I don't really enjoy laying down clear, it's sticky stuff that always seems to create problems. But there you have it. The first car I painted used single-stage paint without a clear so I don't have that much experience with the stuff yet.
Overall, I think it's going to be a pretty good paint job. I'm getting better at wielding a paint gun and building a clean paint booth - I had less overspray hanging in the air on the clearcoat stage than before.
Now I get to put the car back together!
entry 582 - tags: paint | | | 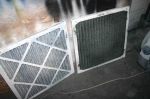 | June 18, 2011 - In order to help with dust control while painting, I had an exhaust fan pulling through a furnace filter.
Another filter cleaned the air entering the booth. Guess which one was pulling the overspray out of the air?
Yuk.
entry 583 - tags: paint | | | 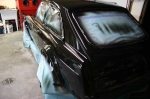 | June 18, 2011 - Now comes my favorite part - unwrapping.
This angle gives you a pretty good idea of the shape of the flares.
entry 584 - tags: body, paint | | | 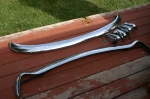 | June 18, 2011 - I've decided to let the paint dry for a couple of weeks before I sand down those runs.
And man, are there are a lot of runs. So this means I'm going to assemble the car now, even though some of this will have to come off again later.
Why? Because that means the car changes from a thing that lurks in the garage to a living car again. I can drive it and enjoy it, and take care of problems one at a time.
But before the bumpers go on that deep black paint, they need a polish. Which is a good excuse to sit on the deck in the sun.
entry 585 - tags: bumpers, body, paint | | | 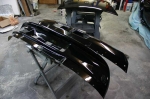 | June 18, 2011 - I painted both the stock front valence as well as the Special Tuning one.
It's amazingly difficult to find a picture of an MG with a Special Tuning airdam that's actually painted instead of being left in white gel coat. We'd never been able to get a good idea of how it looked, so I figured I'd just paint it and we could bolt it on to see.
entry 586 - tags: paint, body | | | 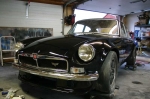 | June 18, 2011 - And voila, the front of the car!
The Special Tuning airdam was the clear winner. I really like the look of the stock part, but with the extra muscle from the fenders the nose just looked...odd. This should balance it out nicely. Once the car's out of the garage I'll get more pictures of it, but overall I'm pretty happy.
We also removed the bumper overriders. Long-time readers will remember that's one of the first things I tried with the car, back in April 2008. Then, it looked wrong. Now, with the beefier looking front and a raft of detail changes, it looks better this way. At least, that's the thought today. We can always put them back on.
entry 587 - tags: body, overriders | | |
|

 THE DIARY