| THE MG |
|
|
 | | 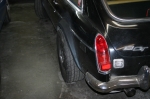 | January 18, 2011 - Here are the 14 inch RA-1s installed.
The left rear is the most problematic tire, and it's not quite tucked into place here. The others are fine, with a perfect fit up front. Really, I should have made that rear axle about 1-2" narrower so I could run bigger tires in the back. That may be a future project. For the time being, I want to see how this setup works, as it's a simple bolt-on that doesn't cost a cent.
On the street, the car is far better. It'll still overwhelm the tires, but only under real duress. I'm not sure it's considered socially acceptable to light the tires up all the way through second gear, but it's in the name of Science!
A nice side effect is that the ride has improved considerably. The Falken Azenis has a sidewall that is slightly stiffer than concrete. The RA-1 has a stiff sidewall as well, but it will flex. So I'm quite happy with this.
entry 539 - tags: tires | | | 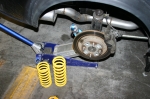 | January 23, 2011 - During construction, Janel often referred to the MG as her little grocery getter.
And you know what? We're actually using it for grocery runs. She's pretty happy with how it's evolving, between the better/more compliant tires and the sway bar it feels much better planted and less skittish. She also really likes the current suspension compliance.
I've known since I put them on that the current springs weren't long enough - they coil bind before full compression. And I suspect that's actually happening once in a while. So I swapped in a set of 10" springs with a 250 lb rate instead of the 8" 225s that were in there. Why the rate change? Because that's what I have! I'll see what change this makes to the dynamics, and then order some springs of the appropriate rate and length. I've said this before, but it's so easy to change the springs on this car!
entry 540 - tags: suspension | | |  | January 26, 2011 - One last job before I start in with the body filler.
I've decided to remove the side marker lights from the car so it looks like the earliest GTs. I've been driving around with black duct tape covering the holes, but something more permanent is required. Step one, clean up the edge of the holes.
entry 541 - tags: bodywork | | | 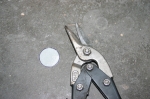 | January 26, 2011 - Step two: cut out a patch.
I used the leftover bits of metal from the Rabbit flares. First I used the hole as a template to trace out the shape of the piece needed, then cut it with a set of snips. Much fine-tuning followed to get the perfect shape.
entry 542 - tags: bodywork | | | 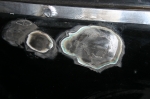 | January 26, 2011 - Then the patches were carefully welded into place.
Of course, none of the holes in the car (I also patched the antenna hole) were on a flat panel. So I welded in one or two sides, then reshaped the patch with a body hammer to make it conform. It's still going to need body filler of course - especially on this side, where there's a fairly thick skim layer on the panels laid down before the black paint - but that will be kept to a minimum.
Now, on to the fenders!
entry 543 - tags: bodywork | | |  | February 1, 2011 - Big work!
I had a few other things to do over the weekend, but I couldn't leave the MG completely alone. I have a few toys that have come in for the interior, so I decided to play with those. Here's the original state of the door.
entry 544 - tags: interior | | | 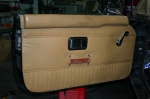 | February 1, 2011 - The final result!
Okay, it's not a big change. The most obvious is that door pull. The plastic MG one really bugged me, and I wanted leather. This particular strap is actually a door limiting strap for a classic Chevy truck - but it's got the right vibe to it and should wear in nicely. It isn't a perfect match to the interior color, and that's exaggerated by the flash - but it's better. I'll live with it for a while and decide what to do.
The window winder was originally black plastic, and I replaced it with a cast metal unit that both looks and feels much better.
We have replacement door panels for the car, but this is still the dirty and wobbly original part. Why? Because I'm still considering moving that door pull, and I don't want to put extra screw holes in my good door.
entry 545 - tags: interior | | | 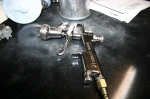 | February 1, 2011 - A fancy new paint gun!
Well, not new. But new to me. Since I want this car to look good and black paint is very unforgiving, I've decided to step up from my cheap and cheerful Harbor Freight guns to a good one. It's still mostly up to me, but this guy should get rid of some excuses.
entry 546 - tags: paint | | |  | February 1, 2011 - I've been working on gauges recently.
The parts just arrived to mate my mechanical oil pressure gauge to the engine. The biggest problem was how to deal with the usual oddball British flare fittings. After doing some measuring, I was able to sidestep the problem by cutting the flare off and using a 1/8" compression fitting. It's a perfect fit. That goes to an AN -3 flare, then it's all just off-the-shelf race stuff. I still have to get behind the dash to make sure the connection to the gauge is tight, then we'll see how it works!
The coolant gauge has been more of a hassle. The one for the engine computer works fine so I can monitor things that way, but the dash gauge reads really low. At 180F, it's just come off the C peg. After some putzing around with the gauge and checking wiring, it looks as if the culprit is the temperature sender in the head. The GM part measures 3800 ohms at 63F and about 150 ohms at 185F. A parts-store piece I also have on hand is the same at 63 and 200 at 185F.
The MG sender apparently measures about 800 ohms at 68F and 33 at 190F. So I need to find one that's somewhere in that ballpark. It doesn't have to be perfect, just close enough that the gauge stays near the middle at normal operating temperature. I'll stop by NAPA tonight and see what I can find.
entry 547 - tags: gauges | | |  | February 1, 2011 - My little science fair project.
I started by stopping off at NAPA on the way home and going through their Big Book Of Temperature Sensors. Not all of the sensors had information about their resistances, but I was able to pick out a few likely suspects out of the catalog. Two of them were in stock, so I brought them home to test.
First, I used the multimeter to check the resistance between the body of the sender and the stud. The MG part apparently reads 800-830 ohms. NAPA sensor 6046 read 631, sensor 6178 was 273.
Then I boiled some water and risked my tender fingertips by dipping the sensor in it while I measured the resistance. The cooking thermometer told me the actual temperature of the water. At 195F, sensor 6046 read 48 ohms and 6178 read 31. Apparently the MG one should be 31-35 at 190F.
So, 6046 will be fairly close when the car is cold, but read a bit low when hot. However, it's also changing quickly in the normal operating range. 6178 will probably read right about C when cold, and should be pretty close when hot. I'll give them both a try in the car and see how they behave for real, but at least I know what to expect!
entry 548 - tags: science!, cooling | | |  | February 3, 2011 - I swapped in the 6178 sender today, and it does sit just above C when cold.
That's fine, it shows the gauge is alive! I wasn't able to run the engine to see how it behaves at 180F or so, but I already have a pretty good idea. So that's good.
I couldn't run the engine because I'd mis-measured the length of the AN -3 line I needed. Either that or the length included a fairly large radius 90 degree section that was on one end. Anyhow, the end result was a high-pressure oil system that isn't sealed up. Of course, as can be expected with AN fittings, there are none to be found in town anywhere. So I've had to order another one in from Summit Racing. Argh.
I've taken on a new project, as you can see here. It's being documented on the Flyin' Miata site even though it's one of my own. Why? Because some of the FM fans might enjoy it, and it is a Miata. It's not going to be a long one, but it is going to involve a bit of bodywork and a repaint for a friend. It'll be my practice run for the MG.
entry 549 - tags: other cars, gauges | | |  | February 5, 2011 - The right front flare has been bothering me.
It's at a slightly different angle than the left side. Now, asymmetry isn't a big deal. But the other one works better! So I decided to try to fix it. I cut out my extension piece that molds the flare into the fender, reshaped the flare and cut a new one. After quite a bit of careful positioning, trimming, hammering and prying...it somehow shifted back into the original shape. Well, not exactly. But not quite what I wanted.
Argh. I can use filler to shape it the same as the other side, but it would be about 1/4" thick in the deepest point. I'll see what I can do with yet more steel.
entry 550 - tags: flares, body | | | 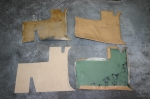 | February 5, 2011 - After the frustration of the flare not following orders, I decided to work on something that I know I can do.
The MG interior is made of the biggest collection of little weird bits and pieces, with carpet chunks screwed into bodywork and various vinyl-covered panels all over the place. Of course, the vinyl panels are simply a piece of cardboard underneath, and when they get wet they warp badly. That's an untouched one in the upper right of the photo.
We have a bunch of replacement panels from the UK. But I don't think it includes these kick panels, down in the footwell. More importantly, I've modified both footwells so even pristine pieces would need to be modified.
They're obviously not original because they're biscuit color, and the GT didn't come in biscuit as far as I can tell. They're not spray painted either, thank goodness.
I peeled the vinyl and some decomposing black foam off the backing board. I then modified the original board to make sure it fit properly. Once that was sorted out, I squashed it as flat as I could and traced it on to a piece of MDF. I cut that out (it's at the bottom left) then used some spray adhesive to glue the vinyl on to the board.
entry 551 - tags: interior, vinyl | | | 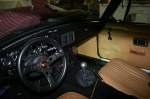 | February 5, 2011 - Here's the end result, just ahead of the door panel.
It's not perfect, but for a little bit of work it's an enormous improvement. You can see how wobbly the door card is by comparison.
entry 552 - tags: interior, vinyl | | | 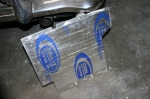 | February 5, 2011 - I also spent some time on a passenger footrest.
The engine computer is at the end of the footwell and it really is the best place to rest your feet. Well, not the best place, but the easiest. So I built this panel to cover it up.
It's a royal pain to install, with one bracket that needs to be bolted to both the footrest and the floor. But it's pretty solid and it'll do the job. Now I just have to cut a piece of carpet to fit it.
entry 553 - tags: interior, footrest | | | 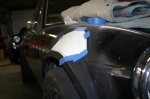 | February 6, 2011 - So, how hard would it be to reshape that front fender flare?
Well, here's what the patch would look like. Can I meld that in smoothly? I don't know. I'll give it a shot. But first, I need to buy some more steel!
entry 554 - tags: body, flares, fender | | | February 13, 2011 - We have a full complement of gauges!
It took a few tries to get the correct length of line for the oil pressure gauge, but it's in. I haven't run it up to full temperature yet but there were no leaks upon initial startup.
The car's been kept in the garage for the last couple of weeks due to cold weather, snow and race tires. The temperature's supposed to be nice this week, so it might come out for some extra exercise.
The Miata is coming along. I'm into the bodywork now. I cannot wait to shoot paint, it's so much more rewarding!
entry 555 - tags: gauges | | |  | February 15, 2011 - The Big List keeps getting shorter!
Unfortunately, the coolant gauge has to go back on it. It reads way to high, settling right on the H at normal operating temperature. I'll try the other one, and if that doesn't work I'll add a parallel resistor to the GM sensor. Easy enough to sort out.
I had the car out today in some unseasonably warm temperatures. Man, this is a fun little critter.
entry 556 - tags: gauges | | | February 20, 2011 - The other coolant sender is better, but not right.
It reads right between N and H during normal operating temperatures. I'll deal with that soon. Right now, I'm spending most of my time doing the body prep on the Miata. It'll get painted next week, then I'll start on the bodywork for the MG.
entry 557 - tags: body, gauges | | | 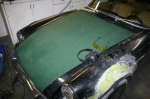 | March 13, 2011 - The Miata is painted, so it's time to turn to the black beast.
I learned a lot doing that car. The experience from it will definitely help with the MG.
So this means it's time for bodywork. I started with the left flares, mostly because they're most easily accessible with the MG in its current parking space. This is going to take a while to get the shape just right, that's for sure. But it's kind of relaxing work.
Why did the hood turn green? Because the black one didn't fit right at the front corners. I was actually afraid the nose of the car had sagged when it was all cut up. But just to be sure before I started taking extreme measures to fix it, I pulled the hood off the green parts car. Problem solved. And laying the black hood on the parts car showed the same fitment problem. So it's not the car. The weird thing is that, looking at old pictures of the car, the hood used to fit perfectly. I'm wondering if it got bent when there were a couple of protruding bolts on the new grille. I wouldn't have forced it hard enough for that, but it's the only explanation I can come up with. Still, I have a good replacement so there's no concern.
entry 558 - tags: hood, bodywork | | |
|

 THE DIARY